
also on this page: Rosto Adjustments, Tips & Tricks
 |
 |
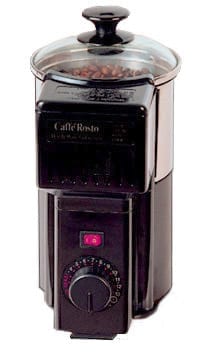
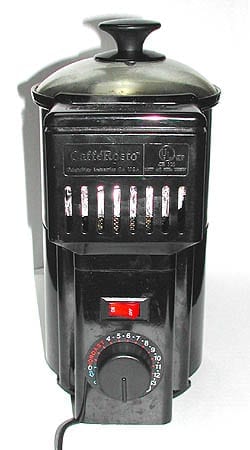
Caffé Rosto CR-120
New– Download and Print this Tip Sheet in a Single Page .PDF Format.
Home roasting is fun and you will be amazed how easy it is. Pay attention to the process, especially toward the end of the roast. And be careful not to touch the hot roaster surfaces during the roast cycle.
- Coffee roastingThe application of heat to green coffee seeds (beans) to create palatable material for brewing a great cup!: Coffee roasting is a chemical process induced by heat, by... ...more produces a wonderful fragrance, unobtrusive with light roasts but smokier if you roast dark. Operating any type of stove hood fan helps if the smoke is too intense for you. You can roast on a porch or near a partially open window weather permitting. But cold temperatures will affect the roast by slowing it down or making the resulting coffee lighter-roasted.
- Roasting produces chaffChaff is paper-like skin that comes off the coffee in the roasting process. Chaff from roasting is part of the innermost skin (the silverskin) of the coffee fruit... ...more. Chaff is a fine skin that detaches from the bean as your roast is agitated. Your roaster takes care of chaff, but you will want to empty the chaff collector with care. Clean the chaff screen between every roast. Yes, it is a little tough to lift the chaff screen out, and you need to wiggle it a bit to remove and install it. The Rosto also traps some chaff below the removable chaff screen, and you will want to remove that with a brush or vacuum between roasts. Leaving chaff in the collector or the screen under it will affect the next roast! The Rosto does allow a bit of chaff to escape in the process. You can set up the Rosto so the airstream blows over a sink, or you can roast outside or in a place where this little bit of escaping chaff is of no importance.
- Never leave the room while you are roasting coffee! With the Caffe Rosto CR-120, do not touch the roaster during the roast cycle -the surfaces are VERY HOT! Be careful, don’t burn yourself. Also, some of the lids on the Rosto do not fit completely flush, but this doesn’t seem to affect the roaster’s performance in the slightest, and I think they will, over time, “break-in” and start to fit fine.
- Built-up coffee oils in the roaster are of no real consequence until they impede visibility or become a fire hazard. (In fact, a professional drum roasterA roaster with a rotating drum that provides agitation to the beans, while a heating element (typically either electric or gas) provides heat. The metal drum conducts heat... ...more requires hours of roasting initially to properly ÒseasonÓ the drum. Do not clean your roaster too often.
- To better understand the roasting process, read our articles on roasting issues, Join our Home Roast coffee email list, check out our links to other sites, and buy Ken Davids’ book “Home Coffee Roasting: Romance and Revival”.
- Batch size is critical; if the amount of coffee you put into the roaster varies, the roast will vary too. If you have received a stainless cup with the Rosto, we have found that this one cup measure should be filled below level with green coffeeGreen coffee refers to the processed seed of the coffee tree fruit. Coffee is a flowering shrub that produces fruit. The seeds of the fruit are processed, roasted,... ...more. 3/4 cup is a safe amount. This will allow the coffee to agitate the beans effectively from the start. To be more exact, weigh out the green coffee: we have found that 4.8 ounces (= 136 grams, or .3 Lbs.) are an ideal batch size. If you want to eyeball it, this is equal to 2-3 layers of coffee seeds below the rim. One way to tell how much to use is how well the coffee moves in the chamber if it is sluggish, try less; if it is bouncing into the chaff collector, use more. You may need to experiment to find the right amount for your particular situation. You can roast more coffee in the Rosto, but you won’t get agitation early in the roast, and you will get scorchingPatches of discolored burn marks on the coffee bean, due to a high-heat roast environment or other roast error.: Scorching refers to a roast error that can be... ...more, which results in off cup flavors. If you roast too much, it will also send coffee into the chaff collector during the later part of the roast cycle.
- City RoastCity roast is what we define as the earliest palatable stage that the roast process can be stopped and result in good quality coffee. City roast occurs roughly... ...more: Setting 9-10 on the dial
- Full City: Setting 11
- Vienna, Light French: Setting 12
- Full French: Setting 13+ on the dial
- These are “starting points” and are based on a first crackFirst crack in one of two distinct heat-induced pyrolytic reactions in coffee. It is distinguished by a cracking or popping sound in the coffee, and occurs between 390... ...more time of 8.5 minutes and a 2nd crackAn audible popping sound heard during roasting. In coffee, one refers to "first crack" and "second crack," which come from two different classes of chemical reactions.: An audible... ...more time of 10.5, which is what we get at the shop with a voltage between 120 to 122. The voltage will affect roast times a lot, as will ambient temperatureThe temperature in a given room or space: This term is used to describe the overall temperature in a given environment, and is an important variable in coffee... ...more. I think the best way to calibrate roast times for your roaster in your environment is to do a batch at a very high setting, like 12, and use a timer to note the first crack time, and second crackAfter First Crack, a roast reaction around 440 to 450 degrees that is distinguished by a snapping sound. Second Crack is the second audible clue the roaster-operator receives... ...more time, etc. See voltage/VARIAC notes below….You will need to experiment to find the ideal roast you prefer for each coffee, but that is part of the home roasting adventure! Roast results will vary with different batch sizes, different bean sizes, and household voltage. But if you are consistent you should be able to determine the settings you like and get consistent results. One way to roast is to set the dial to a high number, then advance it to the cool cycle when you hit the exact roast you want. As a starting point, you can try these setting on the dial: (these are based on our test at 121 volts):
- No home roaster is designed to do serial batches! All home roasters need to cool before roasting another batch. This also improves consistency. Wait 20 minutes or longer – is the roaster feels cool to the touch – then it is safe to run another batch.
- Brightway is the Importer of the Caff? Rosto and provide an excellent 1-year warranty -Call them directly 800-949-0072 if you ever have a mechanical problem with the roaster or technical questions. this is just a tip sheet: read the Rosto Instructions First!
In a nutshell, here is the roasting process you will be observing:
- For the first few minutes, the bean remains greenishA smell or flavor of fresh-cut green plants, vegetable leaves or grass, usually indicating fresh new-crop coffees that have not fully rested in parchment.: A smell or flavor... ...more, then turn lighter and emit a grassyGreenish flavor in the cup, usually indicating early crop, unrested coffee.: Greenish flavor in the cup, usually indicating early crop, unrested coffee. This is a fresh cut grass... ...more smell.
- The beans start to steam as their internal water content dissipates.
- The steam becomes fragrant. Soon you will hear the “first crack,” an audible cracking sound as the real roasting starts to occur: sugars begin to carmelize, bound-up water escapes, the structure of the bean breaks down and oils migrate from their little pockets outward.
- After the first crack, the roast can be considered complete at any time according to your taste. The cracking is an audible cue, and, along with sight and smell, tells you what stage the roast is at.
- CaramelizationA reaction involving sugars that occurs during coffee roasting. A caramelized sugar is less sweet, but has greater complexity of flavor and aroma. Caramelization is slower than Maillard... ...more continues, oils migrate, and the bean expands in size as the roast becomes dark.
- At this point, a “second crack” can be heard, often more volatile than the first. Small pieces of the bean are sometimes blown away like shrapnel!
- As the roast becomes very dark, the smoke is more pungentRefers to an aggressive, intense aroma or flavor, often related to spices (pepper) or roast tastes. Pungent foods are often called "spicy", meaning a sharp or biting character,... ...more as sugars burn completely, and the bean structure breaks down more and more.
- Eventually, the sugars burn completely, and the roast will only result in a thin-bodied cup of “charcoal water.”
Adjustments to the Caffe Rosto
You have to realize that if you use the machine in an unorthodox way, one not specified in the official Caffe Rosto manual that comes with the roaster, you might be voiding your warranty! That said, the Caffe Rosto has been modified by many people, one reason it is so popular among advanced home roasters.
Chaff & the Screens:
You will notice that a decaf that has no chaff, and a dry-processed coffee like Harar that produces a lot of chaff will roast differently. This is because the later clogs up the airflow screens in the chaff collection chamber, while the decaf doesn’t at all. Clog the exit airflow vent (where we put the tin foil in the image below) and you raise the temperature in the roast chamber because more of the hot air is being redirected downward through the return air duct. But most chaffy coffees clog both, producing a mixed effect. Some people who use Rostos have chosen the remove the chaff basket that is *supposed* to catch chaff and keep the return air duct clean. They roast outside and simply blow most of the chaff out of the roaster – then stop the roaster just after 1st crack, clean the return air duct, and finishSimilar to aftertaste, but it refers to the impression as the coffee leaves the palate. Aftertaste is the sensations gathered after the coffee has left the mouth. We... ...more the roast process. Stopping the roaster like this is not ideal for the coffee or the roaster. More importantly, the Rosto is very hot and shouldn’t be handled during the roast process, before the cooling cycle. Heed the warnings that come with the machine- you can get a real owie from the Rosto.
Simple modifications:
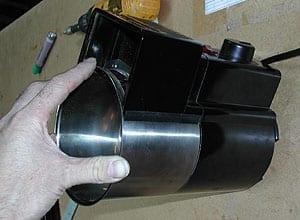
One easy way people have found to achieve darker roasts is to partly cover the outlet air vent (where hot air is blowing out of the Rosto) with tin foil or other heat-proof material. This redirects hot air back through the roaster. Now, the Rosto is already doing this … it’s part of the design. But additional blockage of the air grill will trap more heat in the roaster. A warning: by doing this you are exposing the motor and other internals to higher heat than the machine was designed for! You might fry the machine! A better way to attempt darker roasts is to use an outlet that has better voltage … that means one on a circuit without a lot of other stuff running on it, and as close to your electric service panel as possible.
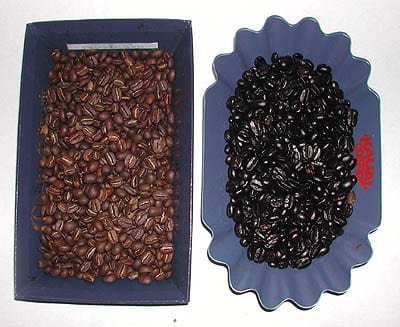
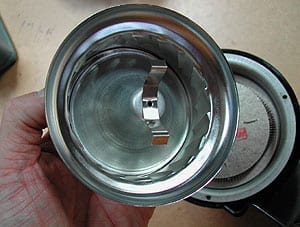
| Below is a rosto with tin foil folded over and partly covering the exit air vent. Fully covering the vent would be dangerous! Partly covering it increases the amount of heat re-entering the roast chamber via the return air duct (the screen in the bottom of the chaff collection chamber as you look down on it. Messing with the 2 screens affects the roast a lot, which is why the amount of chaff produced by roasting, and where that chaff builds up during the roast has a large effect. | Here are the dramatic results of a Rosto with the outlet air vent partly blocked. The roast on the left is a setting of 11 and is a nice City+City+ roast is an ideal roast level that occurs roughly between 425 and 435 degrees Fahrenheit in many coffee roasters with a responsive bean probe where First Crack... ...more roast. The roast on the right didn’t even get to 11 before I had to advance to the cool cycle because it was billowing blue smoke! That roast is undrinkable!
This is a primitive way to affect the roast – and variable, based on the coffee and how much you block it. So you MUST keep a vigilant eye on the roaster if you do this!!! And you need to realize that if you fry the roaster by doing this it si your responsibility and Brightway will not replace it. |
 I would first try to block the exit air vent less than illustrated in this picture! |
 |
Adjusting the Cone:
A safer way to teak the roaster is to adjust the way the roast cone is positioned. The problem with the adjustment is it does not have a huge effect on the roast (in my experience), and you need to take off the roast chamber to do it.
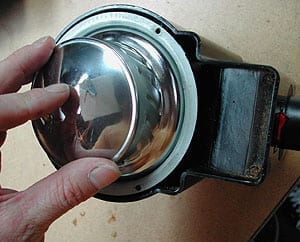
 Remove the 3 screws inside the Rosto roast chamber. |
 Remove the roast chamber. |
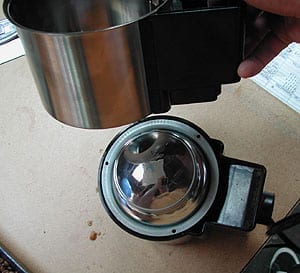
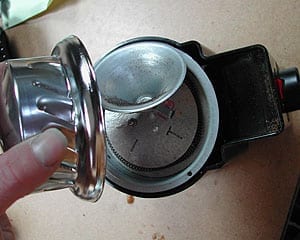 Lift the central hub of the roast chamber off the cone. |
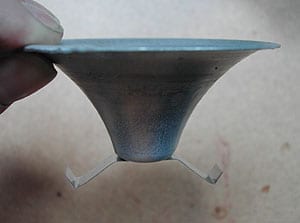 Here is the cone – it affects the roasters air flow. |
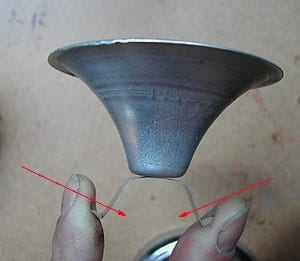 Bending the flexible tabs on the cone inward allows more air to enter the roast chamber – this swirls the coffee more but can also let more heat escape the roaster (unless you have tweaked the exit airflow vent). |
 Place the cone back in the hub |
 Put it where it done was before… |
 And redo what you done undid before… |
|
Now … nobody who tweaks these machines has really explored the possibilities here – reshaping the cone? perforations in the hub? serious customization of the chaff collector? propane afterburner? digital roast color analysis? hmmm….
|
|
Other Advanced modifications:
Many people on our home roast email list use the Caffe Rosto connected to a device called a Variac. With this, they get total control over the roast. You can manually “profile” the roast with the Variac in a straightforward way – by adjusting the total volts going to the machine you can speed up/ slow down the airflow and turn up/ turn down the heating element. This will allow you to extend the roast times or speed them up as desired, and to achieve a darker roast if your voltage is a bit on the low side. The level of advanced modification and creativity people have shown is amazing, including PID (Programmable Input Device) controls to TRULY profile a roast, and they swear by the results. Join our Homeroast List for more information.

