
Visual Changes in Roasting Offer Important Clues When Used With Other Inputs Too!
Color is only one of the ways to determine degree of roastDegree of Roast simply means the roast level of a coffee, how dark it has been roasted.: Degree of Roast simply means the roast level of a coffee,... ...more. By itself, color change is of limited use. When complemented by the audible cues (first and second crackAfter First Crack, a roast reaction around 440 to 450 degrees that is distinguished by a snapping sound. Second Crack is the second audible clue the roaster-operator receives... ...more) and the aromas of the roast process, color can be extremely informative.
We will go through the roast process using static pictures and text below.
Color and Texture Changes in the Roast, a Video
But first …here’s a video showing the color changes that occur during roasting:
Degree of Roast, Temperature, Description
The important thing here is to see the transformation the coffee goes through as it roasts and what look, bean size and surface texture, corresponds to the degree of roast. (see note from home roaster George Steinert at the bottom of this post). Roasting is more about exceptions than rules. For more information, check out this page about whole bean color vs. ground coffee color. Note: This coffee was roasted on my Probat 12 kilo so I could take advantage of the sample trier. Ignore the times, and take the temperatures as a ballpark figure.
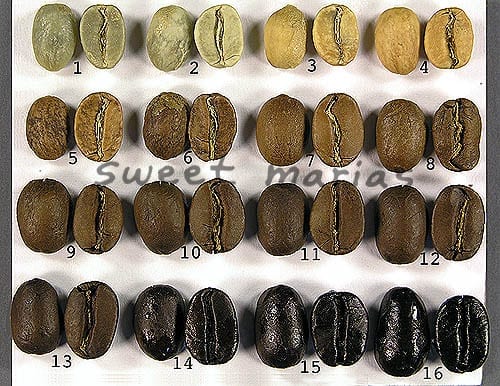
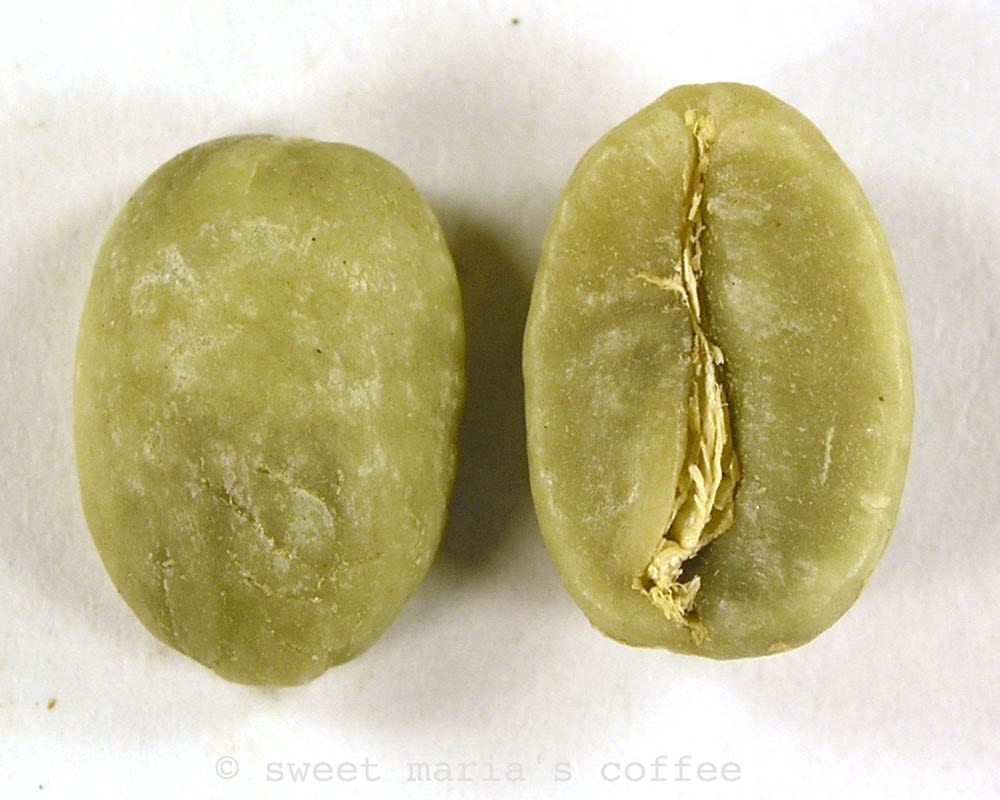
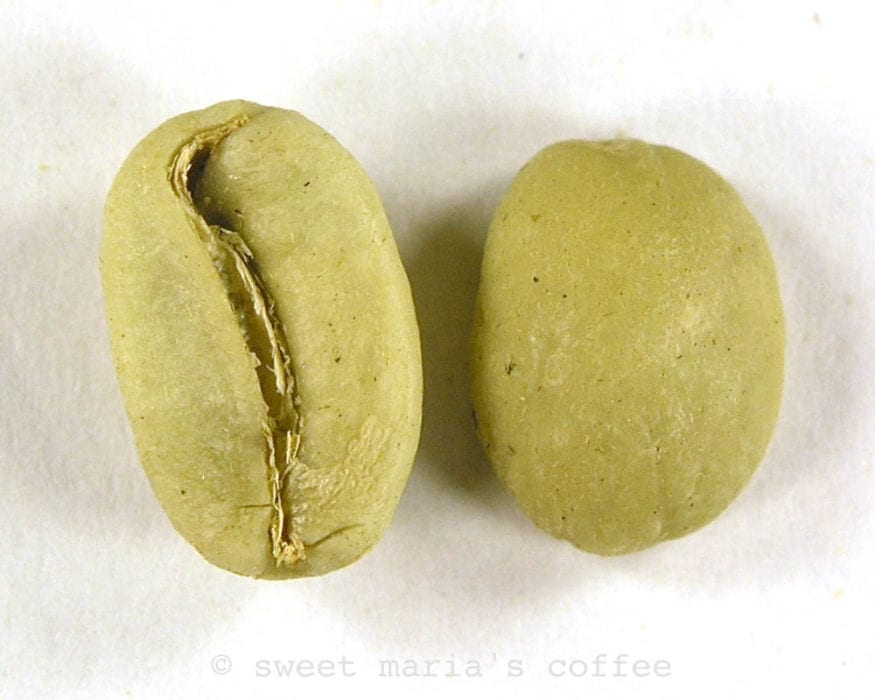
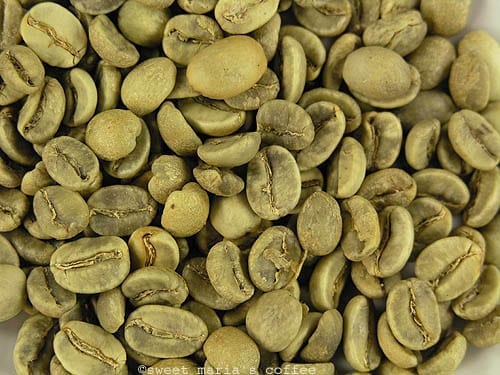
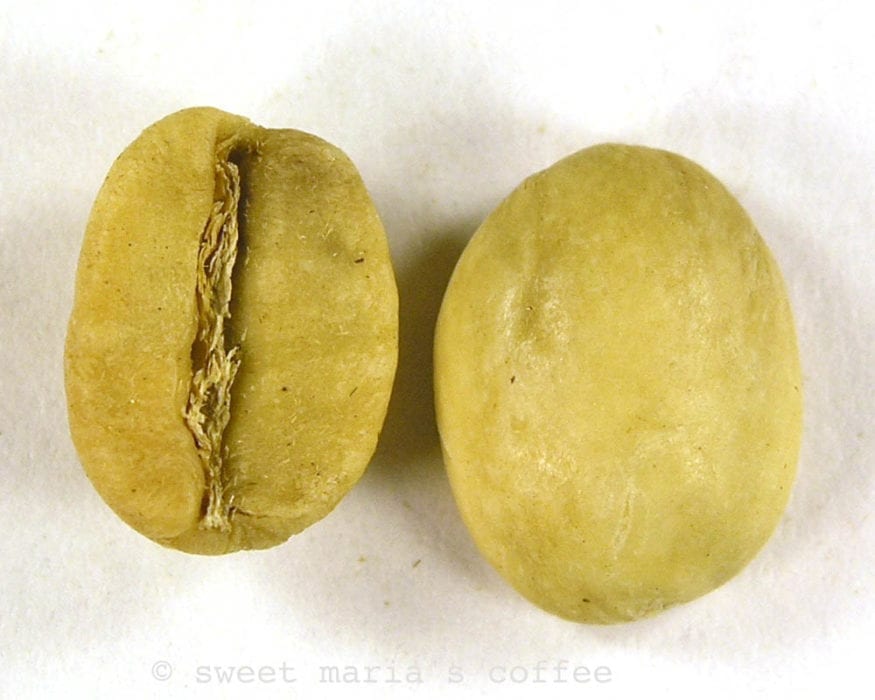
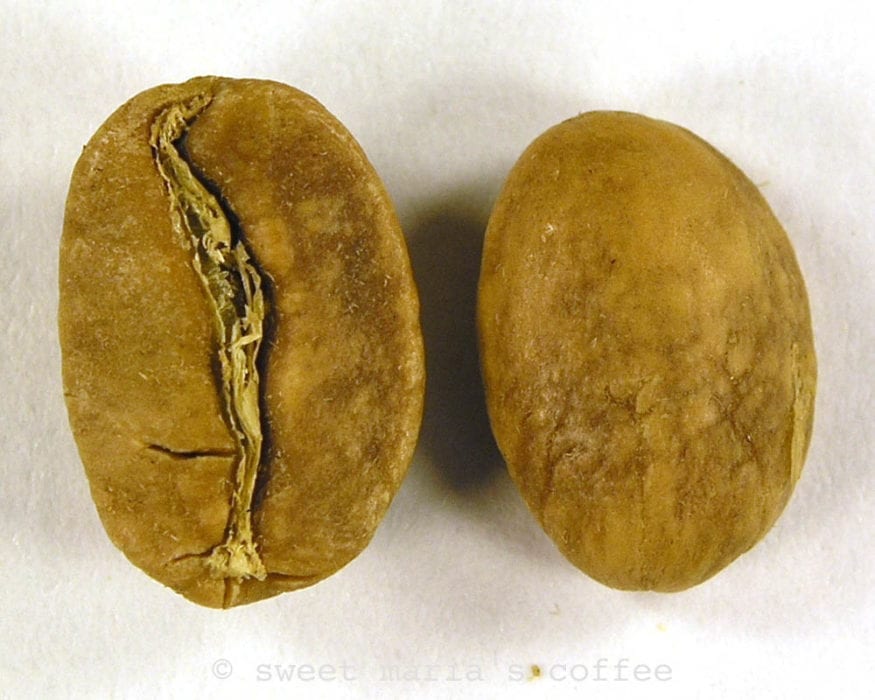
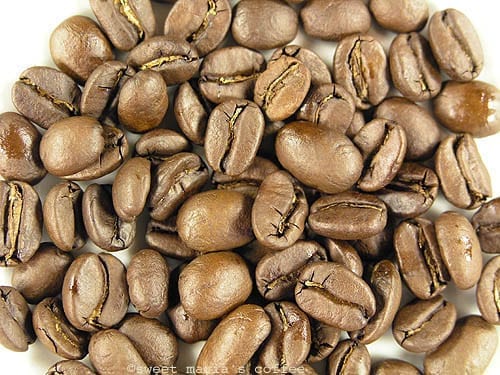
1. Green unroasted coffee 0:00 – 75F
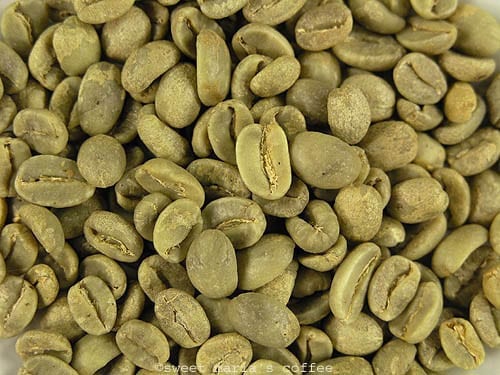
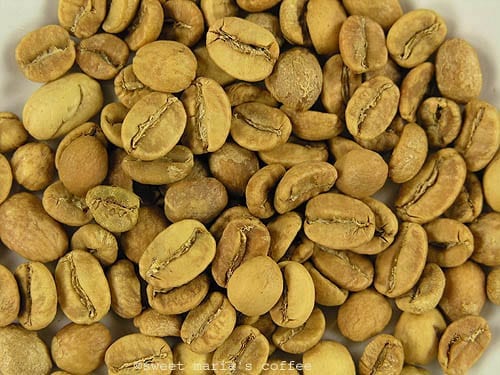
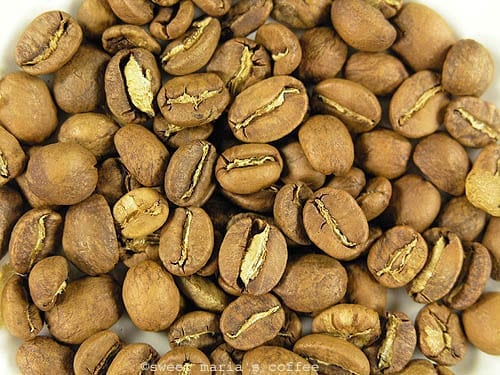
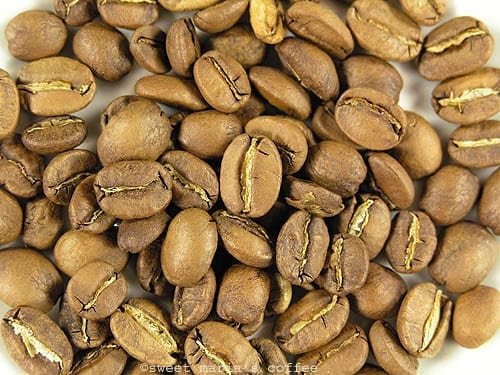
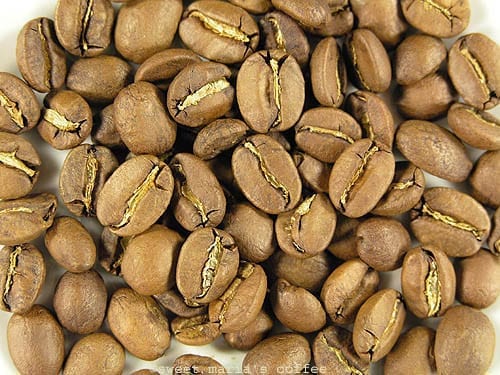
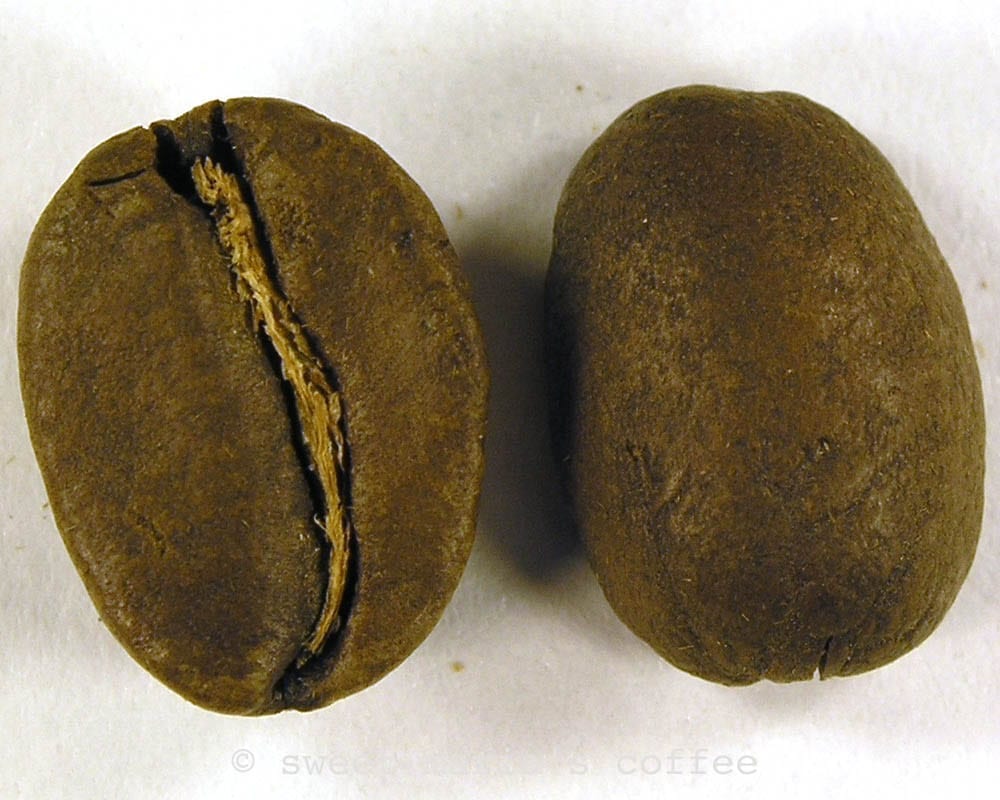
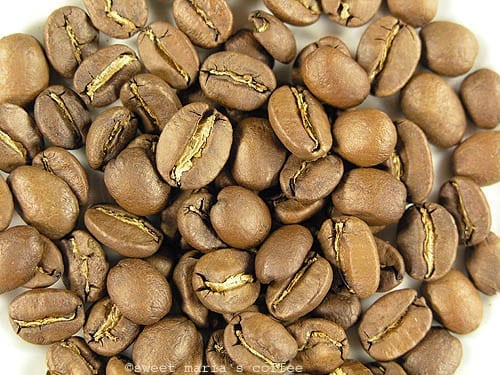
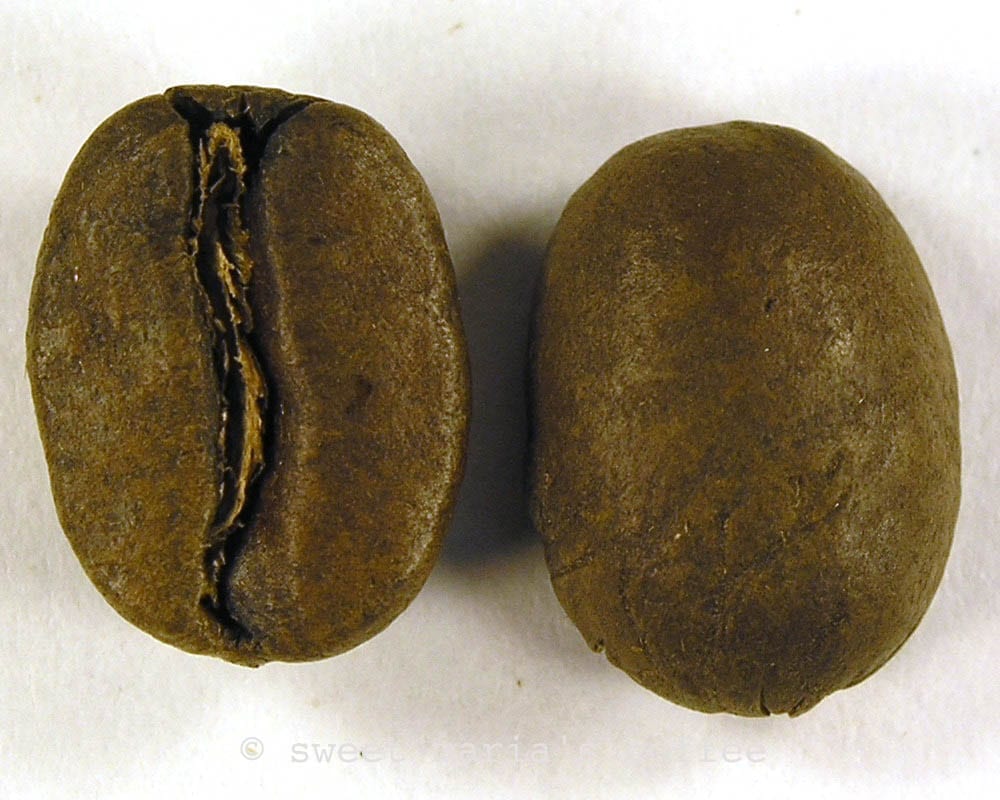
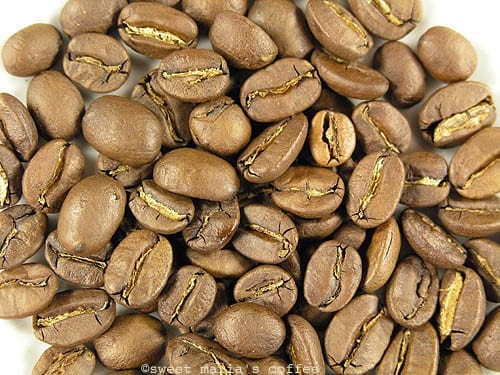
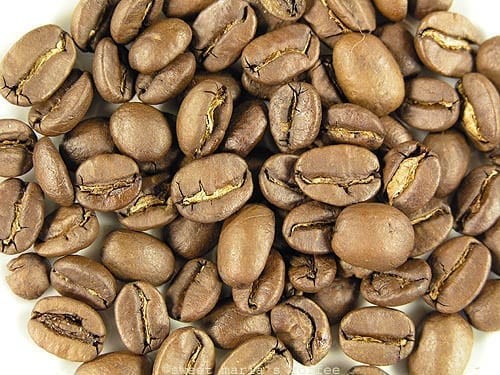
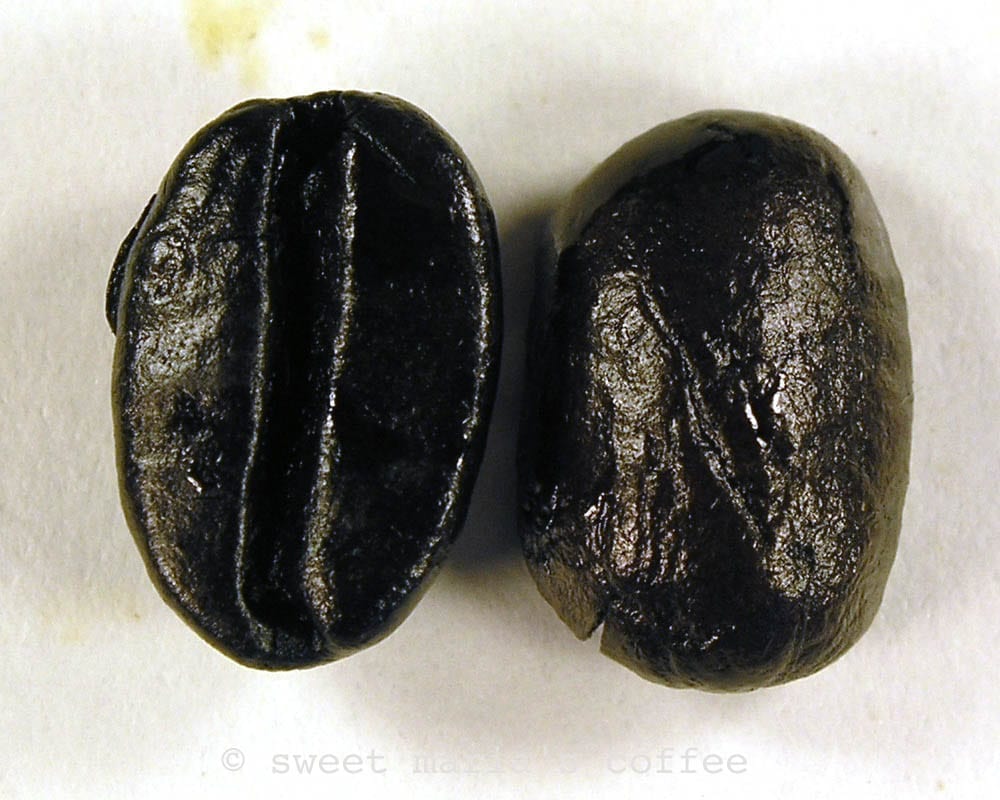
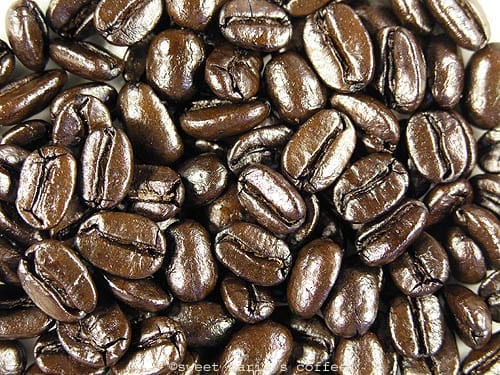
Pictured is a wet processed, Central American coffeeCentral American coffee is known for its "classic," balanced profile.: Central American coffee is known for its "classic," balanced profile. Centrals are primarily wet-processed since the climate is... ...more, an accidental blend I had sitting around. Each photo shows a different coffee seed from the batch I roasted so size and shape will vary seed to seed. The second image shows the same coffee/roast level, but many beans. Hopefully the comparison of the two images gives a better idea of color than the single bean image taken by itself.
2. Starting to pale 4:00 – 270F
Drum roasters take a long time to transfer heat to coffee so there is little discernible change in the first few minutes. In an air roaster, coffee gets to this stage much faster because of the efficient heat transference of the rapid moving air stream – the whole warm-up phase can be as fast as two minutes.
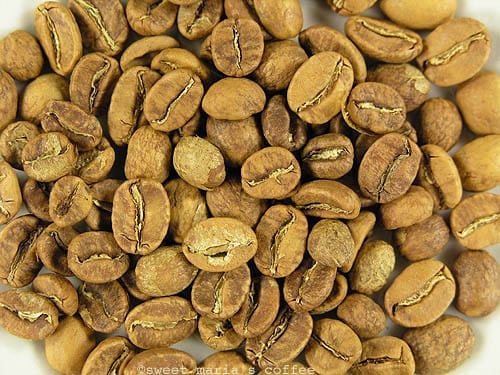
3. Early yellow stage 6:00 – 327F
At this point, the coffee is still losing water in the form of steam and no physical expansion of the bean has taken place. The coffee has a very humid, hay-like smell at this point. All of these warm-up stages leading up to 1st crackAn audible popping sound heard during roasting. In coffee, one refers to "first crack" and "second crack," which come from two different classes of chemical reactions.: An audible... ...more are part of an endothermicA term applied to thermodynamic reactions, referring to one that absorbs heat. Most parts of the coffee roasting process are endothermic, as coffee acquires heat from the environment.... ...more process as the coffee takes on heat, leading to the first audible roast reaction, the exothermicA term applied to thermal reactions, referring to one that releases energy. A classic example is burning. Most parts of the coffee roasting process are endothermic, but first... ...more 1st crack.
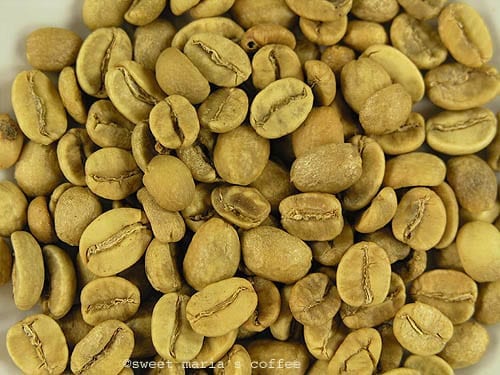
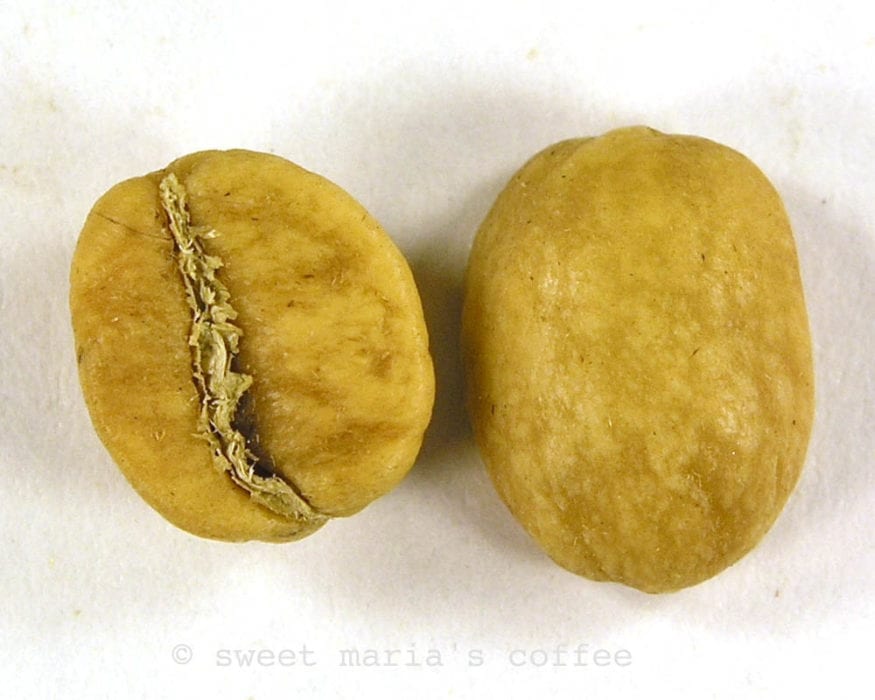
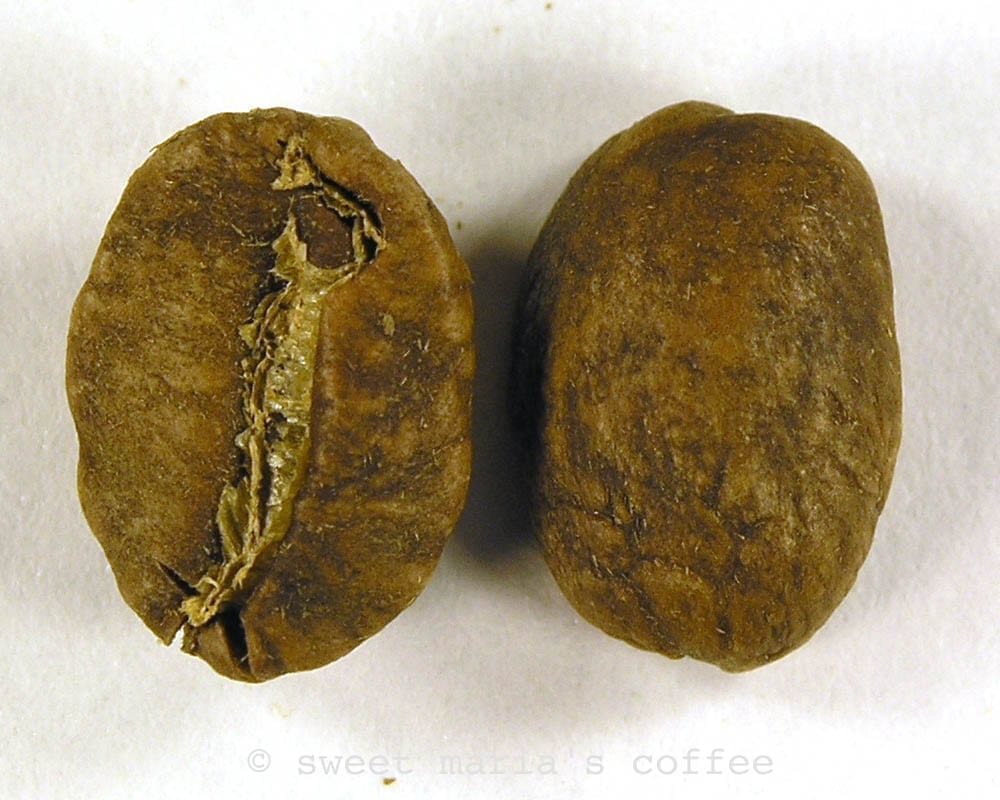
4. Yellow-tan stage 6:30 – 345F
The roast is starting to assume a browner color and a marbled appearance is starting to emerge. No bean expansion yet. The first “toasty” smells (toasted grain, bread) can be detected, and there is less wet, humid air coming off the coffee. Note that some coffees may turn a brighter and more distinct yellow at this time, such as Costa Rican and Mexican coffees.
5. Light brown stage 8:00 – 370F
1st crack is drawing near at this point. Some bean expansion is visible as the central crack in the coffee has opened slightly. The coffee releases some silverskinOn dried green bean coffee, the thin inner-parchment layer that clings to the bean and lines the crease on the flat side. Silverskin becomes chaff and falls off... ...more or chaffChaff is paper-like skin that comes off the coffee in the roasting process. Chaff from roasting is part of the innermost skin (the silverskin) of the coffee fruit... ...more.
6. Brown stage 9:00 – 393F
Now we are right at the door of 1st crack. The coffee has browned considerably, which is partly due to browning reactions from sugars, but largely due to another browning reaction called the MaillardAn important reaction in coffee roasting that results in the browning of the green coffee seed.: The Maillard reaction is a chemical reaction between an amino acid and... ...more Reaction (which also is responsible for browning of cooked beef!) There is a very specific appearance to the roasted coffee at this point. It has marbled accents but has not yet expanded and the crease remains tightly shut.

7. 1st crack begins 9:20 – 401F
At this point, the very first popping sounds of the 1st Crack can be heard. This sound can be similar to popcorn pops (in distinction to the sound of the 2nd Crack, which has a shallower sound, more like a snap). At the point of 1st crack the internal bean temperature would be around 356F.
8. 1st crack under way 10:00 – 415F
As 1st crack continues the coffee still appears mottled and uneven in color. The coffee starts expanding in size and shows visible cracks. The amount of chaff in the crease of the seed is noticeably less.
1st crack is an exothermic reaction; the beans are giving off heat. But then the beans quickly become endothermic, taking on heat. A roaster that is not adding enough heat to the process will stall the roast at this point …not a good thing. Once caramelizationA reaction involving sugars that occurs during coffee roasting. A caramelized sugar is less sweet, but has greater complexity of flavor and aroma. Caramelization is slower than Maillard... ...more begins (340-400F internal bean temperature) a roast that loses heat will taste “baked”, perhaps due to the disruption on long-chain polymerization. The melting point of sucroseSucrose is important to the taste of sweetness in light roast coffees, as it is completely converted or destroyed in darker roasts.: Sucrose is largely destroyed by the... ...more is 370F and corresponds to this window of temperatures when caramelization begins.

9. 1st crack finishes 10:40 – 426F
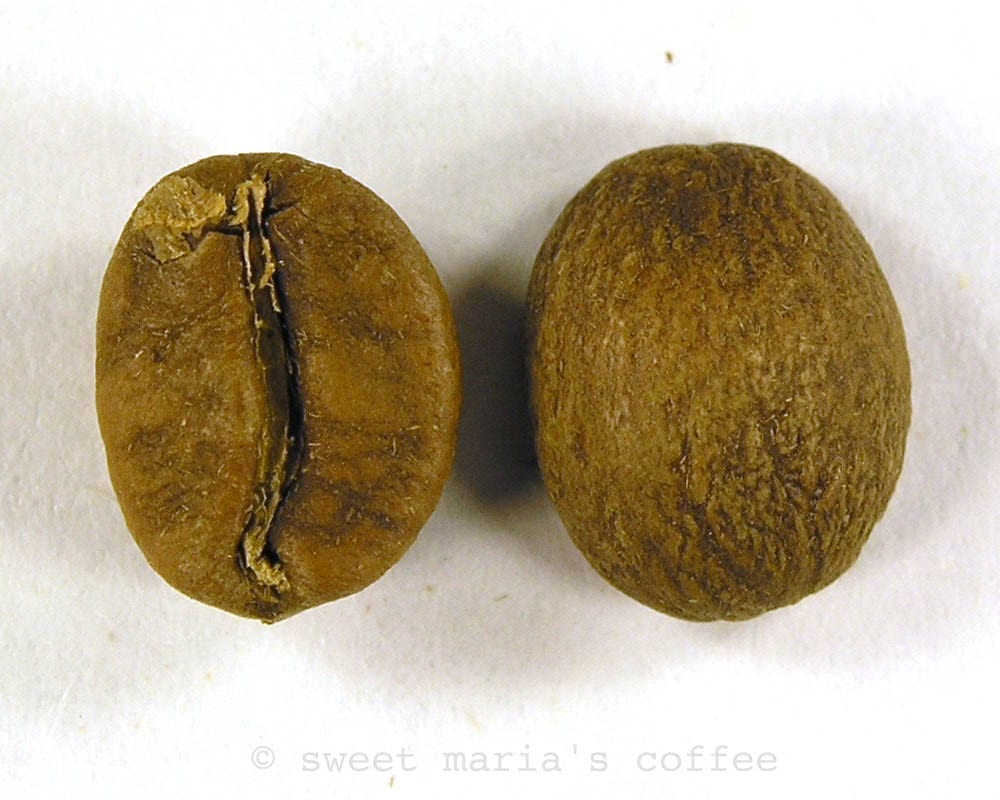
This is considered a City RoastCity roast is what we define as the earliest palatable stage that the roast process can be stopped and result in good quality coffee. City roast occurs roughly... ...more. 1st crack is done and the roast is stopped. Notice the bean surface is smoother somewhat from expansion but still has darker marks in the coffee, like a finely etched pattern. The edges of the seed are still fairly hard. At this point the coffee starts giving off carbon dioxide.
10. City+City+ roast is an ideal roast level that occurs roughly between 425 and 435 degrees Fahrenheit in many coffee roasters with a responsive bean probe where First Crack... ...more roast 11:05 – 435F
City+ means the coffee has cleared 1st crack, and time is allowed for an even bean surface appearance to develop.</span></p> <p><span style=”font-weight: 400;”>There are only very small changes between the #9 picture above and this one, notably the edges of the bean are a bit softer. The whole stage between the 1st and 2nd crack is a short period (15 to 30 seconds) where a lot is happening chemically to the beans. The coffee gains heat once again until its woodyGenerally a taste defect from age; old green coffee, perhaps yellowing in color. This is due to the drying out of the coffee over time, and as the... ...more celluloseCellulose is the principle fiber of the cell wall of coffee. It is partially ordered (crystalline) and partially disordered (amorphous). The amorphous regions are highly accessible and react... ...more matrix, the bean structure itself, begins to fracture … that is, the 2nd crack.
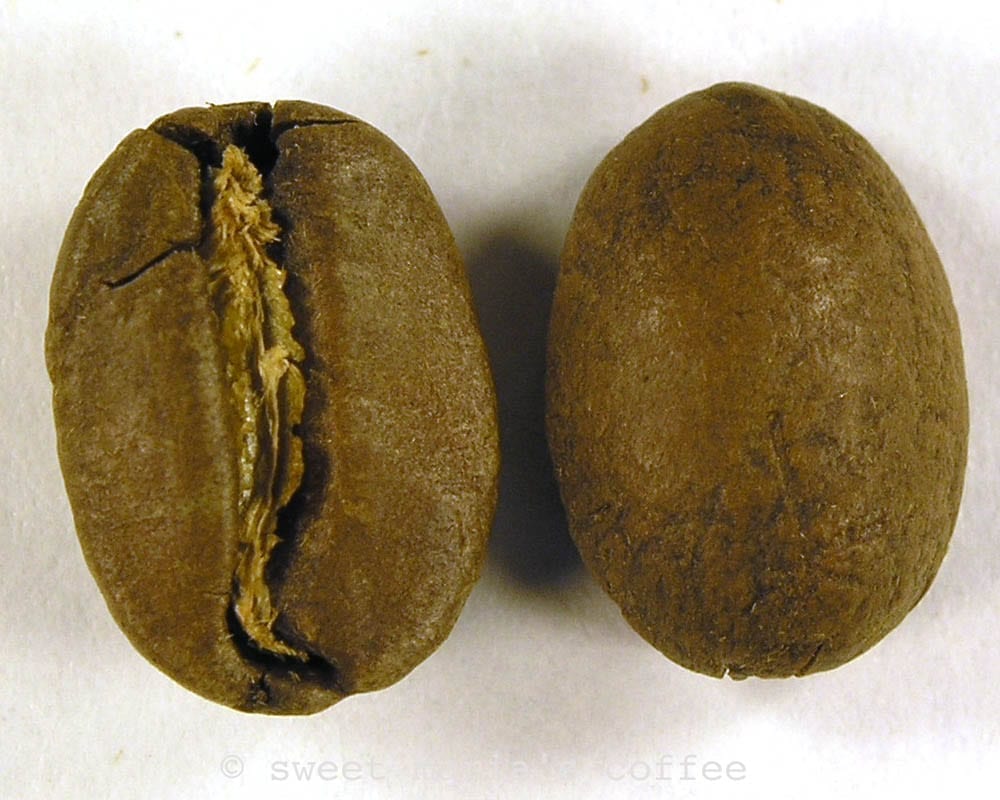
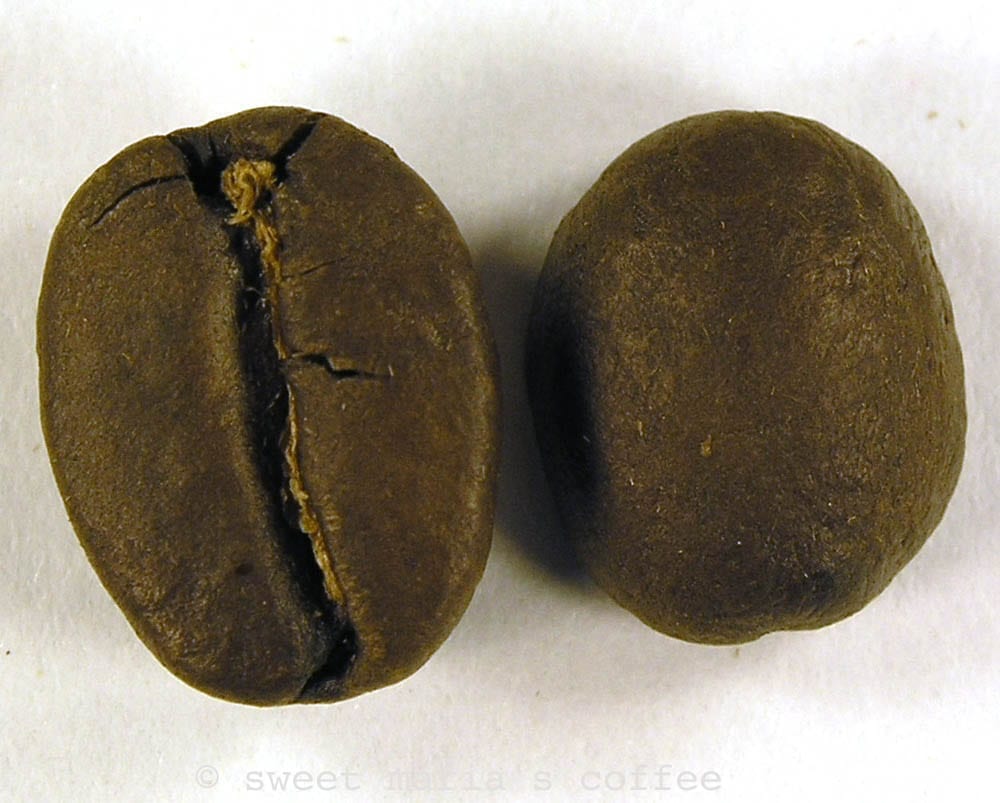
11. Full City roastA coffee that has been roasted to the brink of second crack.: A coffee that has been roasted to the brink of second crack. The internal bean temperature... ...more 11:30 – 444F On the verge of 2nd crack
This image represents a Full City roast; the coffee is on the verge of 2nd crack. This might be hard to judge the first few times you roast; after a while, you will have a feel for it. The beans have a slight sheen of oil and the edges are softer. Look <strong><a href=”https://library.sweetmarias.com//roastedcoffee_grindvssurfacecolor/”>here</a></strong> for the whole bean vs. ground coffee comparison photo of this roast color.</span></p> <p><span style=”font-weight: 400;”>The internal bean temperature for 2nd crack normally is 446F. In practice, 2nd crack is a bit less predictable than 1st crack… why? Possibly due to the fact that 1st crack is the physical expansion of the coffee seed as water and carbon dioxide split and CO2 outgassing starts. 2nd Crack is the physical fracturing of the cellulose matrix of the coffee. This matrix is composed of organized cellulose that reacts readily to heat and not-so-organized cellulose that does not. Since every coffee is physically different in size and densityThe density of a coffee bean is often taken as a sign of quality, as a more dense bean will roast more with a better dynamic. The density... ...more due to the cultivarCultivar is a term used interchangeably with Varietal in the coffee trade to indicate plant material, although there are distinctions.: The naming of a cultivar should conform to... ...more, originIn coffee talk, it refers to a coffee-producing region or country; such as, "I was just at origin." Of course "Origin" for most product we use is not... ...more, altitude, etc., it makes sense that the particular cell matrix is different too, and not as universally consistent.
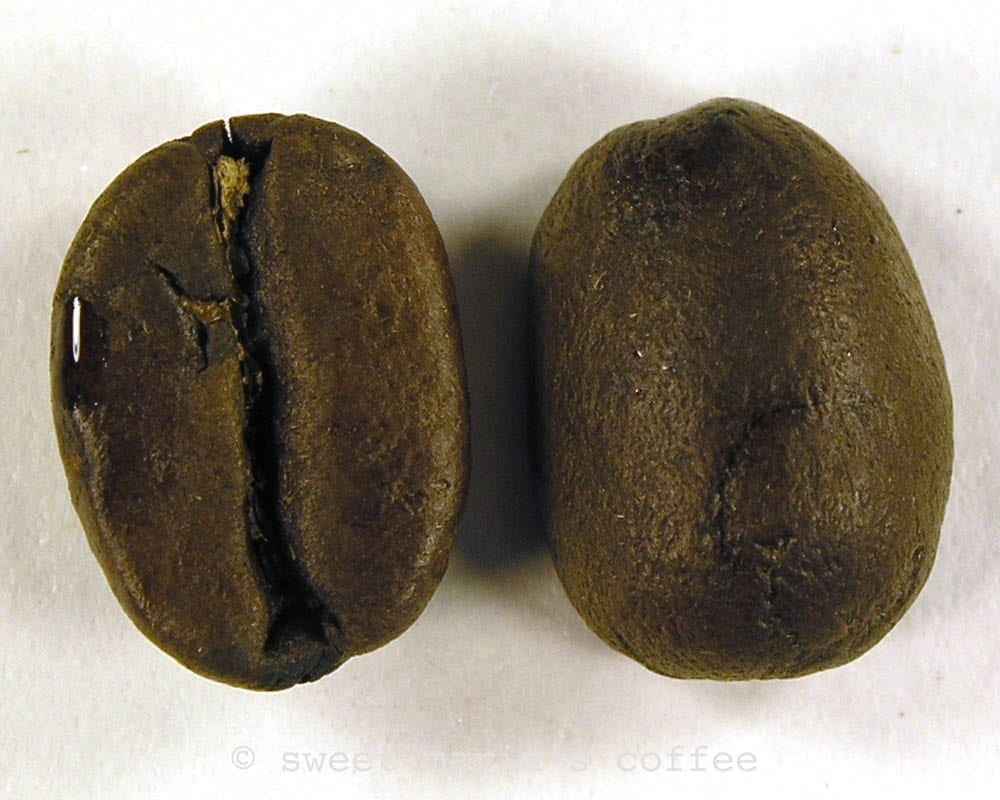
12. Full City+ roast 11:50 – 454F First audible snaps of 2nd crack
The darker side of a Full City roast is Full City +, where the coffee has just barely entered 2nd crack. A few snaps are heard and then the roast is stopped. 2nd crack may continue into the cooling phase – this is called “coasting”. The more effective and rapid your cooling, the better your ability will be to stop the roast at the degree you want. Look here for the whole bean vs. ground coffee comparison photo of this roast color.
Compare the full size images from the Full City roast to Full City+ and I think it’s easy to see a difference. Maybe not easy, but the Full City+ roastA roast slightly darker than Full City. At Full City+, the roast is terminated after the first few snaps of second crack. The main cue that distinguishes the... ...more is fuller, with more small cracks on the face (or flat side) of the bean.
13. Vienna – Light French roast 12:15 – 465F 2nd crack is under way
(This is my darkest roast for espressoA small coffee beverage, about 20 ml, prepared on an espresso machine where pressurized hot water extracted through compressed coffee.: In its most stripped-down, basic form, this is... ...more. I don’t like to drink ash and charcoal!)
The Vienna stage (also called Continental) to Light French stage is where you begin to find origin character eclipsed by roast character. A dark or heavy roast is at odds with buying coffee for its distinct origin qualities. Dark roast coffees tend to taste more like each other – as the differences due to distinct origins are obscured by the carbon-y roast flavors. Nonetheless, some coffees are excellent at this stage (our Puro Scuro blend is engineered for this roast range).
By the way; “espresso” is not a roast. Northern Italian style espresso is usually roasted to 440F – 446F internal bean temperature. Southern Italian (Scura) is generally a Light French RoastSugars are heavily caramelized (read as burned) and are degraded; the woody bean structure is carbonizing, the seed continues to expand and loose mass, the body of the... ...more or a tad darker.
14. Full French roast 12:40 – 474F
2nd crack is very rapid, nearing its end. Coffee tastes ashyThe smell or taste of ash, such as an ashtray, cigarette smoke, or fireplace. Often a roast defect.: A quality in aroma or flavor similar to that of... ...more and burntBurnt flavors in coffee are the result of over-roasting, fast roasting, or roasting in a high-heat environment. This often occurs when the initial roaster temperature when the green... ...more.
Sugars are heavily caramelized (read as burned) and degraded; the woody bean structure is carbonizing and the seed continues to expand and lose mass. The bodyAssociated with and sensed by mouthfeel, body is sense of weight and thickness of the brew, caused by the percentage of soluble solids in the cup, including all... ...more of the resulting cup will be thinner because the aromatic compounds, oils, and soluble solids are being burned out of the coffee and rising up to fill your house with smoke. 474F is well beyond any roast I do on the Probat. I will go as high as 465F on a couple blends, and that’s my limit.
Notice how fast and dramatic the change is from the previous photo – all that happened in less than 30 seconds! In the photo you can see a couple small circular divots blown out of the coffee by rapid degassingThe release of carbon dioxide from roasted coffee. Immediately after roasting, so much carbon dioxide degasses from the coffee, it prevents good brewing. : Degassing, or resting refers... ...more of the roast during the roast cycle.
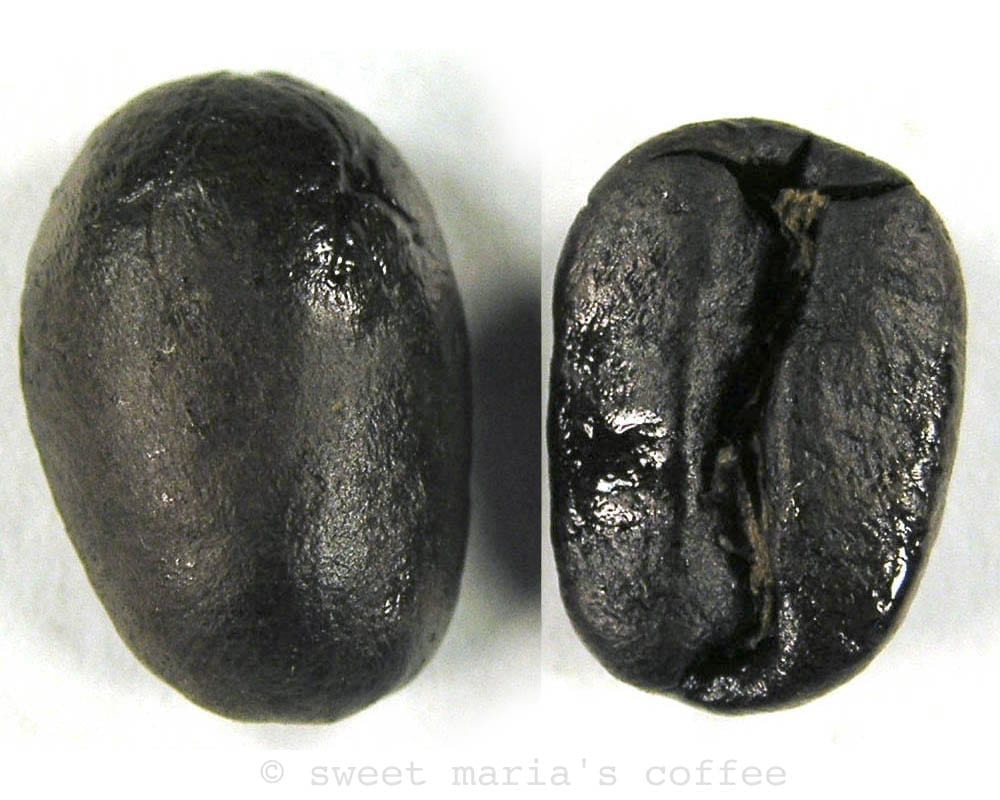

15. Fully carbonized 13:00 – 486F
Some call this Italian or Spanish roast, an insult to either culture, IMO.
At this stage, the coffee can be over 25% ash; it is carbonized, dead, charcoal.
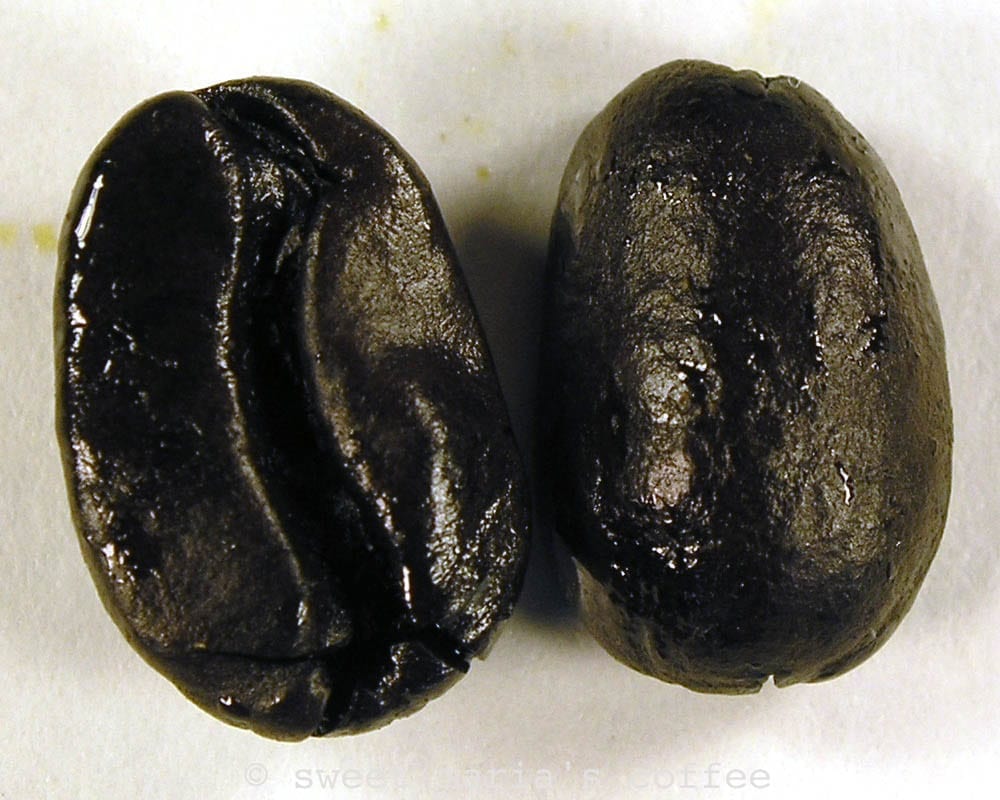
16. Imminent fire … 13:30 – 497F
This bean is right at the verge of fire – in fact you can actually start a fire with a large batch once you dump the coffee out of the roast drum into the cooling tray. The sudden rush of oxygen might be the needed ingredient for cafe del fuego. Kids, grab your marshmallows! Hope you like ’em smokeyUsually a defect of roasting, or of green coffee processing, smokey notes are sometimes found as a positive flavor in a few exotic coffees; This smell and flavor... ...more!
Needless to say, this roast level is full-on carbon and you can write your name with a coffee bean. The bean size here is smaller than photo #15 due to the randomness of the seeds selected to photograph – coffee does not get smaller at this stage…
Dark Roast Tips from the Master (of bad Christmas sweaters)
If you like the dark roast above, you might also appreciate this coffee guru and his amazing roasting technique.
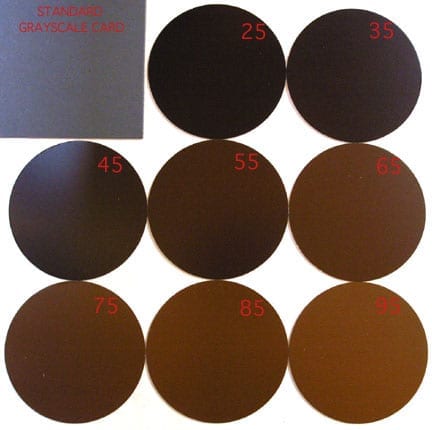
Agtron Roast Color Discs from the (RIP) SCAA
Here is a representative image I took of the AgtronA machine and a color matching system used for quality analysis generally in the food industry, and specifically in coffee: Agtron spectrophotometers are used in the coffee industry... ...more Roast Color Tiles, and might give you a basic idea of the color scale. These were a set of roast calibration discs for those who could not afford a $4000 color analyzer. They were pretty useful. There is a bit of glare on the left side though (most visible on Agtron 45). Since this is such an approximation and the appearance depends so much on monitor calibration, we are working on a better method of sharing this roast color information. The article that accompanied the disks by Carl Staub was also very useful! This was the best roasting science article in the early days and I read it 1000 times. For real. Thank you Carl!
Also check out the few Roasting Articles here: Coffee Science: Academic Papers and Documents
Why not make your own Roast Calibration Kit?
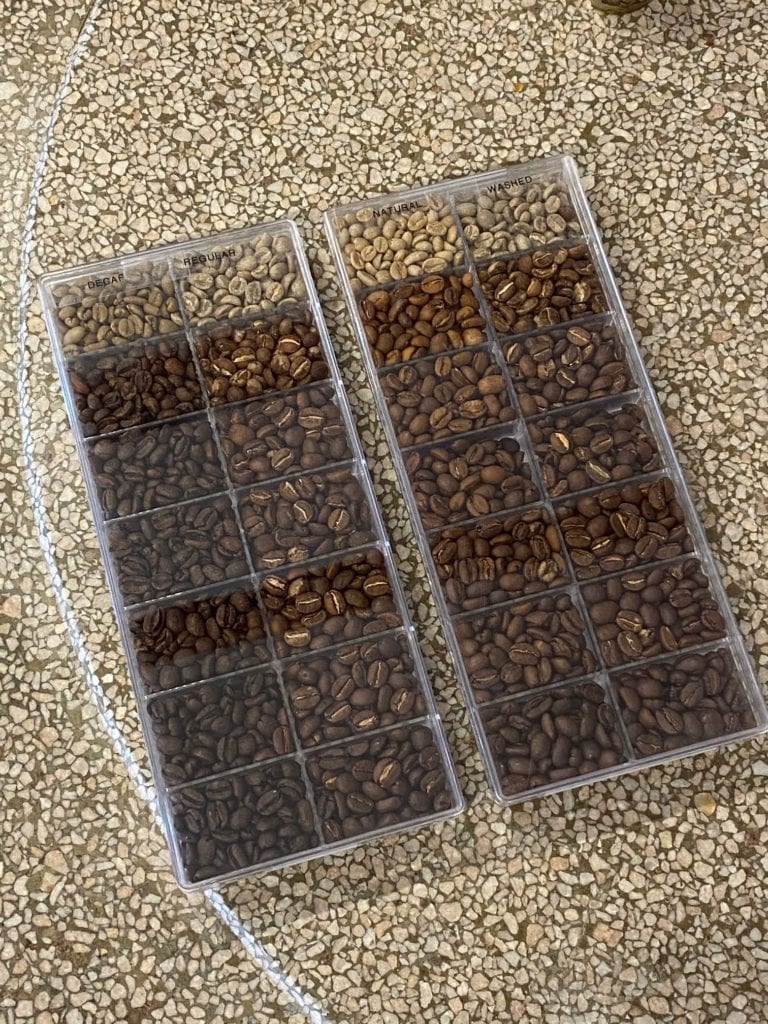
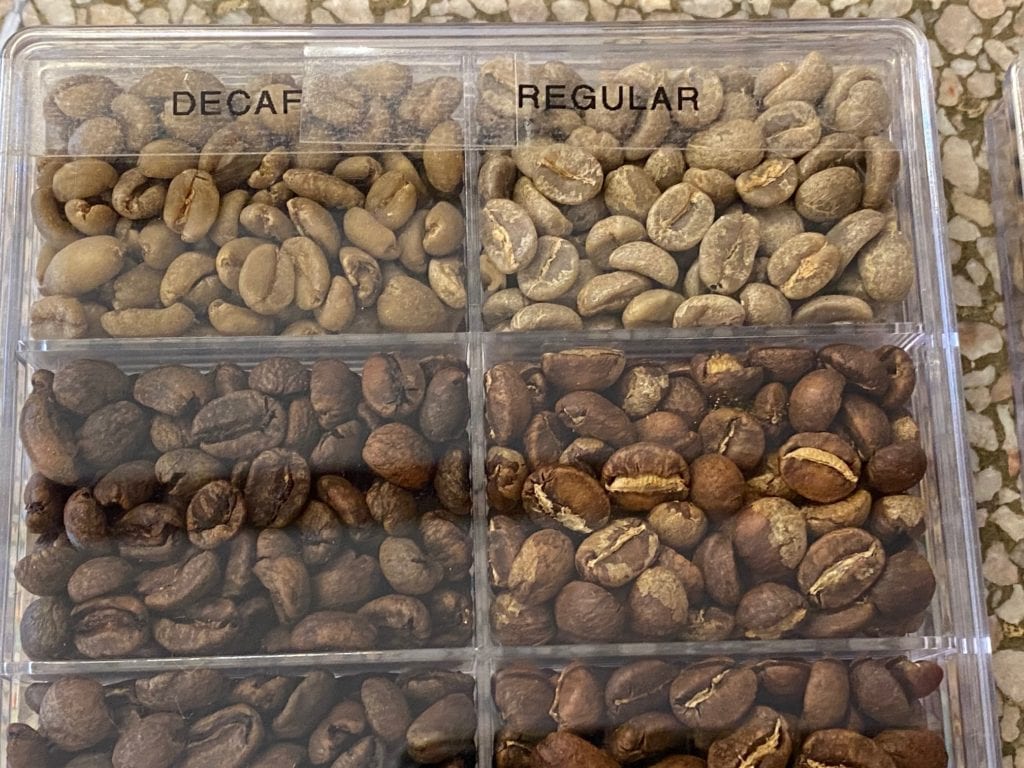
Here are some images of “degree of roast” sets that I made. The boxes are a clear type used for displaying beads and other craft objects. I bought these from The Container Store as I recall.
A homemade roast color calibration kit I made with bead / crafting containers and samples representing the degree of roast from green to Full City+
The set on the left dedicates one row to washed (wet-process) green coffeeGreen coffee refers to the processed seed of the coffee tree fruit. Coffee is a flowering shrub that produces fruit. The seeds of the fruit are processed, roasted,... ...more and the other to decaf, since decaf roast color can be so hard to gauge.
The set on the right also has wet-process coffee, compared alongside natural (dry-process) coffee. Each stage is the roast time and temperature equivalent. You can see how perceived color varies though.


51 Responses
Is there a way to get a better view of the ending stage of the roast in a Behmor using a flashlight or a type of lamp, please? Or overhead lighting vs no lighting – the Behmor is on a deep window shelf with the back of the roaster venting to the outside to the west.
So maybe time of day makes a difference?
Thanks!
In the past I used a lamp like this from ikea. But now I find my cell phone light is stronger! It’s a weakness of the behmor, that the lamp inside has quite a yellow tint, and as the drum turns it is hard to evaluate the coffee. That’s why the sound and smell matter, as well as looking at the bean for expansion and texture, not just color. But cleaning the front behmor glass, and a strong light help a lot. –
I enjoyed your video on the Mexican coffee farms. Do you expect to have coffee from Mexico Chiapas and/or Oaxaca? Thanks
It’s been a difficult year for us to find good Oaxaca coffee, I am sorry to say. The crop was not large, and in evaluating samples we couldn’t find anything really excellent in the cup. We are hoping next harvest is better! -Tom
I can’t afford a coffee roaster, top of stove probably my method. Does it smoke up the house? Will my wife complain?.
If you have a good strong hood over your stovetop you should be able to minimize smoke. It works fine for me. But if you want to do dark roasts, even a good stovetop hood might not capture all the smoke. Using a popcorn popper is inexpensive and less smokey. Plus you can do it on a porch etc.
Yes, your wife will complain unless you roast in the kitchen with the vent hood on. She might still complain because the coffee beans have a skin called parchment which goes everywhere during the roast. I roast my coffee on the patio beside the house.
I used to roast my own coffee until the flood destroyed my roaster so I just ordered another one. I like very strong coffee so I used to roast the heck out of the beans. Which coffee do you recommend for the most flavor when making dark roasted beans? I know nothing……
Sorry about the flood! One way to get a dark roast for sure is roast in an iron skillet, but that’s too primitive for most people. The issue with really dark roasts is the smoke, and they also are hard on certain coffee roasting machines because they result in so much build-up, like in the Behmor where you are roasting coffee in an enclosed box basically. We see Behmor roasters get really dirty on the interior surfaces to the point the thermometer sensors inside are coated with oils etc and don’t work right. So with that in mind, a Freshroast type air roaster, or an old style air popcorn popper like the West Bend Poppery 1500 watt, or Popcorn Pumper 1400 watt are good (can be found on ebay but prices on them have gone way up since people know they are good coffee roasters)
Does altitude effect how the coffee reacts? I am at 4000 feet above sea level. I am roasting with a pan on the stove and as long as I keep constantly stirring and stay below a medium flame the roast is even, but the first crack does not stop until the beans are well into being burned as per your photos. There are some differences from one bean type to another, but I do not think I have ever archived the second crack.
It definitely does have an impact. First crack is the point that the internal moisture in the coffee reaches boiling point basically – it’s water turning to vapor. The pressure from this can make coffee “pop”. It’s the same as popcorn really, internal moisture content turning to water vapor at a certain temperature. So if at your altitude the point that water turns to steam ios different than at sea level, I have to think that impacts your roasts. Roasting shops in the Rockies always have different profiles than those along the west coast… I am also wondering if a bit too much heat might be at play. If I roast in a pan with heat set too high, first and second crack nearly merge.
New to roasting. Currently using my trusty cast iron skillet and have turned out a couple of decent batches of Colombio Huila. Upgrading to a popcorn maker soon. I have not been using a thermometer for my roasts yet but have been going by cracks – stopping right around when I hear the first set of second cracks. Will a stock infrared thermometer be a good addition to the mix? If so, how do you proxy the bean inside temperature when using a thermometer?
Hi RJ – this is a great question, but the answer could be too expansive to write here … I think the IR thermometer can be helpful but a bit hard to manage in a skillet. You should be anticipating first crack in a range of 390 – 405 f, and it’s a bit hard to correlate that to an internal bean temperature. The stumper there is that first crack is the point where water trapped in the coffee turns to water vapor ie steam. 400 f would seem to be waaay above that, yet 212 f would seem to be far too low, and I honestly don’t have an explanation for that. Anyway, for me monitoring temperature is one input to understand where a roast is at. Visual appearance, especially in a skillet, takes some precedence and sound and smell are key too. In a totally enclosed roaster, temperature monitoring becomes more reliable, and also needed because you are more removed from the coffee. I’m working on some new pages that could be useful, especially one about first and second crack – I finally managed to make some clear audio recordings that help distinguish the sound difference much better.I’ll be posting that later this week…
Hey RJ. I use a pretty basic stovetop roaster called the Nuvo Eco Roaster and have had relative success w an IR temp “gun” targeting the following temps and times (actual roast notes w bean type, moisture loss, temps, times, etc.). I also find Celsius way better for just about everything. Hope this helps!
Batch #65 Huila RF 75/63.7 (-15.1%)
Charge temp (160c-190c): 190c
1st crack (185c): 6:45@180c
Drop (195c-210c): 9’@200c
Those ceramic stovetop roasters have always been interesting to me but never actually had one. I know they are used for roasting seeds, sesame etc in Japan. Makes sense they would work well for coffee.
ive yet to get the Behmor 1600 plus to a beyond medium roast. I’m using 1/4 pound on P5 and then I add time. I hear first crack and then the machine will not allow me to roast until i’m into the 2nd crack where I want to be. It stops me from adding time. Im using Kona bloom green coffee.
Hey there Rob, thanks for your comment!
You should think of the “P” numbers as descending in terms of heat – ie, P1 is the hottest profile, and P5 the most gentle. I always recommend folks start with the hottest profile and adjust from there.
My main suggestion for hitting 2nd crack using the Behmor presets is that you should always select a weight setting that is twice the size of your actual batch size (1/2 lb for a 1/4 lb of coffee , in your case). This will automatically give you more time on the roast preset than if you used the actual weight setting.
The other tips involve pre-heating the machine, and roasting in manual mode. Pre-heating shouldn’t really be necessary with 1/4 of coffee, but it’s always an option to shorten the overall roast time.
Here’s a blog post on this very topic.
I hope this helps you achieve your desired roast level! Please feel free to reply with any other questions.
Thank you so much for this one! I’m still going with my old iRoast (v1, yes!). Unfortunately, I’ve had some recent catastrophic hearing loss, so now I’m having to do it all by eye and nose with the heavily seasoned glass canister being hard to see through. I’ve been doing this enough years that I mostly hit my mark, but it’s a lot harder now that I can’t even hear first crack. It’s good to see a visual reference for a change.
My tastes are a little weird — I actually like the earthy Yemeni coffees a little under-roasted, definitely short of City and stopping just barely into first crack. That’s definitely not most people’s choice of cuppa. Any suggestions for easier ways to match my palate?
Seems like the natural coffees from Yemen and Ethiopia are your thing. We have a nice Zambia natural too. I know that roast chamber probably seems hopeless … but it would be amazing to get it cleaned up so you can see again! Some ideas are: soak in espresso machine cleaner like Cafiza, soak in sodium percarbonate such as PBW or oxyclean (I have put things in a stovetop pot with this and simmered at low heat), or something nasty like Easy Off oven cleaner. I like to avoid that last one personally. We also sell a roaster cleaner but it costs more than the other options, plus its out of stock now! : Roaster Sprayz
Looking at your roast photos its interesting how the beans in the two bean photos are much darker than those in the roasting photos supposedly showing the same roast level. I would suggest using your 18% grey card to set your lighting f/stop and shutter speed on a manual camera. Then you should get consistent color change information as your camera is not compensating trying to lighten darker images. Or, have I misread this. How have you made these photos? Maybe using a scanner and consistently calibrating to a white background would help.
Great points here – thanks Rick. Yes the consistency in exposure between images, and one set to other is not good. Agreed that the grey card and manual shooting is the best approach, and in fact I already had re-done all this work, since the photos we used were really old. I just need to get those new improved photos processed and put up on the page! This serves as a good reminder to do that work!
This is a somewhat helpful article, but it could be improved by some advanced photography skills. The color profiles of the various roasts as shown are all over the map. I’ve roasted a lot of coffee, and rarely seen some of these shades. Plus, the photos of the single beams versus the bulk photos show color saturation problems from exposure variations, and this makes it extremely difficult to use the photos for comparison to real-world roasting.
Also, I notice that you do not mention Italian roast. Is there a reason for excluding this oft-used descriptor?
Thanks Gerald – very fair criticism and in fact I have redone the photos in a more controlled way in terms of exposure, white balance and saturation, etc. Italian roast, yes that should be in there too!
This article is a gold mine of information, especially the time/temperature readings taken during your roast. I have a Behmor 1600 Plus and tried to replicate it, but my temperatures were far below your at every time point. For example, at 10 minutes, yours was 415˚F and mine 264˚F. Mine never exceeded 293˚F throughout the roast and 1st crack started at 11.45 minutes.
Is my roaster fault, or is that normal for this model ? This may also explain why my roasts taste rather bland.
Hey James, glad you found this post useful! It is certainly one of our most trafficked pages.
This is one problem with talking temps, as the readings will vary greatly depending on the roaster, and more importantly, probe location. The Behmor’s ‘B’ temp thermistor is located on right-side panel, just on the other side of the inside wall. Because it’s so far from the heat coils, not to mention, outside of the roasting chamber completely, the temps will not correlate to an actual ‘bean temp’ (where the probe is in the bean mass).
Getting close to 300F on the B temp, sounds about right on the Behmor, though a 1600+ typically gets closer to 315F when roasting at the highest P5 heat setting in manual mode. Is the temp you quoted from a Behmor roast preset (P1, P2, etc)?
As for a bland profile, you might try shortening your roast by running a pre-heat cycle, and then roasting in manual mode. The shorter roast time should help coax out a more dynamic cup profile, and highlight acidity. We’ve compiled tricks and tips to getting the most out of your Behmor on our Behmor resource page, which you can check out HERE.
Let me know if you have any other question!
-Dan
Great tutorial. My question has to do with the temperature readings. Are you referring to the air temperature readout (on the FreshRoast) or the bean mass temperature (temperature probe suspended in the tumbling beans)?
Thanks!
Good question! We are referring to the probe temperature, however the temperatures you might measure from a bean probe on an air roaster like the Freshroast are always going to combine bean temperature and hot air temperature to some degree. The higher the air speed in roasting, the harder it is to isolate it from bean surface temperature. It’s also true with drum roast, but to a lesser degree since there is a slower air flow. In some ways a contactless thermometer might be better since it reflects an infrared beam off a surface. But they present other issues (like how to physically mount them so they are always reading the same area / same distance etc
thanks alot of information goodjobs
really informative, thanks for information
you’re welcome!
Tom, thank you for responding to my request for temps! I have an SR800 with a Razzo V6 roast chamber complete with thermocouple and meter. My first discovery was the meter and probe might not be accurate. So I ordered a better quality meter and probes. Now I’m trying to get better roasts that emphasize origin flavors, not roast favors. I hate coffee that tastes like charcoal! What is the point of buying coffee by flavor characteristics if no one will ever taste them?
I found color to be a very difficult method since decaf and traditional wet process start out so different to begin with. I’m hoping temperature is the great equalizer.
In later edits could you be clear whether the temps are bean or air? I’m trying to take advantage of the temp probes. 🙂
I’m new to the home coffee roasting world and where has this been my whole life? I’m having a blast trying different coffees. My current setup is a Whirley Pop on my gas stove and that has actually worked out quite well. I’m achieving nice even roasts. What’s really helped me are the visual depictions on this site, my IR thermometer, and calculating moisture loss post roasting has been a great way for me to double-check my roasts. I see the temperatures here are much higher than the temps I get with my IR thermometer. Using other sources on roasting, I am finding that City+ is around 410°F, FC is 410-425°F, FC+ is 425-435°F with IR. These of course are not hard and fast and do vary. But using sight, sound and smell along with temps really has helped me be more consistent as I gain experience. I have a long way to go on my journey but it’s been a blast so far! And I can’t wait to try more beans. As an aside, have you thought about selling your coffee maps as prints for framing? I really like the way they look and think they would look nice on a wall. Blessings!
Hi Todd,
Thanks for the nice message! I’m glad to hear you’ve been enjoying the home roasting journey. Not everyone does. I think the fact that it’s not a “set it and forget it” effort can be a bit of a barrier for some. I enjoy tending to my roast while it’s happening, and from what it sounds like from all the tools you’re using, you do too! Temperature readings will vary depending on a lot of factors, thermometry being one variable. Since we’re not actually reading the internal temp of the coffee, the readings might look a little different based on probe placement, or in your case, using the IR thermometer. Those are great, but I notice differences in temps between what I get from a drum probe vs IR. The important thing is to understand where those benchmarks lie using your thermometer, and it sounds like you’ve figure that out. That’s an interesting idea on the maps and I’ll pass it along!
Best,
Dan
I have always been disturbed by something in the images of the roasting stages from raw to imminent fire – the amount of oil and the smoothness of the surfaces (and perhaps the color) of the beans in the macro images doesn’t match the same characteristics in the micro images, the micro images appear to me to be much further along in the roasting process than the macro images. Is this a result of different films, cameras, lighting, and so on, or does it have to do with differences in the samples themselves? These images appear to be several years old, I seem to remember their being on your website when I was first learning to roast my own beans about 2008, although that could be a false memory. In any case, I’d like to suggest you repeat and update the images with digital equipment and lighting controls that include color temperature to make sure the images make a closer visual match. “And that’s all I have to say about that.”
Yes I agree they could be better. Fair criticism. I prefer looking at coffee roast levels against an 18% gray card actually because the contrast between a white background and the darker roast levels is extreme. I think that works better for photographing them too. The lighting and white balance really matters. I think I have much more current and better imagery to replace this with already, and shooting it again isn’t too hard. Thanks for pointing this out.
Yes I agree they could be better. Fair criticism. I prefer looking at coffee roast levels against an 18% gray card actually because the contrast between a white background and the darker roast levels is extreme. I think that works better for photographing them too. The lighting and white balance really matters. I think I have much more current and better imagery to replace this with already, and shooting it again isn’t too hard. Thanks
I am fairly new to home roasting and am encouraged by your website! I roast in a Whirley Pop on a gas stove and am generally pleased with the results, usually trying to hit the end of first crack. I am, however, confused about the timing of the roasting process. Currently, I use a pretty constant flame and get the start of first crack at about 9-10 minutes. Should I use a hotter flame at the start to reach first crack quicker? Should I raise or lower the heat once first crack starts? I guess I am seeking some notional heat versus time profile for the stovetop popcorn popper process.
Second, quick question: I roast 8 ounces at a time; can the Whirley Pop method handle a full pound?
Thanks!
It sounds like you’re getting good results with your current heat profile. A lot of home roasters are faster than stove, top roasting, especially air roasters. But you really want to be patient with a direct contact roast method like stove top roasting. So 9 to 10 minutes for first crack is a good thing. Once the coffee gets to first crack or even just a little before if you can anticipate it, it’s great to bring the heat down a little bit so you go into a good controlled crack. You don’t want it to be rapid ideally. And yes, many people can do 1 pound on the stove top. It’ll take some adjustments with the heat, but it can be done.
I’m curious – on the roast spectrum, what roast levels do you all categorize as light, medium, medium-dark, and dark. There seems to be no convention about that in the coffee roasting world.
Cinnamon – light
City Light-Medium
City+ Medium
Full City Medium Dark
French Dark
Vienna Very dark
It seems to me that the IBTS temperatures on the aillio bullet (r2) are lower than the guidance you gave in this article for the various phases. Can you comment and perhaps update the ranges based on your observations with the bullet?
Yes the Bullet (and most other roasters) will show variation in temperatures. I would say the Bullet should be closer to actual with the IBTS, but writing a general article for the way most roasters will probe the coffee bean mass, these are usually what people see. I think we should do a Bullet-specific article for roast levels. And Behmor really needs a separate article too!
What about favoring is there a perfect temp for flavors ?
Adding flavorings to coffee? We don’t know much about that. Some people use syrups like Monin brand which you add to the cup after brewing.
So, I am looking at temperature and time. Obviously if I put the heat at 9 and leave it there and just adjust the fan the beans will hit their mark and be done. What I cant find is info regarding lower temperature for maybe a longer time. Does this help develop flavor or just drag out the process?
Say if I do a
min-fan-temp
1-9-5
2-9-6
3-8-7
4-8-8
5-7-8
6-9 -6-8
as apposed to
1-10 9-8 ?
Hey Walt, not sure what roaster these settings reference, but a lower temp ramp can be effective for developing sweetness. It really depends on the physical characteristics of the beans. Lower grown coffee like Brazils are softer, and hitting hard with high heat runs a risk of roast defects like tipping. Same goes at the end of the roast. We often reduce power a minute before hitting first crack so that it’s more controlled, and does’t get away from us. Let me know if you have questions about a specific roaster or coffee.
Best,
Why the use of scale and roasting in a popcorn popper (using the watt meter, voltage regulator, and thermo).Not used more often. I saw a video you guys made, but it did not go in depth on the process. I have done some roasting this way, and it seems to work fine up dark to medium roasting