
A Rough Outline for Building the “EZ Wobble Disk Coffee Roaster”
An alternative to buying a purpose-built home coffee roasterA machine for roasting coffee. Or the person operating it! The basic requirements for a coffee roaster are a heating element that gets suitably hot and a mechanism... ...more, or using a popcorn popper or an oven to roast, is to build your own machine.
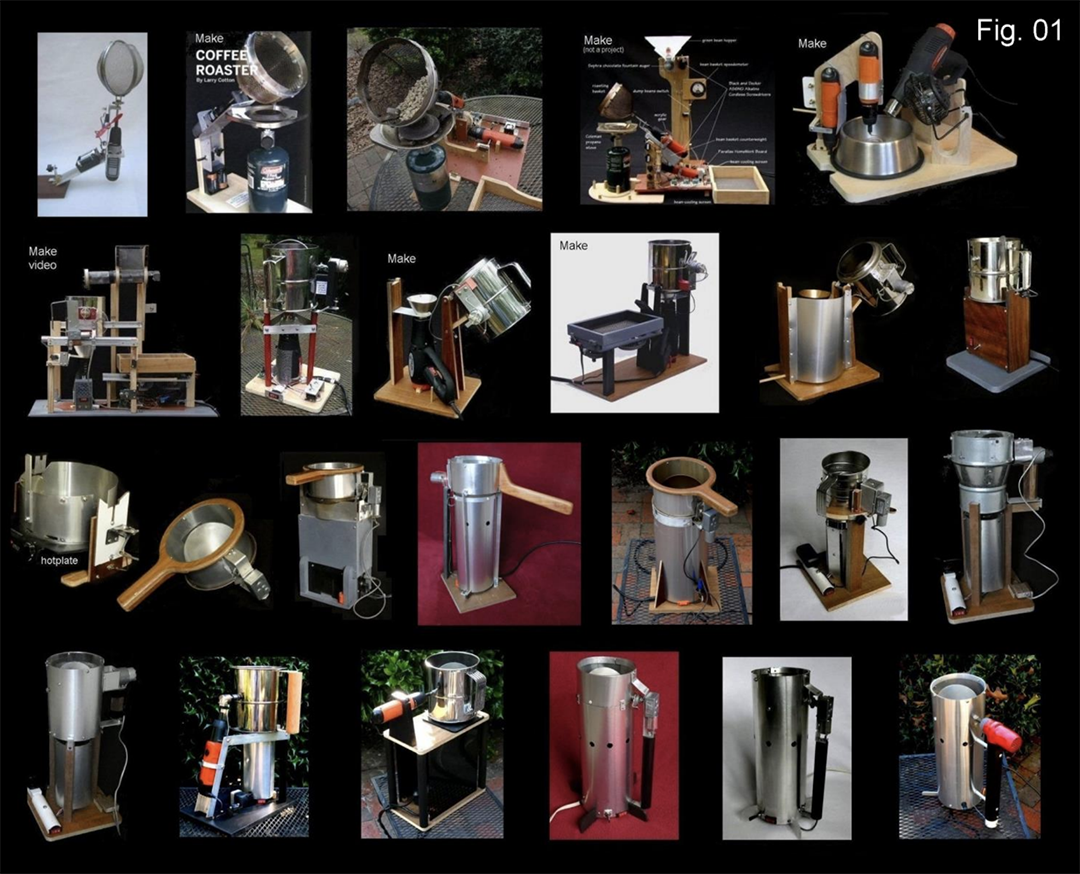
And nobody captures the DIY spirit of home coffee roastingThe application of heat to green coffee seeds (beans) to create palatable material for brewing a great cup!: Coffee roasting is a chemical process induced by heat, by... ...more better than Larry Cotton. He’s been a customer and comrade for years, always sharing his new designs to encourage others. From using flour sifters for a roast chamber, Larry came up with a unique and effective design for moving coffee and roasting evenly. He calls it the “wobble disk,” and he’s able to roast a good volume of coffee using this scheme.
Here’s the intro to Larry’s document, and the PDF file you can download with a direct link at the bottom of this page. – Thompson
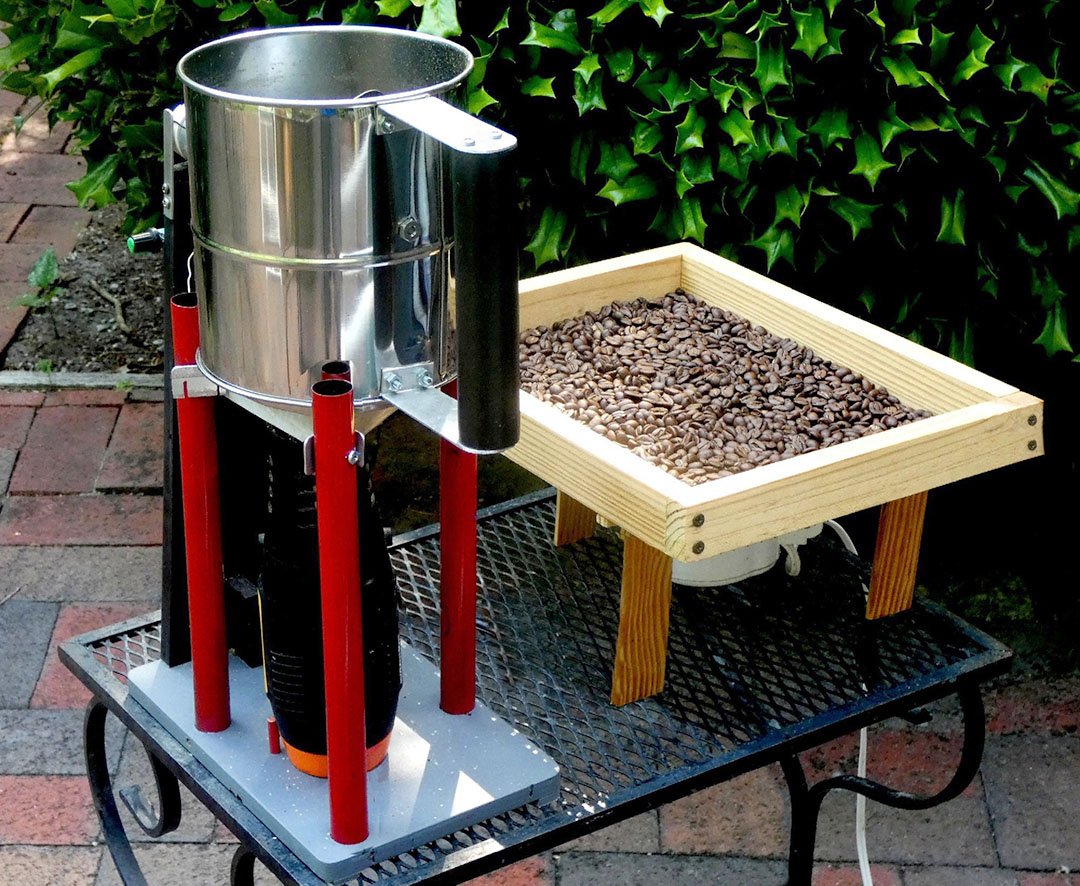
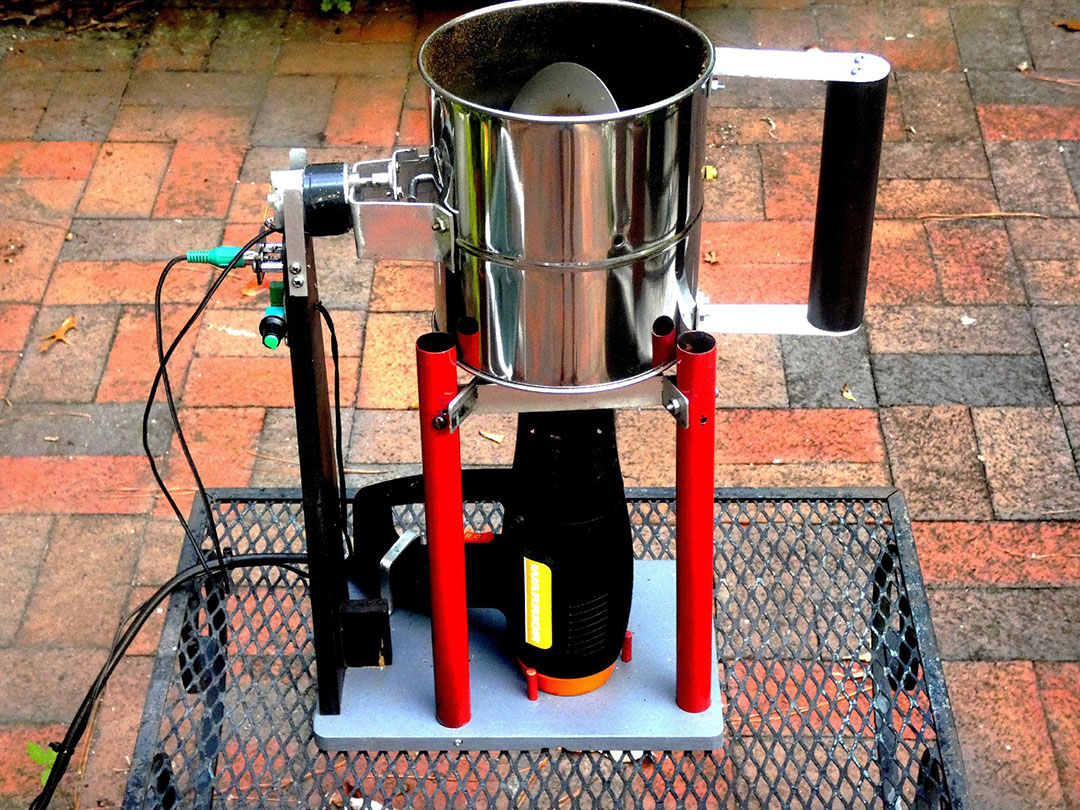
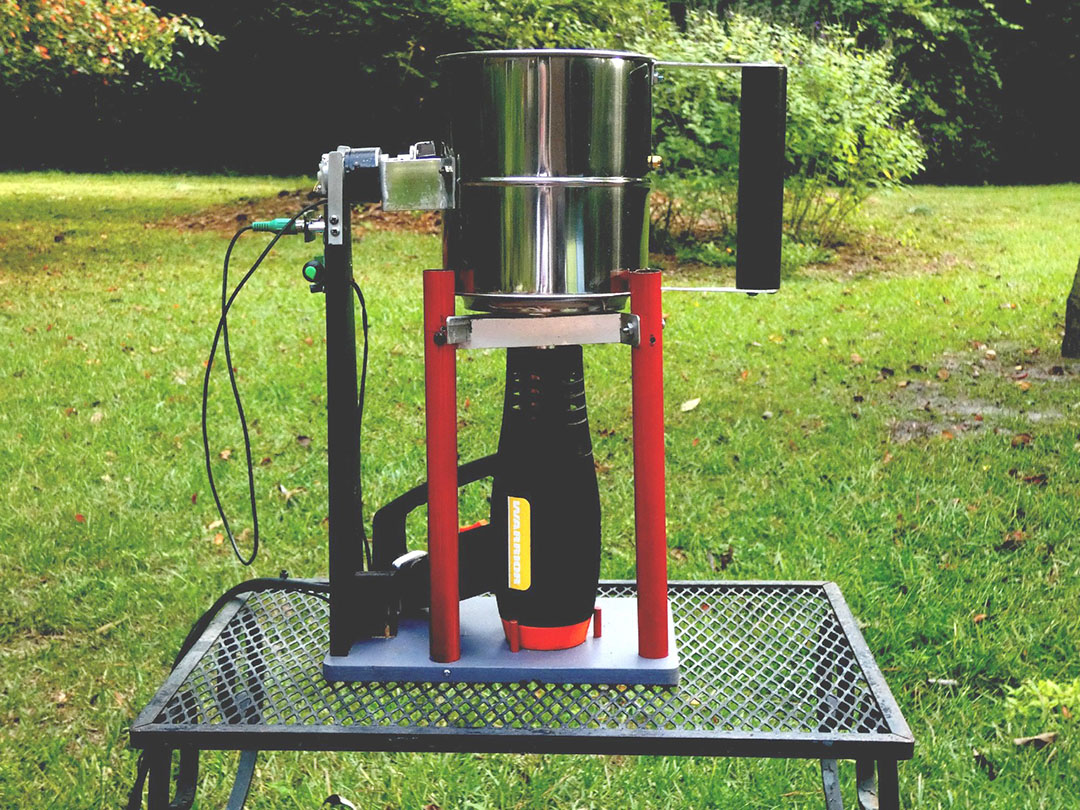
PDF Intro by Larry: Have you ever craved a cup of coffee brewed from beans you roasted? In a roaster you built? That sports a wobbling disk, an 8-cup flour sifter, most of a 13″ pizza pan and three red tubes? Yes?
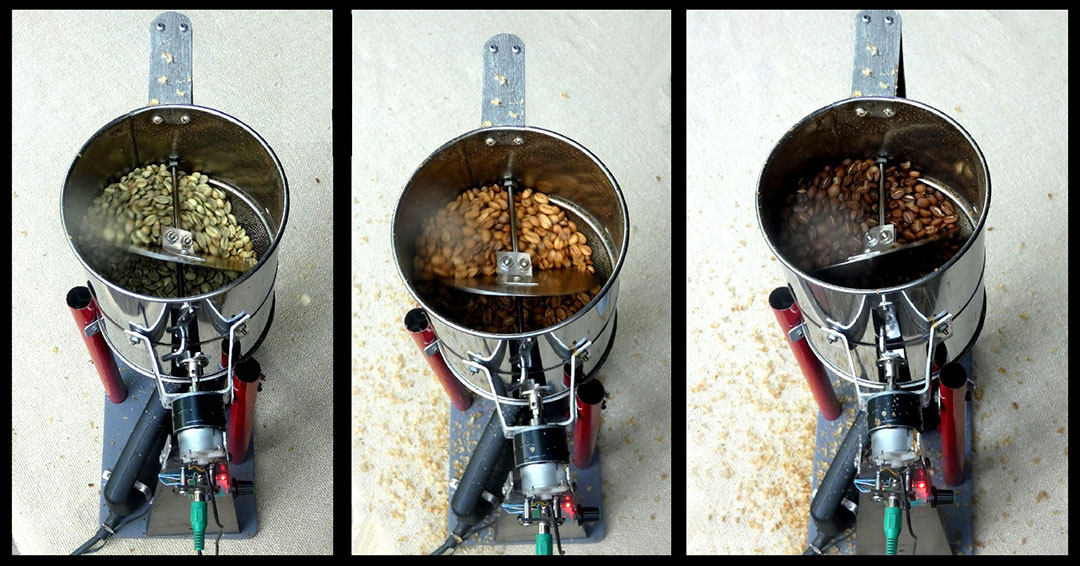
Well, here’s your chance to build one! Roasting times of 12-20 minutes are typical for 300+g (~11 oz) of green (raw) beans in ambient temps of 40+F and above, depending on your likes. Unlike most commercial roasters, you can roast back-to-back batches with no cooling pauses.
In the building process you’ll sacrifice the flat part of the pizza pan*–well seasoned or brand new–to yield most of the roaster’s metal parts.
Though it’s nowhere near as sophisticated and feature-rich as commercial machines (think $$, technical savvy and space requirements), I guarantee it will yield many amazing cups of very fresh coffee.
This plan specifies the materials and tools needed to build the roaster. Depending on your workshop and materials on hand, costs should be around $100-$150.
Warnings: Both building and using this coffee roaster require tools, parts and procedures that can injure you if safety is ignored. A heat gun (normally used for stripping paint and such), and the sifter surrounding its nozzle, can reach 450+ deg. F. This roaster must be used outdoors or in a building or garage with an open door. Coffee beans can emit smoke near the end of a dark roast, and will catch fire if left unattended. And the hard-working wobble disk that stirs the beans could injure you if you touch it while roasting.
I highly recommend using the main parts as specified; they’ve been thoroughly tested in more than a few home-built roasters I’ve built over the years:
Larry’s PDF Outline to Build this Coffee Roaster:
You can view the file in a browser below, and click Download at the bottom of the viewer to save it!
")
")
21 Responses
I’d say don’t skimp on the heat gun quality and invest in a better brand. The cheap plastics/heat element coil material in low tier disposable heat guns would be far from trustworthy applying heat to a consumable product. Not to mention pathetic temperature control/consistency being used for lengthy periods of time.
I’ve built 24 of these roasters over the years, all of which take the Harbor Freight Warrior heat gun. Yes, it’s cheap and has only 2 settings: hot/slow and hotter/faster. None has failed except the one that wasn’t mounted correctly–my bad! If you spend more money you can get more control, for sure, especially the ability to run the fan with no heat; that would be great for the cool-down cycle! I have to dump my beans immediately to cool.
Larry Cotton
That is so beautiful. I loved seeing how complete all the instructions are and that there are pictures of everything that might be confusing. I feel like I already built the roaster. Thank you so much for the fine set of instructions. I did have to laugh at the suggestion that a cardboard box would be helpful in wind protection when roasting at the beach. At the beach? I think that, as a heathen, I would roast my beans before going to the beach. Thank you for the best read I have had in a long time. I love how clear and thorough you are.
the fresher the better. plus i like to show off my roaster!
the beach is a great place to roast coffee, esp if you’re spending a week there and other family members visit, never having drunk freshly roasted coffee. i put the roaster on the back porch. the house faces the ocean and blocks most breezes. as extra protection from breezes i use a large corrugated box with an open top, and set the roaster on the bottom of the box. works perfectly. keep the box top open, of course.
If a cardboard box or any other insulating/wind deterrent is needed the design needs to be tweaked to prevent this. With my sifter setup I have roasted in temps registering 22 degrees F with sustained winds at 20 mph, giving an ‘official’ wind chill/feels like temp of 8 F and had no issues with wind/cold affecting the setup. Even in those conditions I still had 20% more heat range on the heat gun had it been needed. Have since stepped up to an even more capable hot air tool that has been mind blowing and still no need to use a box, insulation or preheating as some setups require.
Thanks for the input. I’m wondering what type of heat gun you found that was more capable?
impressive. glad to hear you’ve improved the roaster! LMC
Sure… it’s the Steinel HG2620E. Granted it’s costly, but that’s the most important part of the setup and should perform 100% indefinitely. Brushless motor rated at 10,000 hrs minimum, heat element rated at 800 hrs minimum and replaceable in maybe 10 mins. Variable fan, temp change in 10 degree increments from 120-1300, 2 stage dust/particle filters. Blows away various others I’ve had, which were fairly good in their own right.
love this discussion. i’ve built 30-some of these roasters, all with the same cheap ($10 on sale at Harbor Freight where I live). and you’re absolutely right that a better heatgun could furnish enough heat in cold weather. i’ve recently incorporated a way to move the heat gun vertically so the gap from its tip to the bottom of the sifter can be adjusted somewhat to compensate for weather changes. thanks very much for your comments!
Thing I really like with these setups is the sky’s the limit on what can be done to produce the expected end result consistently. I’ll gladly say you’ve clearly pushed boundaries with heat gun/sifter implementation over the years. I’ve used my setup going on 9 yrs now and roast what I’d consider a substantial amount for home consumption (espresso only), at least 10 lbs monthly, and have made small tweaks along the way to give consistent heat/temp feedback as well as repeatable agitation speed and it’s been impressive. Granted the Steinel is quite an expense compared to the ton of heat guns available and believe me I’m a huge proponent of maximizing what’s affordable and in front of me for a given task, but it does exactly what I want/expect and should do so for a long time.
People might ask why not just invest in a ‘purpose built’ roaster, but mine is ideal for my use. I can see/smell changes in bean development in real time, have variable points of temp feedback in real time and know exactly how the coffee is behaving right in front of me every second of the process. Not to mention I can replace any part that might eventually fail affordably/quickly, can easily keep the roaster really clean between uses with no concerns of bean dust/chaff buildup, etc. Will also mention that I wouldn’t tolerate the nanny safety systems some roasters are equipped with as I NEVER leave a batch unattended to need that sort of thing.
Thompson:
Thanks very much for all you for us home coffee roasters! I’m still building–and will send you a blurb and photo(s) soon. It can be built with a separable sifter or as one unit with a longer handle. Wobble Disk, sifter, Harbor Freight heat gun–and 350g capacity–are all unchanged!
Larry Cotton
Keep on building Larry!
I’ve been roasting coffee for years with a stainless steel dog bowl from Petsmart and a Milwaukee brand heat gun with only two settings. I manually agitate the beans. Works pretty well since I can see, hear and smell any changes but I am looking forward to trying this method in the future.
Hmmmm…. hmmm…. Now i’m going to have to make this but set it on a propane burner….
diffusion plate, legs (probably slightly adjustable), and heat protection for the motor and wiring… but I like it!
interesting, good ideas. let us know how your modifications work. i’ve got an urge to build another one with an 8″ wobble disk and a stronger motor to get more capacity. i may also have to upgrade the heat gun to compensate for increased batch size.
oh, there’s always room for a comment or two. after over 40 builds of this roaster in various configurations, the basics are the same: a cheap heat gun ($10 on sale at Harbor Freight), a good Amazon 8-cup flour sifter, a decent 12VDC motor to turn the wobble disk, and an accurately made, and mounted, wobble disk (45-deg. angle) on the sifter’s shaft. niceties include an auto-stop wobble disk when dumping the beans and a way to move the heat gun slightly up or down (1-1/4″ gap typical) to compensate for weather conditions. and a hardy thanks to Sweet Maria’s for posting my videos, offering build pdfs and quickly shipping very good green beans at a fair price.
I recently built this version of Larry’s roaster- which I believe is the easiest – as the only metal part you have to cut is the wobble disc:
https://www.youtube.com/watch?v=DSlxddwhTGU
I replaced the screw gun with the 12VDC motor he uses in his other designs, and coupled the nut driver to the motor using a 6mm to 7mm flexible coupler. I also upgraded the heat gun using the $34 Harbor Freight that has adjustable temperature and a cooling setting, which I’ll use to cool the gun – not the beans – as it still blows hot air for quite some time in that mode .
Thanks Larry for all the roasters over the years.
Very nice!!
I actually decided to go with the Warner Furno 700 heat gun instead of the Harbor Freight. The temperature is also adjustable, but you can access the controls with the heat gun mounted in the stand. This may be the ultimate heat gun for roasting coffee – 6 fan speeds plus you can adjust the temperature in 10 degree increments. A bit more ( around $70) but you can usually find some open box deals on EBay.
As some folks have noticed, using a heat gun coffee roaster, even with the ability to blow air with no heat, doesn’t really cool the beans quickly enough. So dump ’em immediately after roasting into a dedicated cooling device–preferably with moving air.