
Home coffee roasting is as simple (or as technical), as you want to make it.
You can roast in your oven, re-purpose a popcorn popper, use a skillet or buy an actual coffee roastingThe application of heat to green coffee seeds (beans) to create palatable material for brewing a great cup!: Coffee roasting is a chemical process induced by heat, by... ...more appliance. Whatever method you use, you will be on your way to drinking much better coffee.
The basic process is simple: use heat to turn green unroasted coffee into brown roasted coffee. Roasting times vary, depending on the method and batch size, but you can expect the process to last about 10 minutes for smaller batches and about 16 minutes for larger batches.

There are many ways to roast coffee. The method you choose should be influenced by how much roasted coffee you need and how much money you want to spend. Whether you choose a D.I.Y. approach or a small appliance depends mostly on if you want more or less automation.
D.I.Y methods are affordable and accessible.
We think using an electric popcorn popper is the best of the DIY methods. You can also use a skillet, a stovetop popcorn popper or a cookie sheet in your oven – while these methods are popular among home roasters, we think it requires a bit of experience to achieve good results.
Hot Air Popcorn Popper Instructions (Recommended)
Stovetop Instructions
Oven Roasting Instructions
Home Coffee Roasting appliances offer coffee specific features.
Depending on the model, machines made for home coffee roasting may offer chaffChaff is paper-like skin that comes off the coffee in the roasting process. Chaff from roasting is part of the innermost skin (the silverskin) of the coffee fruit... ...more collection, smoke reduction, timers, temperature control, airflow regulation and digital automation. There is no “best” roaster per se, but there is a best one for you depending on how much coffee you want to roast per batch and how large of a machine you want to have sitting on your counter. Air roasters are generally smaller, roast evenly without scorchingPatches of discolored burn marks on the coffee bean, due to a high-heat roast environment or other roast error.: Scorching refers to a roast error that can be... ...more, and are better for smaller batches. While drum roasters often roast more, these machines are typically larger, require more attention and generate more smoke.
See our Home Roasting FAQ for more help finding the right roaster for you.


We always have a few dozen coffees to choose from so you shouldn’t have a problem finding beans that make your taste buds happy.
We suggest purchasing a Sweet Maria’s Sample Set to get started. Sample sets include 1lb bags of pre-selected coffees from the different growing regions we offer. Starting off with a sample set is an economical way to start roasting and become familiar with origin flavorOrigin Flavor is a term we use to describe coffee flavors that are intrinsic to a particular coffee from a particular origin, and in contrast to flavor we... ...more characteristics. From there, your palate will have an idea of which ones are more delicious. This will help you narrow down which coffees you want to buy next.
Our Green Coffee FAQ will help take the mystery out of selecting.

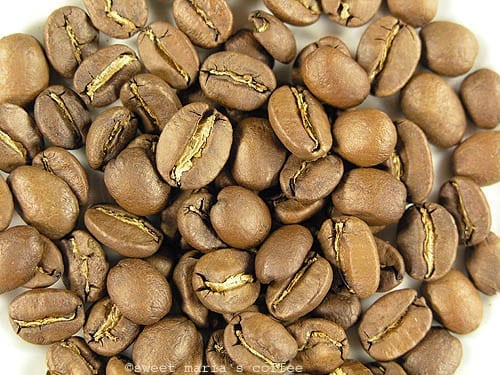
Understanding the different stages of the roast will help you control the flavor of your cup and appreciate how different roasts result in different cup flavors.
Here’s an image that provides an overview of the process:
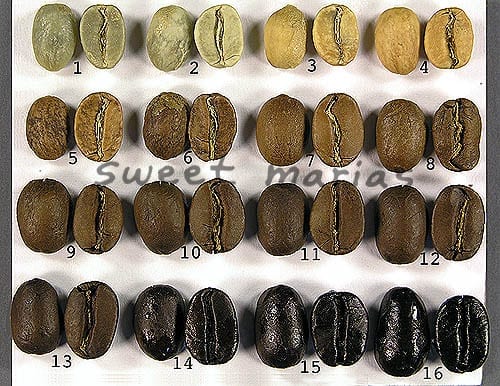
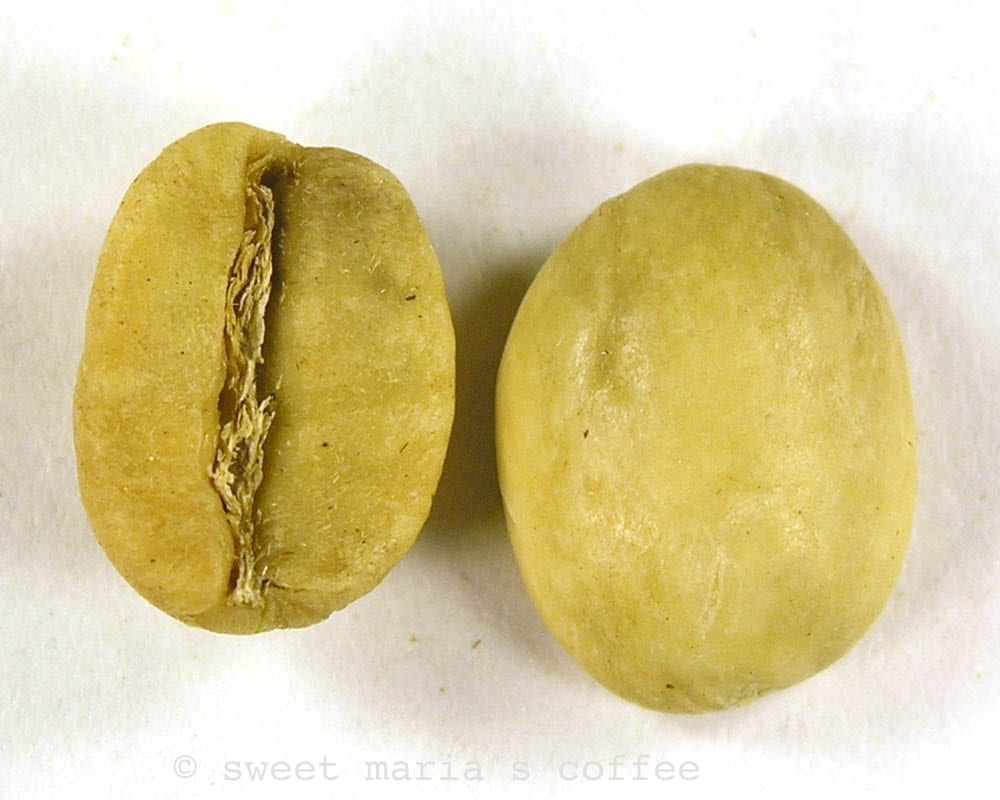
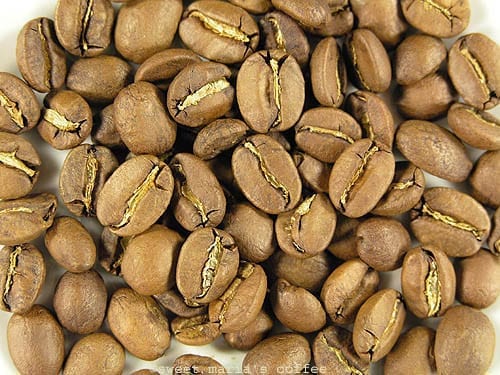
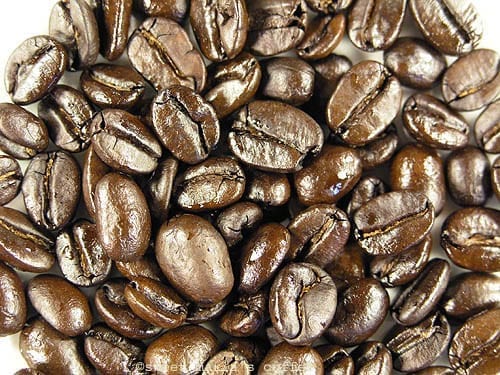
Yellowing: For the first few minutes the bean remains greenishA smell or flavor of fresh-cut green plants, vegetable leaves or grass, usually indicating fresh new-crop coffees that have not fully rested in parchment.: A smell or flavor... ...more, then turns lighter yellowish and emits a grassyGreenish flavor in the cup, usually indicating early crop, unrested coffee.: Greenish flavor in the cup, usually indicating early crop, unrested coffee. This is a fresh cut grass... ...more smell.
Steam: The beans start to steam as their internal water content dissipates. This is also known as the drying stage.

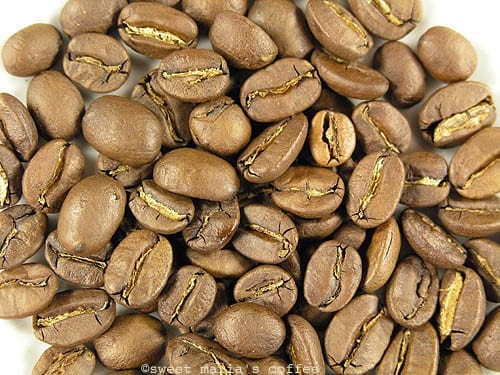
First CrackFirst crack in one of two distinct heat-induced pyrolytic reactions in coffee. It is distinguished by a cracking or popping sound in the coffee, and occurs between 390... ...more: The steam becomes fragrant. Soon you will hear the first crackAn audible popping sound heard during roasting. In coffee, one refers to "first crack" and "second crack," which come from two different classes of chemical reactions.: An audible... ...more, an audible cracking sound as the real roasting starts to occur: sugars begin to caramelize, bound-up water escapes, the structure of the bean breaks down and oils migrate from their little pockets outward.
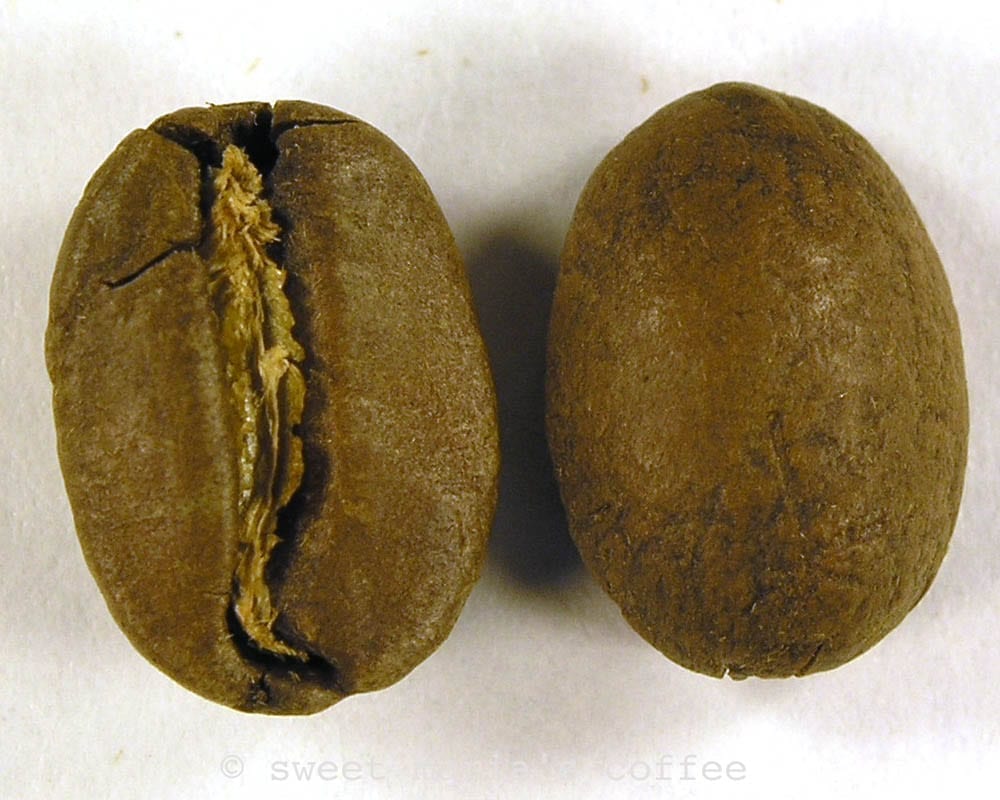
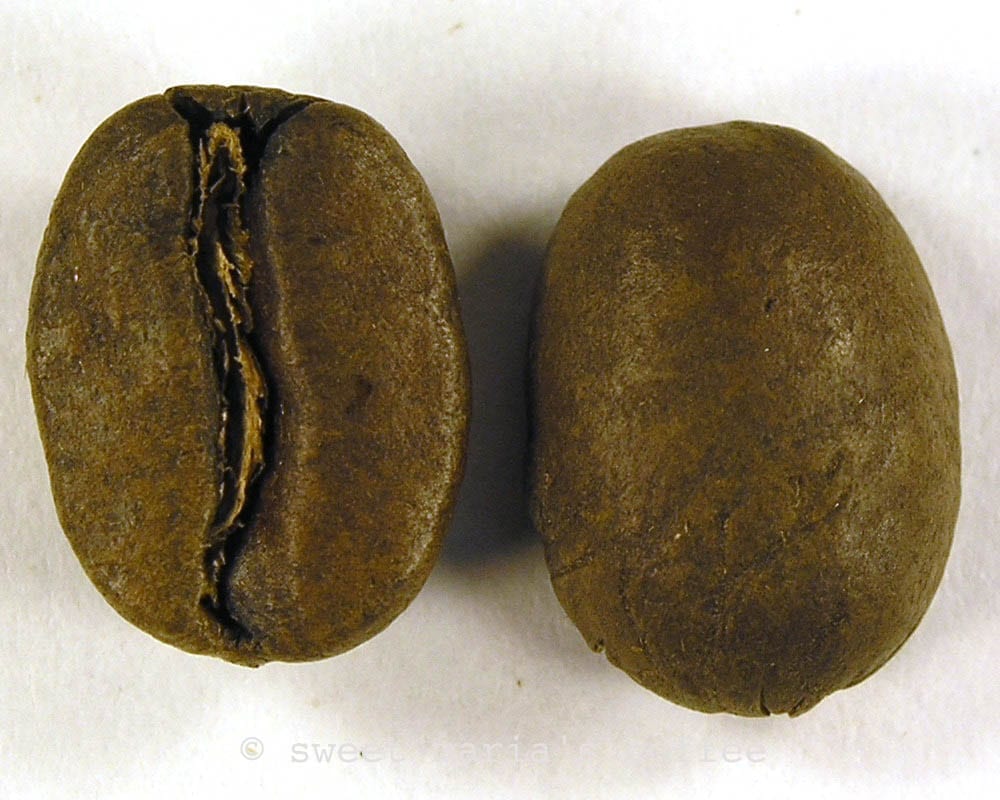
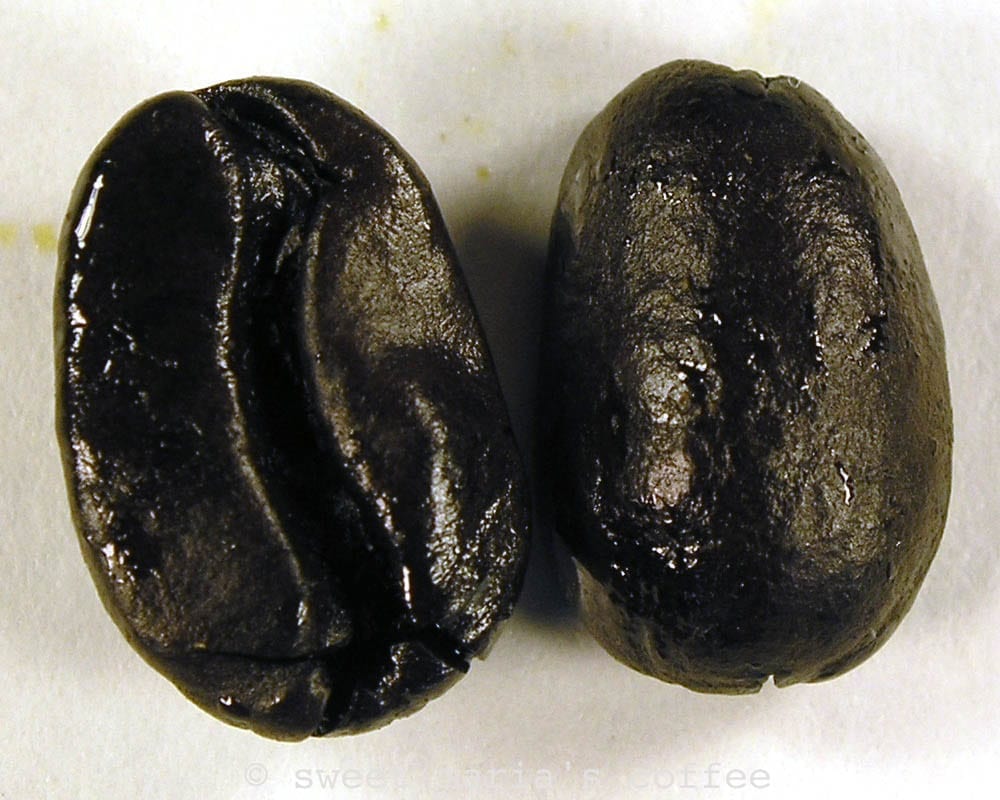
First Roasted Stage: After the first crack, the roast can be considered complete any time according to your taste. The cracking is an audible cue, and, along with sight and smell, tells you what stage the roast is at. This is what is called a City roastCity roast is what we define as the earliest palatable stage that the roast process can be stopped and result in good quality coffee. City roast occurs roughly... ...more.
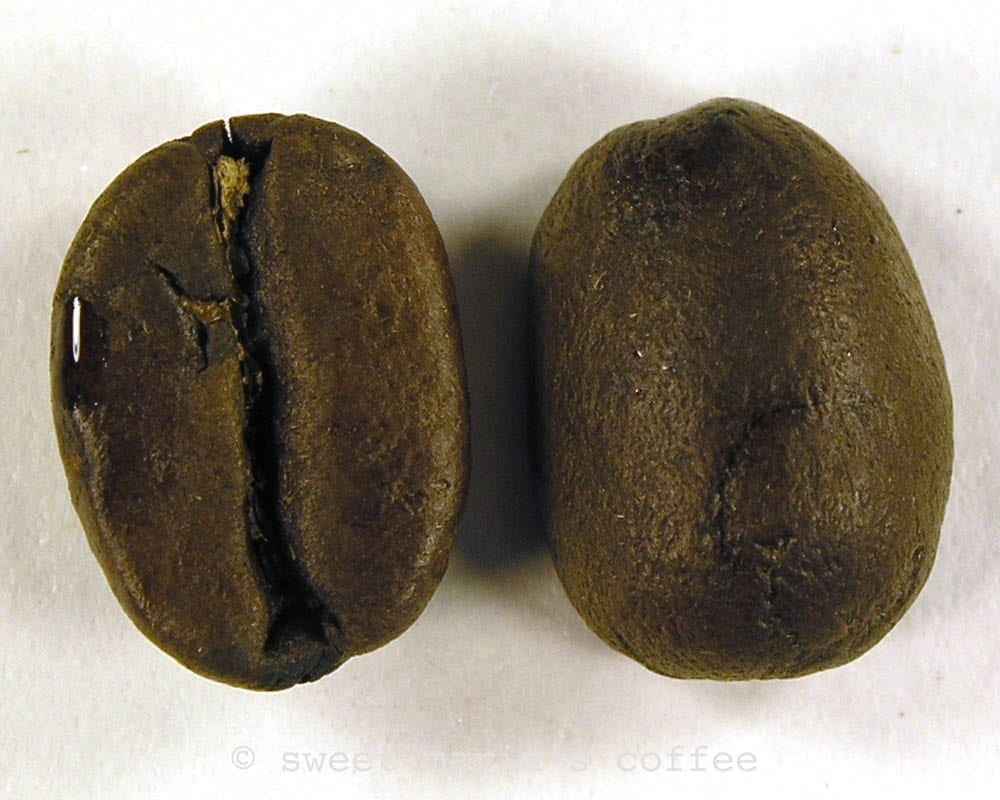
CaramelizationA reaction involving sugars that occurs during coffee roasting. A caramelized sugar is less sweet, but has greater complexity of flavor and aroma. Caramelization is slower than Maillard... ...more: Caramelization continues, oils migrate, and the bean expands in size as the roast becomes dark. As the roast progresses, this is a City + roast. Most of our roast recommendations stop at this point. When you are on the verge of second crackAfter First Crack, a roast reaction around 440 to 450 degrees that is distinguished by a snapping sound. Second Crack is the second audible clue the roaster-operator receives... ...more, that is a Full City roastA coffee that has been roasted to the brink of second crack.: A coffee that has been roasted to the brink of second crack. The internal bean temperature... ...more.
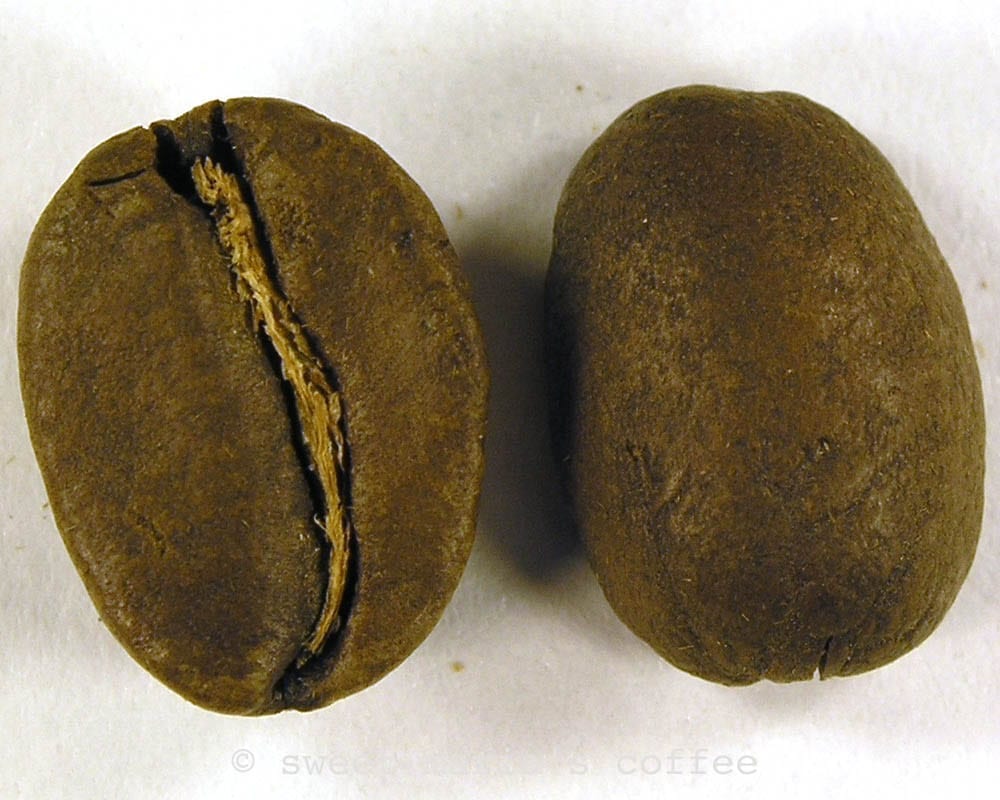
Second Crack: At this point a second crack can be heard, often more volatile than the first. The roast character starts to eclipse the originIn coffee talk, it refers to a coffee-producing region or country; such as, "I was just at origin." Of course "Origin" for most product we use is not... ...more character of the beans at this point and is also known as a Vienna roastVienna roast occurs at the beginning of second crack. The Vienna stage is where you begin to find origin character eclipsed by roast character.: Vienna roast occurs at... ...more. A few pops into second crack is a Full City + roast. Roasting all the way through second crack may result in small pieces of bean being blown away like shrapnel!
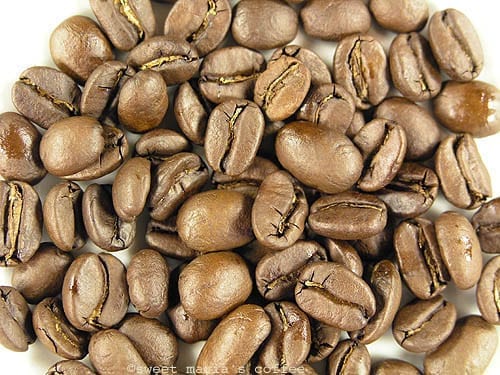
Darkening Roast: As the roast becomes very dark, the smoke is more pungentRefers to an aggressive, intense aroma or flavor, often related to spices (pepper) or roast tastes. Pungent foods are often called "spicy", meaning a sharp or biting character,... ...more as sugars burn completely, and the bean structure breaks down more and more. As the end of second crack approaches, you will achieve a French roastSugars are heavily caramelized (read as burned) and are degraded; the woody bean structure is carbonizing, the seed continues to expand and loose mass, the body of the... ...more.
Ack!! Too Late!: Eventually, the sugars burn completely, and the roast will only result in a thin-bodied cup of “charcoal water.”
Check out our Use All Five Senses to Determine Roast Level and Using Sight to Determine Degree of Roast pages for more detailed information.
And for basics on the coffee aspect, see out Green Coffee FAQ


119 Responses
This is a very confusing spot on your site. It would be easier to understand if it was played out as a chart. I can’t really tell what is being suggested between the Full City (City +), The Full City + (Vienna), and the French Roast. The coffee I roast become much larger during the 1st crack.
Thank for the suggestion. I realized the roast chart image was missing from that page for some reason but I re-enabled it. We also have another page about roast color changes, and the two are redundant: https://library.sweetmarias.com/using-sight-to-determine-degree-of-roast/
… but Karl, your comment makes me realize they need to be merged into a single page and update for clarity. Thanks for pointing this out! -Tom
Putting this here bc I dont think Sweet Maria’s has a forum for roasters. Im a newbie and could really use some help with my SR540! Im trying to capture fruit and floral notes in my beans but Im getting meh results. I usually roast to this schedule:
minute 1-3 @ Fan 9, Heat 9
minute 3-4 @ Fan 8, Heat 9
minute 4-5 @ Fan 7, Heat 9 (first crack midway)
~cool 3 mins~
I get mixed results, Ive never been blow away. I am lacking enough devp time? TIA!!
Hey Ed – the best place to reach out for troubleshooting/roasting tips is via our email, [email protected]. I might recommend starting with a lower heat setting and ramping up to slow development time a bit. This article has some helpful theory regarding emphasizing those fruity/floral notes in your coffee. On the brewing side, I’d also try experimenting with a coarser grind and higher dose. Hope this helps!
#1. Sounds somewhat like what I do, except, I turn the fan down (fan down = temp up) enough to get the roasting temp up into the 450 to 480 range and get to first crack. Once first crack is done fan back to 8 or 9 until temp drops to 400 to 425 range. Roast generally no longer than 12 min, 12 min is my basic roast time. I don’t favor anything approaching the burned/carbonized sugar taste or oily surface if I go too far. Fruity and floral are long gone if you get to this point anyway. I will dial back time on the fly if the color of the beans I am roasting get to a point I judge to be too dark or at any sign of oiliness, oiliness plays hell with my grinder. I make sure to get the fan back to 9 just before it goes into cool down mode. It seems there are lots of people that seem to think espresso beans need to be charred black and oily to make good espresso, me, not so much.
#2 Standard batch size for me is 8oz. anything else and the above is all out the window. I am also of the opinion that if you don’t use your roasted beans in 5 to 7 days from roast they’re pretty much done after that. You will have to start chasing grind settings at 5 days and at 7 days, for me anyway, it is impossible to grind fine enough to get a 9 bar/40-45 sec pour. I use a large double basket and dose at 24 grams shooting for 48-50 grams in the cup at 40-45 seconds. Any ways if I can manage all this it produces a fairly palatable cup, to me at any rate, way the hell better than anything I’ve had anywhere in my burg. I very well could be the one out in left field here as I have no standard reference of what actually is a world class cup.
So the take a way in all this is, don’t roast too dark and use what ever you roast in under 5-7 days, i.e. find a standard batch size and roasting profile, that lets you use what you roast in that window.
Of course the variables go up exponentially if you start considering the bean or beans you choose to roast. I roast blends of green beans, I am told this is not ideal, probably should roast bean varietals separately then mix and grind, but for me this ends up with beans that have all to often gone past my self imposed use by date and therefore I am not able to hit my ideal pour window. Roast then mix might work for “some” high volume coffee shops/roasteries but home roasters not so much. All the (few) shops in my burg don’t or can’t meet my one absolute criteria that roasted beans absolutely must be less than 5-7 days old. None have/had a roasted on date on their products. This is the prime reason I roast my own. Even the one shop that I had a relationship with and knew when they would roast, I still ended up with beans that were dead before I could use them all up. I couldn’t drink up a pound of beans in 5 days. That business went out of business as they couldn’t or wouldn’t charge/sell at prices high enough to break even much less make a profit. They absolutely would not sell anything less than what they though was perfection even though a good proportion of their customers were likely quite unaware of what a prefect cup could be, me included. Selling into a market who’s standard of perfection is Maxwell House instant crystals is like trying to climb Mount Everest in flip flops and a thong.
It’s interesting you keep the espresso fresher than 5-7 days max. I have more trouble with extraction on fresh roasts, so like to rest coffee at least 3-4 days. Maybe that’s the sweet spot for espresso when home roasting. Sounds like you have the method down to a science!
Hi Ed,
I don’t have the SR540 but this is what I do with my 1K gas drum roaster.
I start with a medium high airflow about 80% of max and high heat 100% at full 1K load.
At dry end (aprox 325F) I reduce the gas slightly and ramp up the airflow slightly.
Approaching first crack (380F) I reduce gas to a value that will give me the desired roast level
After first crack gets going (400F+) I increase air flow to final setting and reduce gas to finish as I approach the desired roast level.
I have roasted with an iRoast electric fan roaster which is similar — The problem is higher fan lowers the heat and lower fan gives you more heat. You want your highest heat in the beginning and ramp it down from there keeping enough heat to get through first crack in about 8-9 minutes (which is about the best you can do with a hot air roaster). It’s hard to stretch a roast out to a decent length with a hot air roaster but you should try to get at least a 7 to 8 minute roast by reducing the heat more aggressively (with what ever works best fan or heat setting) from dry end (yellow -325F) ~ minute 3 on. If you see a drop of oil on any bean time to kill the heat and cool, it won’t get much better. Good Luck
Yes Ross is exactly right – and it seems counter-intuitive at first… higher fan speeds lower the roast chamber bean temp. Less fan speed maintains more heat in the chamber. Also, adding more coffee can effectively raise the roast chamber temp as it block more exit air flow. Of course, if the coffee isn’t rotating sufficiently it will scorch so that needs to be avoided above all. Some people using air poppers simply resort to using more coffee but manually stirring the coffee for the first couple minutes until it spins freely on its own… That might work with the freshroast too, though it seems like a PIA
You may want to try a few minutes at the beginning with lower heat, more of a low and slow approach to let that flavor develop a bit redirection take the heat up high.
Also how many days are you resting after roast? Try adding another day then two and see if more flavor develops. You’ll find the sweet spot.
Yes good advice!
This is a pretty typical roasting schedule that I use. Note that I pay attention to the color, the bean loft and sound for the times, so these are merely ball park. I don’t really pay attention to temperature at all so far. Also note that I use an SR540 Fresh Roast with the extension tube which allows me to roast just a little more mass of beans (140g) and also there is much more movement of the beans for an even roast.
Fan Heat Time
9 4 0
8 7 1 If the beans are dense, I go a little longer above until they get some more lift
7 9 2.5
6 9 5 first crack complete – city
6 9 5.5 city+
5 9 6 full city
5 9 6.5 second crack begin – full city+
*disclaimer: I am still quite new to this roasting coffee for just over a month and perhaps 25 batches under my belt.
necesitas menos aire inicial para recuperar el calor desde el punto de equilibrio
So, I just did my first roast and my experience was not what I expected. Not sure I can tell the difference between first crack and second crack. To me it’s more like popping corn. first is gradual popping (cracking) followed by more cracking. So my question is, is first crack considered to be the first audible noise from the roast? I frankly would have no idea what 2nd crack is as this was not my experience. Can anyone shed more light on this for me?
Hi Jason – this is a really good question and a fundamental one to to roasting. It’s hard to identify something you haven’t heard before … plus the sound of the popper obscures it. I’ve described the sound of first crack as a pop, more like popcorn. In fact it actually is the same thing happening to the popcorn kernel and the coffee bean: water internal to the bean has reached boiling point and is turning to steam / water vapor. Of course popcorn is a bit more dramatic when it hits that same point!. Second crack is different, and for me the closest sound is when you add milk to Rice Krispies. It’s a shallow sound snapping sound. The problem with some poppers is the roast process goes so fast that first crack and second crack can blur together, so you might be facing that: Initially you hear this real popping sound but it transitions without pause to a snapping sound.
Your comment inspired me though: I made a short video today to try to document the difference in the sound of first and second crack. To get a clear recording, I roasted this batch in a skillet on a stove so there was no other sounds and the cracks were audible. I have to edit that though but just FYI I will post it this week.
Cool, I look forward to seeing this. Thanks for the response and clarification. I did my second roast today, still using a cast iron skillet at this point. Hope to take a look at using an air popper in the future. I went a few minutes past the first audible crack and not into the second crack. I think the results will be better.
Jason —
You have so much joy ahead of you! People will wonder how you learned it all, and will marvel at your coffee. I started like 20 years ago with a popcorn popper and some green beans from Sweet Maria’s and burned the popper and another one out and enjoyed every step. Still learning like a novice, though. This is a good place for tips. (Also equipment — just got my first “real” roaster and it is awesome.)
— Geoff B
could you please also write up a post about flavoring your beans after roasting them? I am trying to find what flavoring product to get and how to flavor my coffee beans to get chocolate cherry flavor for instance. I’ve read that you need to “soak” them in the flavoring oil for overnight but also I’ve read contradictory articles as well. Thanks
i don’t prefer flavorings but wife does; one pot and i drink it black and she uses the Monin flavorings
Hello,
I am a freelance writer working on an article about grinding times for coffee beans. I am in search of a table or list of grind times for different brewing methods, along with a weight measurement of the coffee beans. Any information that you can provide on this topic would be great. If you could respond by Friday afternoon, I would be most appreciative. Your company comes highly recommended by a specialty coffee company here in Mobile, Al.
Thank you!
Thanks for your question – I don’t think we can help and I dont think i have ever seen a chart of grinding times for coffee. The only thing that comes to mind is that old “whirling blade” type grinders from companies like Krups would tell you how long to push the button the get a certain grind. I think a chart would be very grinder-specific, part of info on a retail box. But the grind time for one machine wouldnt apply to another. Anyway I hope you find your info!
Thanks for this..all of this type of information helps the new guy like me; we know it’s just part of the journey but it is VERY helpful
Thanks – I am glad its helpful!
Maybe your roasting with the wrong kind of beans. try buying some Beans that have fruity and floral notes. I would Suggest Ethiopia.
My FreshRoast is a conumdrum, or love/hate! I love it because it has infinite options to roast; I hate it because it has infinite options to roast. I live where it is in the high 90’s, low 100’s daily. Of course everybodies AC is blasting and that drags down the line voltage to 118-118 during the day. So I have to roast at 6 am, which isn’t bad as it gets me out of bed .
But my question is about roasting dry process coffees, should I drag out the 1st craack a little? With variable voltage, every roast is a little different and I can’t tell whether its best to prolong the drying stage a little or hurry through it.
Any advice would be welcome,
thanks.
Mike Thompson
Hi Mike – yes that sounds like some extreme conditions for coffee roasting. For me the dry process tend to take a little more hear to get into first crack (also the cracks can sometimes be a bit harder to hear). So that in itself influences the roast profile, without really needing to make any adjustments to the roast machine. I think DP coffees tend to benefit from more rest after roasting. Sometimes I find the cup better 3 days after roasting than they do with 24 hours rest, IMO. With those kinds of temperatures (and assuming its dry climate) I would pay a lot of attention to storing green coffee in barrier bags or glass – it could dry out in storage, even in a couple weeks, if you don’t. (Same advice for very humid climates too – barrier storage is important!)
How long should beans outgas after roasting and before storing?
I think once it is cooled in can go into sealed storage – although it might build up some pressure in something like a glass jar. Nothing wrong with that!
I place my roasted beans in mason jars with plastic lids. They outgas without issue right inside the jar (gas can escape with plastic lids). That is where I rest the beans. 3-5 days and I grind the coffee and back into the same jar. Ground coffee lasts only two days max in my house (two coffee drinkers).
I roast 140g green beans at a time in an SR540 Fresh Roast with extension tube.
My cupboard usually has three or four pint mason jars with different roasts in it at any given time.
Thats interesting … I havent seen plastic lids for Mason jars. I will check those out. On my metal lid jars the fresh coffee would often bulge out the top!
This is very helpful! I’m trying to roast Arabica I hope this will work. I want my coffee to be made like this but I’m also thankful for the free espresso machine in the office.
Good morning Thompson,
I’ve been roasting in the Showtime with a hot air gun blasting in from a whole cut in the top of the oven and using a thermometer probe inserted into the oven through the side wall. The hot air gun can deliver either 800 or 1200 W . my beans are in a typical cylindrical basket that I purchased from Amazon for about $20. I preheat the oven for about 10 minutes until the interior temperature probe registers about 420 Fahrenheit. During the rosary will regulate the temperature by either opening the door or turning down the watts of the hot air gun.
Moka Kadir is my favorite bean at this time. my roosts often tend to be uneven with some beans a lot lighter in color than the others at the point after the first crack. I’ve tried slowing down the roasting process during the drying stage by keeping the oven temperature around 400 Fahrenheit. usually I get first crack at about 8 to 9 minutes. I have read online that actually I should probably be having a higher temperature during the drawing says, what temperature do you think I should be trying to keep oven at? I realize that these are not really the temperatures that the beans are at
If I do a roast with a higher temperatures for the first crack the beans come out very unevenly roasted with regard to their color. What suggestions do you have? Thank you
Hey Alan, sounds like quite a DIY setup! I’ve seen a few rotisserie coffee roaster setups, and so much about the configuration is conducive to roasting coffee. It sounds like you’re getting pretty good results with your current regimen, but I’d be happy to help dial things in with a little more info too.
To your question about what temp to warm up to, I think that’s going to depend on what type of roast you’re trying to achieve, and then of course, where the probe is located in relation to the heat gun. 420f reading on our Probat is likely a very different temp at the bean bed than 420f on your Showtime setup. 8-9 min first crack is a decent roast time for a small batch of coffee IMO. That’s about what you’d hope for in Behmor. How much time til 1st C at 420?
Conventional wisdom would have your starting temp higher than at the end. That really depends on the roaster though. But I would think in your case it seems like extending development time a little might help the beans find equilibrium, and some roast uniformity. That said, Moka Kadir is all dry process coffees, so I would expect some color variance unless going way into 2nd Crack.
What are your batch sizes like? Is there plenty of room left in the drum for the beans to shift around when rotating so that you get an even roast?
Thanks for writing in about your roaster. Hopefully you’re enjoying the results you’re getting with it, which is the most important thing!
Best,
Dan
I did my first roast but I think it was too long. I have a roaster and everything I read said 185 to start and increase to 225. Either my thermostat is wrong or I roasted too long. Any suggestions? I didn’t leave the roaster at all and I think I should have roasted a shorter amount of time.
Hi Bobby – those temperatures are pretty low, but it depends on how the thermometer probe is positioned in the coffee (or in the hot air stream). If its directly in the coffee, first crack should happen about 385 -400 f
Sorry, I should have specified.. my temperature is in Celsius not Fahrenheit. I think that was part of my issue.
Hello! My name is Sam, and I started home roasting over a year ago, using much of the information and videos Sweet Maria’s has made. I recently took a break for several months until I got (or made, with help) a more official roaster: based off of the Kaldi Mini roaster.
Anyway, in regards to optimal flavor, may I ask what would be the typical recommendation for degassing/resting a relatively dark roast (achieved some 2nd crack, and then stopped) to be used in espresso, as well as, a Moka pot?
Thank you!
Sam
Hi Sam – I think darker roasts benefit from a little more rest time after roasting especially for espresso. I have pulled shots from very fresh roasts (12 hours rest) and had really bad results, not only in flavor but in the physics of the shot. Just really bad extraction. Same coffee with 3 days rest, whole different result, and much better. Dark roasts would tend to degas faster as the coffee structure is fractured in 2nd crack. But for espresso etc, really benefits from 36-48 hours of rest!
Fun read, but I am too big of a lout to roast my own.
Beginning to get a small handle on flavors. Coffee shop lingo is over my head.
Eight O’Clock french roast is good enough for me.
Don’t spoil my coffee with additives, that includes sugar and cream.
Honestly, if you’ve found coffee that works for you, you’re already batting 1000! But should you decide to dip your toes into roasting at home, we’re here to help 😉
Thanks for taking the time to read our post David.
Cheers,
Dan
For clarity I am 85
I can tell you its never too late to start ROASTING :D..
I tried a couple of the roasters out there, the latest one I had was Gene Kafe. It was good, best one I had tired for sure but still a real pain. If you are slightly interested in roasting and have some money to play with I would recomend kaffelogic. They have a roaster they just made for the US and it can be as easy or as hard as you want it. You can start roasting beans with literally 2 buttons. You can go really complicated or just go with preloaded formula’s.
Im not gonna slam 8’oclock coffee but the beens SweetMarias sells are really good and then drinking them freshly roasted is absolutley amazing. Im 48 so I can’t have coffee late anymore but when I get home all I want is a cup of coffee because its just sooo good. I just ordered some green decaf beans which I hope give me the same satisfaction.
I say go for it!! get a roaster and see what happens… I send my family some of my roasts from time to time and they are so appreciative.. it’s really a fun hobby.
Hey, thanks for the kind words! The Kaffelogic roasters are quite nice. It’s nice to have the functionality options in any roaster, like you said! Not everyone cares to do the deep dive, but the ability to complicate things is there should you feel so inclined :-).
Glad to hear you’re enjoying the home roasting hobby. We’re with you 100%.
Best,
Dan
Hi David,
12 days short of 85 here. I enjoy roasting my own coffee. Sweet Maria’s has been my source of beans for years.
Paul
Happy early birthday Paul! While we appreciate all inquiries, testimonials like yours never fail to make our day. Cheers Paul, and hope your birthday is one for the books.
Best,
Dan
I upgraded from the red air popper to a SR800 and having trouble reproducing my results on naturals. Initially, I used a slower development and total time of 7-9 minutes trying to start cooling 30 seconds into rolling 1st crack. The result was flat taste and no fruit. I pulled out the popper to confirm that it’s a roasting issue and got good results with a total time of ~4:30. Roasting as fast as possible in SR800 (5-5:30) has helped but still not as good as the air popper. Any advice? Really looking forward to this year’s crop of Timor Dukurai Daurfuso- our favorite coffee so far.
Hi Shane. I think shortening the roast time is a good start, and should help achieve a more dynamic cup. 9 minutes isn’t long on some roasters, but I agree with shortening that overall duration when air roasting small batches like this. On our Popper (is a Coffee Roaster), I would shoot for 1st C by about 5 min, pulling around 1 minute after rolling 1st is underway.
What coffee are you roasting? What is it about the profile you’re getting from the Popper that you like better? That might help us give better advice to your specific situation.
I’ll just add that I’m always blown away by how nice some of my Popper roasts taste! My #1 recommendation to ANYONE looking to try their hand at coffee roasting. Great, low cost entry point with unparalleled visual access to the green during the roasting process.
Cheers,
Dan
If you haven’t already, consider getting the extender tube for the SR800 – It has been a game changer for our roasts!
Hi Taylor, thanks for the comment! We concur, and actually do carry it here – SR800/SR540 extender tube.
Cheers!
Dan
Hi! My husband roasts in the stovetop popcorn popper purchased from this website! I’m here though looking for some diy or store bought mid ranged priced chaff removers. We live in an apt and do not have the luxury of blowing the chaff outside. And I am tried of cleaning chaff from the nooks and crannies around my kitchen sink lol . Please help!
Hi Gail, thanks for reaching out! Unfortunately, that particular roaster isn’t really conducive to chaff collection by design. There isn’t an airflow circuit to move the chaff to a specific location, or lid to help direct the chaff, like a popcorn popper (though they aren’t that good at it!). One thought would be come up with a DIY shop-vac system that could somehow be positioned above the opening and turned on when the chaff starts to separate from the seeds. That could be a bit cumbersome though. You could check the pages at homebarista.com too, and see if someone there has come up with a solution. I’m going to ask around myself and hope to circle back with more info…
Cheers,
Dan
The newer SR 500 series roasters offer far more flexibility in choosing settings. This is good and bad. I’ve been air roasting for 7 or 8 years now. I’ve found the permutations and combinations of roasting settings to be maddening, and I am an engineer. I now tend to set the same fan speed and heat and a general time of 5.9 minutes which was the old SR 500 default. I set the fan to 5 and the heat to max at 9. Then I watch as the time gets to 5 minutes . If the roast is not dark enough then I extend the time in 30 second increments past 5.9 minutes. If it’s done early, I go to cool. Once it is visually to my taste, I go to cool and jack the fan to 9.
I’ve played around and this is simple and works almost all the time. I am also not a creature of habit and order the eight pound samplers every 9 or so weeks so I can taste more and more kinds of coffee. All have been good. The only meh bean to me was the recent Indian coffee which has very light and uninteresting taste to me which I added to an order.; Every sampler has been great. I’ve had hundreds of coffees from all over and these settings work pretty damn well. Decaf takes a little less time.
I offer this for the confused. It’s not that hard.
Hey Steve,
Thanks for the comment. I’m a big fan of keeping things simple myself, which echoes through my coffee roasting habits as well (brewing too!). Sure, it’s nice to have more control option at the ready. But I tend to find something that works for me, and stick with it. Glad I’m not alone.
Good to hear you’re enjoying our sample sets. When you add up the 1# price of all the inclusions, they really are a great value!
The Indian Arabica’s we’ve had have been pretty mild. I think the India you received was likely Araku Valley. I preferred a little more roast on that one to bring out the bittersweetness, balance out some of the subtle earthy notes. Definitely not a showy coffee though.
Thanks again for chiming in Steve.
Cheers,
Dan
Hi all, i’m trying to decide if I should roast my own beans.
Currently, I am ordering beans from the best roasters like Stumptown and Klatch, and they arrive within a few days of roasting. I enjoy the variety of roasts with different nuanced flavors. My wife likes a classic chocolatey tasting espresso.
If I buy the hundred dollar starter kit and invest three or four hours learning, will I be able to get flavors that are satisfying?
We think so! Your mileage may vary of course, as with any DIY hobby. Some of that depends on equipment, and a lot of it depends on the operator. When any of my friends ask about getting started, I always tell them to start with a popcorn popper. They are a low cost entry point to test the waters, and you can get really nice light-to-medium roasts from them. They are also probably one of the best learning tools as the visual access to the coffee is unparalleled, so you can see the roasting process as the coffee develops.
Here’s our must budget friendly Popcorn Popper ($24.00), or you can buy as a kit here for about twice that cost, and it comes with a bunch of coffee and extras.
Let us know if you have any other questions about getting started!
Cheers,
Dan
I use two 11-inch stainless steel salad bowls and a standard heat gun (high setting) to roast 300-400 grams of green coffee beans with a gentle circular motion, occasionally using the gun to stir the beans, until they’re light brown, past first crack but not second. Then the hot beans are poured back and forth between the bowls until the chaff has blown away. Perfect uniform City roast every time. What could be simpler than that? Ethiopian yirgacheffe reveals its floral character with this approach.
I love it. Heat gun roasting can be really nice when you have the technique down, as you do!
After a very long hiatus, I’ve started to get back into roasting again. Fortunately, I still have my Gene Cafe. When I was roasting several years ago I was doing quite well with it, having established a routine. But it’s been so long I’m coming at it as a novice. I get that you set the temp on high and reduce it after first crack, but I’ve forgotten what I reduced it to. Can you give me some idea, generally speaking. And by the way, I love the machine and recommend it highly. Thanks.
Welcome back! I do think you’re on the right path with the Gene Cafe in terms of starting high to get through the drying phase, and reducing temperature in stages towards first crack. But I think the level adjustment depends a lot on your line voltage and other factors like ambient temperature. I find 20% reduction usually works to have a nice controlled first crack … to slow things down to draw it out, but not stall the roast.
Been home roasting a long time. Started with the dog bowl heat gun method, then the hot air popper, then moved up to the turbo oven method now roasting on a Gene.
Thats great – I had done some videos about “heat gun dog bowl” because I think it can be great. My problem is that I am not very good at it. It takes a certain touch to get good results IMO.
Can I brew coffee or espresso with beans that have just been roasted? I’d think the answer is yes, but I’ve seen comments that people store them up to several days before brewing to allow for “off-gassing” or something and to allow the flavors to develop. This seems counterintuitive to me in the sense that the reward of home roasting seems to be to drink coffee from beans that are as freshly roasted as possible, but I may be mistaken here. Do you have any advice for whether it’s advisable to store roasted beans to allow the flavors to develop? Many thanks.
Hey Chip,
How long one waits to brew coffee after roasting is mostly a matter of preference. If you prefer the way your coffee tastes straight after roasting, go for it! That being said, many people do allow coffee to rest before brewing, especially if preparing espresso. When I was working in specialty coffee shops, we often found that blends reached peak flavor between day 3 and 7 and single origin coffees between day 7 and 14, post roast. That wasn’t always the case, but that was the general trend. Here at the office we usually try to wait 24 hours.
A more technical reason people may wait has to do with extraction. Excessive CO2 off-gassing can introduce turbulence into the brew bed and water stream when brewing, which can lead to inconsistencies during extraction. For espresso, the shots using extremely fresh roasted coffee were often “foamy” for lack of a better term. Again, this might be a characteristic the people really enjoy, but in my experience it isn’t a desirable characteristic. Happy brewing and extracting!
Just found this great forum. I have been a sweet Maria’s customer for several years. I have used two fresh roast machines, a gene café, and some other brand that looks like a toaster oven. The gene café worked great for about a year and then it Went up in flames and had to be discarded. The fresh roast SR 800 is fragile and much cheaper than the Gene café. but if you treat it carefully seems to put out a very consistent brew. Just don’t drop it!
As far as roasting technique, I start out on the lowest fan setting for about 10-20 seconds, then bump it up to nine to agitate the beans very briefly. I repeat this process throughout a total cycle length around 7 to 8 minutes until the smell and color seem right. If you know something I could do better, please let me know. I’m not that sophisticated and cannot tell first from second crack. It would be fun to be able to program temperature and computer profiles, but the cost would be prohibitive. My uniformity is probably not the best but my wife and I like what I’m doing. Thanks for being a fantastic supply and support team!
Well thank you for helping us do what we do, Kenneth! I hear you on the Freshroast – I have dropped the base, roast chamber and the chaff top at different times and it doesnt survive well (especially on concrete!) I learned to handle it with some care, the hard way. I think using the fan speed like you do is effective – the high speed to move the coffee and low speed to increase the heat. In fact the hold Hearthware roasted did this cycle automatically, and it was effective – but other things about that roaster design were not. Anyway it sounds like it is working well for you!
I am new to coffee roasting. I have the fresh roast sr540 and I was wondering what is a normal time frame for roasting coffee and why does some of my batches smell like bread and one smells like normal coffee. I typically like medium to medium dark roast with the occasional light roast throughout the week. I’ve only done 4 roast so far.
From your description it sounds like the “bread” roast is under-roasted? There’s a real grain smell from coffee that hasnt really entered first crack yet.
We have a page dedicated to roast color: https://library.sweetmarias.com/coffee-roasting-basics-color-changes/
We have a roast coffee color card to assist with this too: https://library.sweetmarias.com/sweet-marias-roasted-coffee-color-card/
At what point after roasting is it best to sample your work!
Ideally coffee rests at least 12 hours after roasting. We regularly have to taste sample roasts sooner though, but its best to give it an overnight rest.
Well, I found some Sweet Maria’s green beans in my closet. According to the invoice they are nearly 2 1/2 years old. Are these still usable? They have been kept in dark, fairly temp controlled (60-75 degrees) all that time. Thanks.
They are definitely usable, but will likely have “age” flavors at this point, which can come through as paper/cardboard. There’s no danger in drinking it though. I’m way too curious a person to throw them out, and would likely roast a batch to see how the coffee’s changed over time! If you decide to try them, feel free to reply back with your results 🙂
-Dan
Hello, all!
Home roaster and Sweet Maria’s customer for many years.
The Situation:
I used to roast only a pound at a time. However, I now live alone and want to roast in smaller batches for freshness. I roast exclusively for espresso and pull on a La Pavoni Professional. I typically roast Full City+. My favorite recent Sweet Maria’s beans include: Nicaragua Finca Buenos Aires, Altiplano Blend, Brazil Dry Process Pedra Branca.
Question 1:
Is there any danger or benefit (flavorwise) to roasting 8 oz. at the 16-oz. time, that is 8 oz. of green into the cylinder, but choosing the 1-lb setting, monitoring temps? I’m trying to get the most flavor from my beans, and I swear I can tell a difference in taste when I roast 8 oz. at the longer roast times. Am I nuts?
Question 2:
Can one tweak flavor profiles by choosing:
1. how late in the roast to hit first crack?
2. how much time exists between first and second crack? Is there a best practice here for espresso?
Idea:
It would be great to have a widget or app where the users can slide the first and second crack points on a sliding scale of time and have it show how it affects the flavor. Possible?
Thank you for your individual and collective coffee wisdom!
Hi Michael – this covers a lot of terrain! For 1. : yes the batch size is part of the roast dynamic. Think of the green coffee as part of the roast system. People who roast on commercial drum roasters are very aware of an optimal batch size for their machine, and even though they have control of variables (air flow, burner, drum speed), you will find commercial roasters using a particular batch size they have found that meets the roast characteristics they want – initial heating, browning, first crack etc, and gets them the cup they want. As far as 8 oz at 1 lb setting in Behmor, that’s what I use as my baseline all the time!
For question 2, yes these are important benchmarks. How long your development time is before first crack and the time between first and second, if you go to second crack, are important. Extending it a lot might be better for espresso, but taste a bit flat as drip / brewed coffee.
I have been a SM customer for many years now, although not a big spender. After a short experiment with hot air popcorn poppers I moved onto a simpler, more efficient method to roast my coffee beans. I use a wok on the side-burner of my outdoor grill. I essentially “stir-fry” the beans to my taste of Dark Roast. Lots and lots of smoke – sometimes making it difficult to stop in time but so worth it! I pour the hot beans into a colander and do a ceremonial dance around the driveway to separate the chaff from the beans. I cool them on a cookie sheet then store them in large peanut butter jars.
My garage smells like fresh roasted coffee for a week!
Just thought this comment may entertain you.
Pipp
Sometimes the simplest way is the best!
using the SR800. attempted roast with 150 gr, 160gr, and 225gm. goal is to produce a coffee with bright acidity. been buying africans and a few costa and guat. been relatively disappointing. I get fairly nice coffees but negligible acidity (pulled early – just into 1st about 20-60 seconds after.) just ordered 5lb Kenya Nyeri Chinga from Sweet Maria hoping a change in coffee will help. could use a profile that produces a good acidity – at least as a starting point….would be very useful to have Fan/Power settings and timeframe as well as time to stop after first and cooling time. asking a lot but would appreciate the help.
using the SR800. attempted roast with 150 gr, 160gr, and 225gm. goal is to produce a coffee with bright acidity. been buying africans and a few costa and guat. been relatively disappointing. I get fairly nice coffees but negligible acidity (pulled early – just into 1st about 20-60 seconds after.) just ordered 5lb Kenya Nyeri Chinga from Sweet Maria hoping a change in coffee will help. could use a profile that produces a good acidity – at least as a starting point….would be very useful to have Fan/Power settings and timeframe as well as time to stop after first and cooling time. asking a lot but would appreciate the help.
Hi snd thsnk for all the good work with coffee. Made me a lot weiser in the coffee world.
I would like to share my coffee story, if allowed?
Living in an old house, built in 1683. My late husband and i took a long timetravel ofcthe house and found out thar since 1874 a coffee company had been here. Our luch were we nanager to trace down relatives to the founder and some employees as well. So now i have for the fact the oldest recipies for coffee blends in this town. It still sell big time.
Some collegzes in this area had tryed to get the recipies behind our back but they did not succed. Not very pleasant. But loyal to friend the old family was. Do i am still going strong.
At that time it was not possible to pick a sungke estate. You need to take what was available and made the best out if it. “my grocer” succeded very well. When he started out there were 7 roasters in this littke town and when he passed away in 1922 1 was left. His! 2 of his sons took over and 3rd generation started in this bussiness 1952 and closed in 1983. One one in the family wanted to continue the company. The employed were ready but the boss would notcsell to them, too ridky he ment. Reason why: wacum packed coffee. Wgar a wasre if good coffee. But laughing last is not always the winner. Sales dropped fast not just fast but high speed fast. From above the sky to below the deepest grave in one week.
Lucky for us becsuse we hsve found a solid ground to stand on.
The best selling recipie was ablend of
Java 50
Columbia 25
Brazil 25 green bean plus 25 yellois beean (think this means old / aged beans)
All roasted individually and then mixed. Domething very new here. The rest of the roasters mix ahead do they just need 1 roast. Impossible recpie. Small and big beans rosted together can not work well. One of the reason for the succes. When he passed awy there was around 183.000 dkr in the free harbour in copenhagen equvalent to 35.000 $ at that time 1922 lot if money in denmark.
Cannot scroll up ind the field so sorry for evt. Misspelling. Hope you can understand.
Wow sounds like an amazing history of local coffee in Denmark.
Can an air fryer be used to roast coffee beans??
Our experience has been that the temperatures are a bit low in some types, but we have used the toaster oven type by adding a drum available on ebay etc. We do use air fryer to roast cocoa but that is done at lower temperatures than coffee. Here are the articles we have:
Air Fryer Coffee Roasting
Cocoa roasting
Hi,
I’m a lazy home roaster who just retired and wants to up their game.
I’ve been roasting for about 15 years. I have a Gene Cafe roaster, always use SM beans, and a MagnificaXS espresso/coffee maker. I did some experimentation with different roasts when I first started (made everything from grossly under roasted orangish beans to near charcoal that even Starbucks wouldn’t use) and then settled on what I think is FC to FC+. I have trouble hearing the crack over the drum roaster noise, so I am going by looks only. I usually set my roaster to 455 degrees and let it go for ~15-15.5 minutes, depending on the temp outside when I’m roasting. Looking at the temps on the roasting overviews you have, now I am wondering if that is too hot and maybe I am roasting it too fast. Everyone else here seems to be putting a lot more effort into controlling the temps throughout the roast. Am I missing something? Is this just a function of the different types of roasters or is there a benefit to modulating the temperature more? I usually watch the end of the roast (last couple of minutes) and if the beans start roasting too fast or get too dark, I will lower the temp or stop the roast and let the roast go into the cooling cycle. Usually though, 15 minutes set to 455 works just fine and my coffee tastes great to me, but maybe it could be even better.
Thanks for all the great info on the site! The new site design looks great and is much easier to navigate.
-Robin
Hi Robin, “Can I get more out the coffee” is such a common question, and one worth asking if you’re roasting coffee yourself. As it sounds like you’ve tasted first hand, there are definitely “sweet”, and “not-so-sweet” spots in every roaster :-), and part of figuring out what’s possible to get out of the coffee is just knowing what your roaster is capable of. With the Gene, I think the hottest approach is the best for anything close to full capacity. You don’t want to roast the coffee too long, and risk baking out sweetness. Behmor’s have a similar limitation, and I always find myself defaulting to the hottest heat setting to push things along. The most important thing is that you’re enjoying the coffee, and it sounds like you are!
Thanks for the great question, and congrats on retirement!
-Dan
Hello, I bought a Fresh Roast 800 starter kit about 5 months ago and have roasted just over 20 roasts. I have been learning a lot and making adjustments to improve results. Almost all of the roasts have been “good”, but I am looking to hone my skills in nailing the Full City level. While I think the color of the beans is good, I am seeing a range of 16 – 18% roast off, which I would like to reduce to around 14 – 14.5%. I have tried to shorten the roast and am getting to 1st crack in 6-6.5 minutes, which I think is pretty good. Any suggestions would be appreciated. I haven’t tried it, but I read one thread that suggested reducing temperature about 30 seconds prior to anticipated 1st crack. Thanks for your help!
Hi Mark, glad to hear you’ve been happy roasting on the Fresh Roast so far! That’s a great little air roaster, and the visual access afforded by the glass roasting chamber gives you a view into the roasting process, which is great for when you’re learning the ropes.
Dropping power before 1C is a great way to slow things down, and get a nice, gentle first C. I think 30 seconds is a good place to start. I would expect to see a lower moisture loss roasting to the same overall duration following this kind of approach. One other thing to note is that some coffees lose more moisture/weight than others. This is especially the case for ones with higher moisture content to begin with.
Hope that helps, and feel free to check back in with how things are going, or with any other questions!
Best,
Dan
My Behmor profiles options are way too comprehensive for me to deal with. I roast 1/2 lb at a time and for simplicity and fastest roast I start by pressing “1” (1lb setting), then “Start”, then “P5” for constant max heat, then “D” (fast drum rotation). I press “Stop” after first crack has been going for a time that I pick from experience with a particular bean and moisture content.
Anything more complex than this usually results in me making a mistake.
Do you think I am sacrificing anything really significant in flavors?
This sounds like a really good approach, honestly. I do very similar, but make some adjustments just before it starts first crack. I preheat the Behmor initially and like you I throw the highest heat at the coffee … scorching coffee in the Behmor is nearly impossible. The risk is roasting too long and “baking” the coffee. I don’t think you are missing out by using your technique
Thompson Owen, Thank you. That makes me happy. Even though the coffee is always good it’s nice to be assured I’m not missing out.
Hi there,
I set annual goals with my wife. This year one of my goals was to “learn something new”.
since i have always loved coffee (I started in college in the ’80s by drinking taster’s choice instant coffee in the Civil engineering student lounge).
So my goal this year was to learn how to roast my own coffee. My bride spoiled me by buying a Gene Cafe roaster for Valentine’s day and a variety of your beans.
first batch was a disaster because the roaster kept turning itself off. Finally, I realized the beeping at 390F was an “attention” alarm to make sure the roaster was being monitored. (They should really publish a new users guide that mentions that, i had to go online and read through some troubleshooting blogs to figure it out.)
Anyhow, i have the same issue as a previous commenter. The rotating drum and blower/fan are so loud that i cant hear any “cracking”.
Q: Do you know where the temp is measured on the Gene Cafe? is it somewhere inside the drum or where the air is heated?
Hello Chip,
The unattended safety switch can definitely catch people off guard to start. There’s another one when you hit 446 Fahrenheit to be aware of as well. The printed manual that comes in the box typically has an insert (in our current batch of Gene Cafes it’s on bright yellow paper) that explains how the shutoff functions, but we agree it would be even better if the main text and online manuals were updated as well.
There are two temperature probes on the Gene Cafe. There’s one on the inlet side and one on the exhaust side. The temperature you see on the display is from the exhaust side, so it is the temperature of the air as it is leaving the drum. I’ve been doing a lot of roasting on the Gene lately and I’ve been hitting first crack very consistently between 458 and 462 Fahrenheit. I also use, and I’m not kidding here, a paper towel tube as a sort of ear horn to help me hear first crack. Starting around 455 degrees I’ll put one end to my ear and the other end about a half inch from the Gene Cafe exhaust. It really helps me hear when the pops start but provides enough separation that I don’t burn my ear or the side of my face.
Happy Roasting,
Jarrett
Thompson Owen;
I picked up your fruit basket assortment of beans back in May or June of this year and have been enjoying trying the different beans. The fruit characteristics are certainly different in that collection, with the Rwanda beans having a very cherry component that remains even after two weeks of resting. The Ethiopian beans were not nearly as fruit forward, but showed a good dose of milk chocolate which I like a lot. The beans I have a question about are the Java Sunda Anaerobic Honey Puncak Sirna. Two days ago I fired up the Bullet, preheated it to 347 degrees Fahrenheit and roasted 8 ozs. of those beans to a final IBTS of 414 degrees. Yesterday, after a 24-hour rest, I ground up enough beans for a cup and tried it out. The mouthfeel was exceptionally thick and there was a strong taste of chocolate followed by a lesser taste of something like herbal or vegetal. Today, after a 48-hour rest I ground another cup’s worth of beans and this time things were quite a bit different. The mouth-feel while still somewhat thick was thinner. The main taste is now the herbal component with the chocolate taking a distinct back seat. Maybe the herbal is actually more a fermented fruit taste since I did smell that in the grounds. In any event the chocolate has really run for cover. I’m just wondering if I should be aiming for a higher finish temp to accentuate and keep the chocolate. I’ve never seen a coffee change so much from one day’s rest to two day’s rest, and before I roast my other 8 ozs. I would like to know if you have any suggestions. This coffee seems to have the potential to really exhibit chocolate…I guess I just need to coax it out.
I think what you’re seeing the in these coffees is very accurate – and part of the way fruit shows in coffee. Sometimes I think of “fruity” (like the anaerobics) and “fruited” like the fruit acidity etc in Rwanda. Anyway maybe its something that only makes sense to me. But the anaerobics do have a lot of potential chocolate bittersweet, and that can mask fruit to some degree.
I am looking for suggestions from this forum as to what I might be doing wrong. I bought several batches of green coffee, all with the smae flavor profiles – nutty, chocolaty, caramely….I roast with a SR 540 with the extension tube to get to high enough temperatures to get to first/second crack. Note that I use a stovetop Italian espresso machine to brew my coffee.
I recently did two roast batches – one with Liquid Amber and one with a Columbian green coffee. Below are the details of my two roasts. Result, not really getting any of the flavor profiles I was expecting. I took both roasts to Full City+. What am I doing wrong?
8/13/2025
Outlet 1563 watts
126 volts
Outside temperature 74
Time 3pm
Liquid Amber Espresso Blend
130g
Time Fan Power Temp
0 9 9
1 9 9
2 8 9 358
3 8 9 370
4 7 9 385
5 7 9 395
6 6 9 400
7 6 9 413
8 5 9 418
9 5 9 428
10
FC 5:45
2C 9:30
Columbia Narino Buesaco
160g
Time Fan Power Temp
0 9 9
1 9 9 400
2 8 9 412
3 8 9 427
4 7 9 440
5 7 9 450
6 6 9 443
7 6 9 440
8 5 9 440
9
10
FC 5:15
2C 8:00
Those roast numbers seem good – I think that the second one is definitely darker by temperature. But also the freshroast temperature from the control panel is difficult to pin down, as far as understanding exactly what it refers to. Maybe if you email a roasted coffee photo to me at [email protected] I could understand the roast level a little better
Thompson; I took daily samples of the Java Sunda over the weekend and what I have found is that with 24 hours rest there was heavy chocolate and medium earthiness and a really thick mouthfeel. With 48 hours rest the mouthfeel was a low medium, the chocolate was low and the earthy was medium. With 72 hours rest the chocolate was low, the mouthfeel was low medium, and the earthy was almost gone. With 96 hours rest the mouthfeel was low medium, the chocolate was low and the earthy made a comeback to low. This is a bean that had a very thick mouthfeel and absolutely screamed chocolate on the first day; yet it has toned down in all respects since then. I haven’t sampled it yet today; but based on the first four days I would think it has pretty much settled into what it’s going to be. I’m wondering if upping the finish to 425 degrees from the 414 degrees of this roast would cause the chocolate and mouthfeel to remain longer.
Interesting! Resting definitely matters, but also in tandem with the brew method and things like steep time etc. A little more roast might definitely give a stronger bittersweet characteristic, as well as higher sense of body. Makes sense to try that…
Thompson – Good point about taking pictures and I should probably have taken weight measurements as well. I will roast more beans (out of Liquid Amber and the Columbia’s) and report, but is there a reason I am not getting any chocolate, caramel, sugar from my roasting?
It might be the roast level – the weight loss measurements would definitely be a clue if so. 12% loss would be very light. 16-18 percent or more and I think you would definitely get those flavors to a greater degree
Tom – I roasted a 2nd batch last week (sent you the results) and it looks like the weight loss measurement is 17%. Still struggling with the flavors. Will try to control the brewing process just to make sure I am not messing up there – and watering down the coffee. Thanks!
Sounds like a good weight loss percentage for a nice developed roast taste. There might also be some benefit to wait 3-5 days for resting and then see. I like air roasts when they are fresh but certainly harder to extract in brewing with a lot of active off-gassing if the coffee is super fresh. For some more rest helps a lot with that.
Here it is three weeks later and the Java is regaining some of its thickness. The taste is a good mixture of fermented something and chocolate with very low acidity, except in the aftertaste where the acidity grows over a two or three minute span. This is maturing into a really nice cup, but it probably isn’t finished; so I’m leaving enough to try again at four weeks. I surely do hope you are able to get more of these beans this coming year.
Sounds interesting – honestly my home roasts never make it to 3 or 4 weeks. Often gone in 3-4 days!
Mine usually don’t last very long, either; but everything I’ve been reading tells me that anaerobic beans may need as much as four to six weeks rest to be at their best. So, my first roast of those and I decided to give them some time while I drink some Guatemala Antigua beans in the interim. If you can’t get the Java Sunda beans again I may try a small bag of Monsooned Malabar which are probably somewhat similar. I’m gravitating to thick, chocolate character in coffee, and would like a bit of nuttiness as well. This may require blending, something I may or may not try.
I think I stumbled onto something that maybe I should have known. If I grind these beans and put them in a sealed jar until the next morning I get the thickness and chocolate I expected from them. I keep reading that ground coffee goes stale within 15 minutes, but maybe that isn’t always true. Anyway…cheers! And if you have any other beans that are similar to these i would like to know.
Interesting! I think the main concern with pre-ground is the effect CO2 depletion has on extraction. Too much CO2 inhibits extraction, which is why we often let coffee rest/off-gas post roast (though I’m guilty of brewing straight from the roaster!). Grinding coffee speeds up off-gassing significantly, and the coffee loses aromatic compounds with it. Sealing the coffee will slow that down some, as long as the jar is airtight. I prefer to just grind as needed, but that’s just me!
Hope that helps,
Dan
Anyone have a good baseline schedule for roasting for espresso (455 deg Vienna)? I just got the SR800 and have no experience. Once I get the hang of it I can make my own adjustments. Thanks.
We are working on more material about freshroast roast profiles. Our basic approach is on our Tip Sheet (see downloads tab on this page: https://www.sweetmarias.com/fresh-roast-sr800.html) which is to start with a higher heat level and reduce it. With espresso you want a longer roast and more gentle heat, with a slower approach to the end of the roast, drawing out the time after first crack and before second crack
I roast with a Top Hot Drum Roaster. I like my roasts to be medium Light to Medium. I pour beans at 100% hot. When buzzer goes off, I pour 1/2 pound green beans. Wait for the lowest tempeture (104/105), drop to 90%. When beans get to 200 degrees, drop heat to 80%, with 25% air.
Leave 80% to 300 degrees, then increase fan to 50%. At First crack (Between 336 to 340 degrees, lower heat to 70% and air fan to 75%. Leave running to, between 354/350 and drop beans. The finish product is always between Medium Light and Medium. I follow this system even if I can’t hear first crack. Never failed me with over or under roasting.
I have inherited a 1600 and have run a few quarter pound amounts to some basically good results. Although the buttons all seemed to work on the dashboard for the system check…….. during the actual heating process I can’t get the C button or the D button [or change a program] to do anything……… Do I need a new control panel?
I’m trying to recall if the 1600 control panel had any distinctions from the more recent 2000AB model. I think those programs for C and D should work but there were some function changes between those 2 models. Best option is to just roast in manual mode – our Behmor Cheat Sheet makes those functions clear to enter manual mode etc.
Hey Terry, congrats on picking up the 1600! Mine is still going strong with many, many roasts logged on it (wish I’d kept count!).
Regarding the C and D buttons, if this is the base 1600 model (not the “1600 Plus”), these are the “Programs/Times” buttons used to change the overall roast time before starting the roast. To test their functionality, first select the 1/4# setting (or any weight), then press each of the A-D buttons and the time increment should change. If it doesn’t, there could be an issue with the panel. That said, if the +/- button works to add/subtract time, that’s really all you should need to use that roaster.
I rarely use the Programs/Times buttons to adjust my roast times. In fact, the functionality has changed for these buttons through the years. For example, for the 1600 Plus models on, the A/B buttons can be used during roasting to exhaust and roast chamber temps. Also, I want to point out that there is no “manual mode” setting or variable drum speed for the 1600, but we do carry the upgrade kit if you’re interested in those features. Not necessary, and really just a matter of preference.
Hope this helps, and glad to hear you’re already getting good results with the old 1600! Feel free to reach out with any other questions.
Best,
Dan
Hello.
By any chance does anyone have a sound clip or video of how the 1st and 2nd crack sounds on a Behmor 2000AB at 1lb for P1 roast level? I would love to validate what I hear if possible. I am a new roaster. Thank you!
Hi Shelly. You can hear our audio clips of 1st and 2nd crack here. They were recorded on an air roaster, but will sound the same on a Behmor. The main difference in audio will be the machine. I can say from experience that you can hear 1st Crack on a Behmor just fine. Hope you find these useful!
Best,
Dan
There will be for sure. Watch for the reviews so you can see if one sounds like it hits the mark for your personal preferences. I’d also watch for any of our Rwanda naturals. I think Gitesi will launch toward the end of the month, but all 4 are really nice, and I think you’ll find them similar to the Burundi lots.
Hello,
I’ve recently started roasting with a Gene Cafe. Prior to this, would purchase freshly roasted beans(within 3 days). I prefer a bean with floral or fruity fragrance and smooth finish, Ethiopian and Kenyan are examples. Finally, I brew on a Technivorn.
Having said that, I hoping for some roasting advice. In setting up my roast, I usually preheat to around 350 and roast at 464 until just after the beginning of first crack, usually 14-15 minutes. The results have been kind of flat and I’m wondering if my time temperature is right. I’m would to understand the affect of slow temperature vs high temperature has on the process. For instance
Would it be better to set temperature to 487 and go to cool down at first crack?
Any advice you can give me will be greatly appreciated.
Thanks
Hey Ted, we think you’re on the right track and maybe just need a few adjustments. Typically we’d ask some follow-up questions, but we’ll just share our basic process and let you fill in the gaps. We followed this basic profile for a roast of our Silvertone blend last week with really solid results that seem in line with what you’re looking for.
We would recommend a batch size of 200g. Once you get some good roasts under your belt you can make some changes to accommodate for larger (up to 225g max) or smaller batches, but 200g is the starting point we recommend. We don’t always pre-heat, but if we do it’s to 300F for 5 minutes. (Set temp to 300 and timer to 5:00). In our experience, pre-heating can sharpen the perceived acidity and “brightness” in cup, but in side-by-side blind tasting our staff have slightly preferred coffees roasted without pre-heating.
Once the pre-heat is done, we set the target temp to 476 and just let the roaster do its thing. Typically we get first crack when the temperature is around 468 – 470F, around 11:30 – 12:15. Once first crack is just starting to roll (a few snaps in rapid succession) we like to drop the temp down so the roast doesn’t run away from us. We will usually drop it back to 470 or 468 depending on how rapidly first crack is progressing. For a city+ roast, 1:30 to 1:45 of development time produces consistent results. For full city, 30 more seconds should suffice.
Once the cooling cycle is engaged, we use the E-Stop function to stop the drum and dump the coffee into an external cooler or colander, whatever you have. Make sure you have an oven mitt ready! Then we reinsert the drum and run a full cooling cycle to let the roaster cool down.
We’ve experimented with lower set temps, but for getting to first crack in a reliable time 466F seemed to be the lower limit. The coffee would hit first crack but it took awhile, so going with a higher set temp then dialing back at first crack seems to work best for us. Most of the challenge with the Gene Cafe is in managing the roast and temperatures from first crack and beyond.
Hopefully this gives you something to try that will yield results that are closer to what you’re looking for. Roasting is a journey!
Hi Jarret,
Thanks for your advice! I roasted your Ethiopia Dry Process Duromina Aba Bulg with a pre-heat of 350 deg for 5 min. Note: the actual machine temperature, after loading the roast chamber had dropped to 228 deg. Set machine at 476 deg and ran to the start of first crack, which came at 10 min and 468 deg. I dropped temperature to 468 deg for 1.5min then started cool cycle. Results were a City+ to Full City, with good floral fragrance and a small amount of chaff. Made the first brew with French Press and the result was delicious.
Hey Ted, thanks for the update! Glad our suggestions worked out.
Is there a cross reference chart that correlates between city designations and % weight loss?
There is! We sell cards with this info, but we also have good photos of them and plain text info here. The numbers are useful as guidelines. Type of coffee, starting moisture % and style of roaster can all make the numbers higher or lower at each roast level. So determining roast level is really about triangulating using weight loss, roast color, roast time, development, etc to arrive at a determination.