
In honor of the discontinued iRoast Coffee Roaster by Hearthware, and all that may turn up in thrift stores – we are keeping this information online!
An update on the new chaffChaff is paper-like skin that comes off the coffee in the roasting process. Chaff from roasting is part of the innermost skin (the silverskin) of the coffee fruit... ...more collector design, and the exhaust adapter…
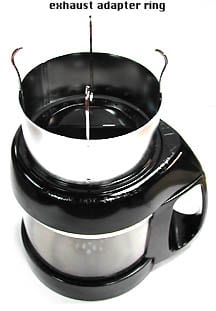
The i-Roast ships with a decorative chome crown … no really it is an adapter ring to allow you to attach an exhaust hose (4 inch diameter) to the i-Roast. Note that an exhaust system does shift the roast profiles. An exhaust hose can get HOT during roasting, so use this with great care!
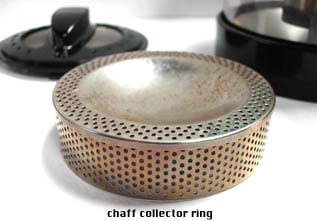
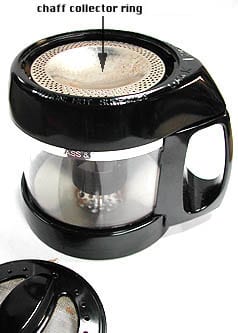
The i-Roast features a new design of the chaff collector ring, an insert that goes inside the chaff collector top. This is a great improvement from the prototype design I tested; who would guess such a small design change could make such a big difference. The new design has improved the consistency of the roast levels between different types of green coffeeGreen coffee refers to the processed seed of the coffee tree fruit. Coffee is a flowering shrub that produces fruit. The seeds of the fruit are processed, roasted,... ...more, some that produce more chaff during roasting, some that produce little to none (like decafs).
The new chaff collector ring fits in the top as pictured,


In a nutshell, here is the roasting process you will be observing:
- For the first few minutes the bean remains greenishA smell or flavor of fresh-cut green plants, vegetable leaves or grass, usually indicating fresh new-crop coffees that have not fully rested in parchment.: A smell or flavor... ...more, then turn lighter and emit a grassyGreenish flavor in the cup, usually indicating early crop, unrested coffee.: Greenish flavor in the cup, usually indicating early crop, unrested coffee. This is a fresh cut grass... ...more smell.
- The beans start to steam as their internal water content dissipates.
- The steam becomes fragrant. Soon you will hear the “first crackFirst crack in one of two distinct heat-induced pyrolytic reactions in coffee. It is distinguished by a cracking or popping sound in the coffee, and occurs between 390... ...more,” an audible cracking sound as the real roasting starts to occur: sugars begin to caramelize, bound-up water escapes, the structure of the bean breaks down and oils migrate from their little pockets outward.
- After the first crackAn audible popping sound heard during roasting. In coffee, one refers to "first crack" and "second crack," which come from two different classes of chemical reactions.: An audible... ...more, the roast can be considered complete any time according to your taste. The cracking is an audible cue, and, along with sight and smell, tells you what stage the roast is at.
- CaramelizationA reaction involving sugars that occurs during coffee roasting. A caramelized sugar is less sweet, but has greater complexity of flavor and aroma. Caramelization is slower than Maillard... ...more continues, oils migrate, and the bean expands in size as the roast becomes dark.
- At this point a “second crack” can be heard, often more volatile than the first. Small pieces of the bean are sometimes blown away like shrapnel! It can be more difficult to hear than the first crack though.
- As the roast becomes very dark, the smoke is more pungentRefers to an aggressive, intense aroma or flavor, often related to spices (pepper) or roast tastes. Pungent foods are often called "spicy", meaning a sharp or biting character,... ...more (oils burn against the hot surfaces of the roast chamber) as sugars burn completely, and the bean structure breaks down more and more.
- Eventually, the sugars burn completely, and the roast will only result in thin-bodied cup of “charcoal water.”
Our old tip sheet:
- •Roasting is fun. It’s as easy as you want to make it, or as exacting and technical as you care to be. Pay attention to the process, especially toward the end of the roast. The roasting process unfolds slowly at first as the coffee loses moisture and turns to a yellow, then tan color. But later in the roast, each few seconds that pass have a large influence on the flavors in the cup. You can roast too dark, burn the coffee and damage the roaster, so always be present while the machine is in use! o
- •Coffee roastingThe application of heat to green coffee seeds (beans) to create palatable material for brewing a great cup!: Coffee roasting is a chemical process induced by heat, by... ...more produces a wonderful fragrance, unobtrusive with light roasts but smokier if you roast dark. Operating any type of stove hood fan helps if the smoke is too intense for you. You can roast on a porch or near a partially open window weather permitting. But cold temperatures will severely effect the roast, and may make the roast stall completely.
- •Roasting produces chaff. Chaff is a fine skin that detaches from the bean as your roast is agitated. Your roaster collects the chaff, but expect a little to escape. Empty the chaff collector between every roast and brush it out to get perfectly consistent results. For safety, the roaster will not start if the roast chamber is not rotated into the locked position by turning the roast chamber clockwise on the base.
- •Built-up coffee oils in the roaster are of no real consequence until they impede visibility or become a fire hazard. (In fact, a professional drum roasterA roaster with a rotating drum that provides agitation to the beans, while a heating element (typically either electric or gas) provides heat. The metal drum conducts heat... ...more requires hours of roasting initially to properly “season” the drum.) Empty chaff between each roast- and SOAK THE ENTIRE CHAFF COLLECTOR ASSEMBLY IN DEGREASER PERIODICALLY TO REMOVE BUILT UP OILS- REDUCED AIR FLOW CAN OVER HEAT ANY ROASTER AND KILL IT.
- •Batch size is critical in any roast process; if the amount of coffee you put into the roaster varies, the roast will vary too. Ideally, it is best to roast by weight, not volume. We currently offer an accurate digital scale for this purpose. I have been using 130 to 150 grams per batch or basically 6 ounces by volume. This is not the same as what Hearthware recommends! So you might try both and see what you like.
- •The i-Roast comes with two pre-set programs. USE THE PRESETS FIRST as you get to know the machine. You can customize the roast times on either pre-set – You can add time to a roast that seems to be finishing too light (you can only add time in Stage 3 of the process), and of course you can always hit to COOL button to stop a roast early. To get the exact degree of roastDegree of Roast simply means the roast level of a coffee, how dark it has been roasted.: Degree of Roast simply means the roast level of a coffee,... ...more, it is always preferred to manually stop the roast (by hitting the Cool button) when you see, hear & smell the signs of that roast you prefer! Trust your ears and senses to get best results. Start out by setting long roast times and stopping the roast manually to get a feel for how the roaster is operating on your specific household voltage. (Yes, it makes a difference! Household voltage varies greatly from 106 to 130 in the U.S.)
- •I prefer to dump the coffee into a stainless mesh colander after the cooling cycle completes, just to get the coffee away from the warm metal/glass surfaces. When the coffee is room temp. I transfer it to canning jars. Coffee is better after 4 hours of “resting”, which allows the CO2 to de-gas from the coffee. It is at its flavor peak at 12-72 hours. When you open the jar, you will know what I mean!
- •This machine is for HOME USE ONLY – Hearthware makes that very clear in the instructions. You have to also wait for the roaster to cool between batches – the manual says at least 20 minutes – though some customers have told us longer.
- Hearthware provides a one year parts and labor warranty (shipping not included)- your order confirmation serves as the proof of purchase. Call them directly 888-287-0763 (ext. # 103) or if you ever have a mechanical problem with the roaster. And READ their instruction book!!!
Program Tips for the Hearthware i-Roast ver.6/04
Please note: As promised, this tip sheet is rapidly evolving as Tom uses this latest version of the machine and we get feedback from customers. Check back to the web site for the latest version.
Understanding the Program Temperatures and the Onboard Thermometer Readings: The i-Roast is truly a next-generation home coffee roasterA machine for roasting coffee. Or the person operating it! The basic requirements for a coffee roaster are a heating element that gets suitably hot and a mechanism... ...more because you can create your own roast programs. Use the pre-sets to get used to the machine function, and remember that you can customize the overall roast time on each of the pre-sets. To find out how to use the custom program function and to adjust the roast times on the pre-sets, see the i-Roast manual.
There’s a trick to using the custom program: the temperatures you program are not the temperatures you are going to read on the thermometer during the roast. This is going to take some getting used to, but after a few trials you will see the correlation. The actual onboard thermo temperature seems to be about 40-50 degrees lower than what you program. So when you set warm-up max temperature and you want to see 380, you will have to program in 430, roughly. But the other factor is the air flow pattern – if the roaster uses a high velocity air flow to maintain the program temperature you choose, it will tend to lower the overall roast chamber temperature. I like this for the first stage because it aids in even roast development. In fact, the i-Roast is the most even roaster I have seen for the early warmup stages, aside from $4000 professional sample roasters! I am still playing with the programs and seeing how different time & temperature combinations affect the roasters behavior in terms of onboard temperature readings and air movement.
***Please note – It seems that with later versions of the i-Roast 2 the on-board temperature and the programmed temperatures more closely match. So the information about seeing a temperature differential may not apply.
In general, programmed temperatures of 320-400 degrees are good for your warmup period and are not going to get the coffee into the first crack. Settings of 450-470 degrees are going to slowly get the coffee into the first crack range. (First crack occurs with onboard thermometer readings of around 375-380 on my test roaster). If you can avoid using the highest temperatures, 480 to 485, do so … but if you need them to get the kind of roast you are looking for then they are there to use! If these conflicting temperature settings/readings seems odd, remember that the numbers are not the important thing … what you want is for a coffee seed to progress evenly and steadily through the roast stages, not too fast or too slow. The i-Roast does that extremely well with the pre-sets, and with the custom programs you can truly get one-of-a-kind roast results. Don’t program a roast that has the seed advance to a stage of roast (such as the medium brown color the coffee achieves just before 1st crack) and then just stall there for a long period of time. Using your program, keep the coffee moving, slowly and steadily, through the roast stages. With darker roasts, try to have a “controlled” end of roast, which is indicated by a defined pause between the end of the “first crack” and the beginning of the “second crackAfter First Crack, a roast reaction around 440 to 450 degrees that is distinguished by a snapping sound. Second Crack is the second audible clue the roaster-operator receives... ...more.” (Another indicator is a slow and controlled sound of second crack, not a super-rapid, out-of-control snapping.)
What you are doing with the programmed temperatures is essentially lowering the fan speed so that less air moves past the coffee and it gets hotter as the roast progresses. A slower fan speed later in the roast is okay in some ways too – because the beans are less dense and moves better with a weaker fan.
Presets for i-Roast #2:
Preset #1 : total roast time 10 :00 min: 450 degrees for 10 min – This is the hotter setting – and I always stop the program early. There is a note in the I-Roast 2 manual stating that this program is designed to be used with half a batch – 70 grams. You can use a full batch, but be careful to stand by to hit cool.
Preset #2 : total roast time : 11:30 min Stage 1: 455F for 6:00min; Stage 2: 400F for 4:00; Stage 3: 435F for 1:30
Sample Roast Curves for Specific Coffees:
Here’s the roast curve that I use for almost all samples to get a City or City plus roast (which is considered a cuppingCupping is a method of tasting coffee by steeping grounds in separate cups for discrete amounts of ground coffee, to reveal good flavors and defects to their fullest.... ...more roast I know and is probably lighter than most folks like):
Total roast time: 9:30 min
- Stage 1: 350 F for 2:00 min
- Stage 2: 400 F for 3:00 min
- Stage 3: 460 F for 4:30 min
Island Coffees: Coffees from JamaicaJamaica coffee can be excellent mild, lush coffee... sometimes. Like Kona and Puerto Rican coffee, it is soft, mild, clean and well balanced when it is good.: Ah... ...more, HawaiiThe Kona district on the big island of Hawaii produces the best coffee from this state - clean, sweet and mild. : Ah, Hawaii... what a nice place.... ...more, and to a lesser degree Puerto RicoPuerto Rican coffee has the typical"island profile". These coffees, which include Jamaica and Kona, have a soft cup, not acidic, balanced, and mild. : I have tried other... ...more, have a lower bean densityThe density of a coffee bean is often taken as a sign of quality, as a more dense bean will roast more with a better dynamic. The density... ...more because these island coffees do not have the altitudes of such origins as KenyaKenya is the East African powerhouse of the coffee world. Both in the cup, and the way they run their trade, everything is topnotch.: Kenya is the East... ...more. They benefit from a lower initial temperature during the warmup time. Here is the program I am currently using for a City roastCity roast is what we define as the earliest palatable stage that the roast process can be stopped and result in good quality coffee. City roast occurs roughly... ...more:
- Stage 1: 350 degrees f for 3 min. ( = 310 f onboard thermometer reading)
- Stage 2: 400 degrees f for 3 min. ( = 360 f onboard thermometer reading)
- Stage 3: 450 degrees f for 3 min. ( = 375-390 f onboard thermometer reading) (It might be wise to make the last stage 3-4 minutes, then simply stop the roast manually when you reach the “degree of roast” you like – this is always the best method to target an exact degree of roast.)
BrazilBrazil is a coffee giant . As Frank Sinatra sang, "they grow an awful lot of coffee in Brazil".: Brazil is a coffee giant . As Frank Sinatra... ...more Coffees for EspressoA small coffee beverage, about 20 ml, prepared on an espresso machine where pressurized hot water extracted through compressed coffee.: In its most stripped-down, basic form, this is... ...more: Like the Island coffees, Brazils come from lower elevations. They benefit from a slower warmup and a longer overall roast. For Northern Italian Espresso I like this program, and you can use it for other light espresso roasts too:
- Stage 1: 350 degrees f for 3 min. ( = 310 f onboard thermometer reading)
- Stage 2: 460 degrees f for 3 min. ( = 370 f onboard thermometer reading)
- Stage 3: 470 degrees f for 4 min. ( = 390 f onboard thermometer reading)
Decaf Coffees: Since decafs produce little to no chaff, they will need hotter temperatures and longer roasts. Even this might not be enough. One simple adjustment to make is to reduce the batch size by 25 to 50%. I have found that about 30% reduction in the batch size will roast the same as a full batch of a comparable regular coffee, using the same roast settings. Another trick I have tried (and this applies only to these chaff-free decafs!!!) is to leave chaff in the collector from a previous roast of non-decaf coffee. I roast the decaf batch without cleaning out the collector and get good results.
Some additional thoughts:
A basic profile I am using is my lower-heat warmup profile. It benefits all coffees, and only causes problems with really dense seeds that need a higher initial temperature. Basically it is
340 for 2 minutes –this will give you a high speed air pattern to aid in really even initial heat distribution
390 or 400 for 3 minutes — this raises the temperature right to the verge of first crack
450 for 4 to 6 minutes — with most coffees, 4 minutes will give you a City Roast, 5 a Full City, and 6 gets you to the door of 2nd crack.
I think the best way to use the curves in the i-Roast is to regulate initial heat distribution. Air roasters, even the professional Sivetz air roasters, have never allowed a slower warm-up “ramp” and this is where you can cup quality by letting the coffee accept and distribute heat according to its physical limits, not forcing the heat on too quickly. Once heat is distributed from the core to the exterior of the bean evenly, then a higher roast temperature that allows the coffee to pass through the cracks can be applied. If this temperature is not too excessive, the cracks will happen in a slow and controlled way, with a clearly delineated pause between 1st crack and 2nd crack.
At first I thought I would be using the stages of the i-Roast program to regulate the finishSimilar to aftertaste, but it refers to the impression as the coffee leaves the palate. Aftertaste is the sensations gathered after the coffee has left the mouth. We... ...more of the roast, but realized through trial and error (and cupping) that this doesn’t make sense. The fantastic thing about programming a temperature over a period of time is to get the batch on the right “track” for the final finish roast temperature. As I said, no air roaster has offered this before, and despite the fact that the buttons and programming technique on the i-Roast is …well … lame, and despite the fact that the temperature you program is not the temperature you read on the onboard thermometer, the i-Roast is still a “next step” in air roasting because of this feature.
One last thought … don’t get hung up on overall roast times. 8 minutes, 11 minutes, 14 minutes … it DOES NOT matter! Roast times are only relative to the method of transferring heat to the coffee. Air roasts are not supposed to be as long as drum roasts because they have the ability to transfer heat rapidly in a high velocity air stream. A drum has to conduct and convect heat to coffee much slower to avoid scorchingPatches of discolored burn marks on the coffee bean, due to a high-heat roast environment or other roast error.: Scorching refers to a roast error that can be... ...more. With the i-Roast, let the coffee be your guide in programming curves. Watch what the coffee is doing, and adjust your curves to what you observe. If you blast it with hot air, and 1st and second crack blur together. make adjustments. If you stall it, and the coffee just sits there, not developing but being exposed to heat, then you are baking it … make a change. But a particular roast time is not a goal, and a 10 minute roast in one machine has not relevance to a 10 minute roast in another machine, not in terms of degree of roast, quality of roast, or cup quality. I hope this helps a bit… Tom
Hearthware i-Roast FAQ (Frequently Asked Questions)
Having answered a lot of emails in the past months about the i-Roast. If there is something not addressed below or elsewhere on this page, just email me – as I do update these tips from time to time. – If you have an idea for a FAQ that is not posted – let me know –Maria 10/25/04
Q: My roasters temperature read outs are below the differential that I was told to expect. Is there a problem with the roaster?
A: Some people have reported that the temperatures that they see on the read out are lower than expected, off not by 40 degrees but as much as 80 to 100 degrees. As Tom notes above, the onboard temperature reading on all the roasters is NOT the same as the bean temperature. While the temperature read out is handy, it is not the only information you need to use to gauge the roast. If the beans are moving through first and second crack, producing an even roast in about 9 to 12 minutes (see note on timing above) then you do not have a defective roaster, no matter what the temperature read out states. You ought to reach second crack by 8 minutes – for some roasters with some beans the time may be as short as 6 minutes, or as long as 8 minutes. All of this is within normal parameters. The temperature read out ought to be consistently off, so you should be able to compensate for any differential.
Q: The manual says not to roast outdoors, but what if I can’t roast indoors because of the smoke? While mild weather effect the roaster?
A: Ambient temperatures effect all the air roasters because they recycle air through the machine to cool it. So if the temperature outside is hotter than room temperature, the roast may go faster, and if cooler, then it may go slower. This seems to be the case even with a difference of 10 degrees either way. You can roast outdoors, but be aware that it effects the performance of the machine.
Cold Weather Roasting Question: When I go to roast, the roaster will not turn on but just clicks! What is wrong?
A: Since the weather has turned cooler in much of the country, I have heard from a lot of folks saying that they go to use the machine and it will not turn on. As noted above, THE I-ROAST IS VERY SENSITIVE TO AMBIENT AIR TEMPERATURES, AND BELOW A CERTAIN TEMPERATURE THE ROASTER WILL NOT TURN ON. this may be to to roasting outdoors or just in an unheated space like a garage. You can reset the machine by pressing the “preset 1” and “roast” button five to ten times. (Supposedly, hitting the roast button causes the machine to heat up slightly, so that allows the machine to get hot enough to start.) This does however make it very difficult to program the roaster – unless you let it run a minute, then stop and program a roast before the machine can cool. Storing the unit indoors before you move it outside to roast helps, also breathing on the sensor itself inside the air vent on the top of the base can trick the sensor. Ideally, you probably want to find a way to use the roaster indoors- using the vent attachment with a length of dryer hose to direct the smoke outdoors. See below for a note from a customer with more helpful information on this situation.
Q: I am trying to roast decaf coffee and the roast never gets dark enough, never reaches second crack. What should I do?
A: Roasting decafs is a challenge in this roaster. Because decafs lack enough chaff to block up air in the roaster, the roaster may not get hot enough to get a dark roast. There are a couple of tricks to try: 1) use less coffee, up to 1/3 or 1/2 less than a full batch, this ought to make the roast go faster and get darker; 2) save some chaff from a regular roast in the chaff collector so that can help block some of the air and heat up the machine; 3) remove the cylindrical chaff collector screen so that what chaff is present actually blocks up the top screens on the roaster. One person has told me that they blocked up the screens on the top of the roaster with aluminum foil to get the machine hot enough. This seems a bit dangerous because you could overheat the machine, but it did seem to work.
Q: My roaster is roaster way too hot, burning coffee and it looks like the top chaff screen is clogged with chaff. What can I do?
A: I have heard from a very limited number of people that the chaff collector cup (the clindrical cup with the concave top) is failing to stop the chaff and it is ending up blocking the top screens. This seems to happen when the top part does not press down hard enough and hold this piece in place. Some folks have been able to adjust this by placing washers to snug up the fit between the top of the chaff collector and this cup, providing a more secure fit. I have also heard from a person who came up with a remedy — that I posted below. I tried it and it worked great! Another customer told me that he used a flashlight spring on the underside of the lid and that seemed to work well. There is more than one way to skin a cat as they say (no offense to cats). Hearthware has also replaced maybe two chaff collectors for folks that I know of.
Q: I broke the roast chamber – can I buy a replacement?
A: Yes, Hearthware sells them directly off their site at www.hearthware.com We do stock replacement roast chambers – but not the chaff collector parts. Those are listed on this page below the oredr buttons for the roaster .
Q: The fan motor on my roaster seems to alternate between two speeds, faster and slower, throughout the roasting. Is this normal?
A: Yes- the fan ought to alternate between the two speeds during the roast, that is normal. In the early version of the roaster it alternated thoroughout the roast. In later versions – the fan speed alternates with the different stages of the roast only.
Q: Can I set the roaster and walk away?
A: No! You should never leave any roaster unattended! You want to be within hearing and smelling distance so that if the roast starts to get too dark – if there is a lot of smoke – you can rush over and stop the machine. Some coffees will roast faster than others, so it is best to never leave it unattended. That does not mean you have to stare at it the whole time, but you want to be on hand in a case the roasting times need to get shorter or longer. There is always a risk of fire any time you roast coffee – you want to be near enough that if the beans are turning into little charcoals, you can stop them before the conflagration begins!
Q: Do I need to clean the top screens on the chaff collector any more than just brushing away the loose chaff?
A: In general, brushing or blowing out the loose chaff ought to be sufficient, though once you have roasted a number of times, and roasted darkly with oils appearing on the beans, you want to look through the screens on the chaff collector lid and see if you can still see light coming through them. If the screens are blocked at all – this will back up heat in the roaster, making the roaster roast faster and, in extremis, can lead to too much heat and a melt down. So if you see any blockage of coffee oils on the screen – if is best to soak the screens and lid in a degreaser and scrub the screens clean. We have not seen this much yet with this roaster because it has not been out long, but it was definitely a factor with some failures with previous Hearthware machines. These screens have to be kept free of oily build up. If you can not see through the screen, that means it is not letting enough air flow through the roaster.
Q: The top lid of my roaster is loose and jiggles free during the roast – spewing chaff . What do I do?
A. In the latest manufacturing of this roaster we have seen a few chaff collectors that are not assembled correctly and this problem occurs. Hearthware suggests bending the clips that are inside the chaff collector (in the area where the chaff collector cup sits) slightly outward so that they hold the lid more firmly. This seems to be a temporary fix and I have a more detailed fix below.
Q: The whole chaff collector – not just the lid – seems to come loose when I roast. What can I do?
A: This is also something that has cropped up lately. It seems to be caused by two factors 1) the vibration of the machine and 2) not putting the chaff collector on firmly so it locks in place. I have seen some roasters that seem to vibrate more than others slightly – I am not sure what the long term prospects of this are but it seems to help to place the machine on a non-skid surface, like wood or something, so the rubber feet have something to hold onto. As for placing the lid on tightly – be sure to set the chaff collector on the glass roasting chamber so that the pointed part is just to the left of the handle (if you were above the roaster) and then slide it into place so the point matches the handle piece on the roaster. Also – this tip sent in by Steve Bellner of Kingsport TN might help – to make the chaff collector lock on tightly – you might need to adjust the metal band on the roast chamber – that has tabs that hold the top part on. Loosen the screw in the roast chamber handle – move up the band if the chaff collector is not sliding over the metal tabs, or move it down if it is, but is still wiggling loose. Retighten the screw and it ought to make a better fit.
Q: Why does the machine seem to ramp up and down or “surge” during roasting?
A: It is normal for the roaster to act that way. The reason is to keep the temperature where the user programmed it. When the fan is on low, the temperature is increasing, when the fan is on high, the temperature is decreasing. It is very hard for the roaster to stay at a consistent temp for long period of time. To help stay as close as possible to the desire temperature, the fan blows low and high depending on the ambient temp inside the roasting pot, the temp setting, and the amount of chaff that is produced. Because of these variables, there is no pattern when the roaster surges on and off. For example, if the temp is set at 420 F, the fan will blow low for most of the roast, when it gets above 420 F, it will start blowing high to get it back to 420 F. Also, within the first three minutes of any roaster or any roasting profiles, the temp will never go above 355 F and the fan will blow high during the first three minutes. The reason for this is to create an even roast. Every bean has different amounts of moisture so during in the first three minutes of the roast, the roaster is trying to sufficiently dry out all the beans so they will be at the same level. (Thanks to Paul Peterson of Portland OR for forwarding this information from Hearthware customer service.)
My i Roast Chaff Collector Lid is Coming Loose!
This is a fix for the very top part of the chaff collector, the Lid which has the fine screen in it. If this is clogging with chaff, or coming loose during the roast, you can reverse the screw pattern holding the screws (located underneath the rubber ring, repositioning them from the indented holes they arescrewed into, to the non-indented/flush holes.
In case you start to feel like you are working in Hearthware’s South Korean factory, don’t try this alteration. I can send you a fixed chaff collector or get yours back and fix it. But for those of you who are handy and what to understand why this lid is loose – like me- here is the solution I came up with:
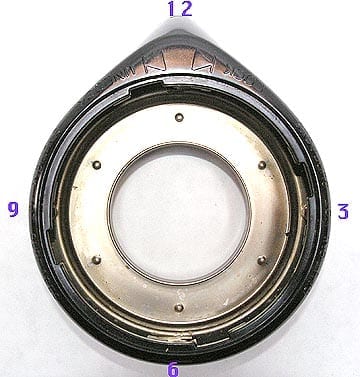
Here is the bottom part of the chaff collector, the part that attaches to the glass roasting chamber. For orientation purposes in the next 2 photos after this, we have assigned a 12 o’clock position (as well as 3, 6 and 9).
Reverse angle view with 12 o’clock at the bottom
Essentially what seems to be wrong is the metal clips that hold the lid n place seem to be in the wrong positions – if the pointed piece of the chaff collector is say 12 o’clock – the clips ought to be at 12 and 6. When the lid is too loose and not fitting right – they seem to be in 3 and 9. So what you need to do is follow the above instructions steps 1 and 2. Remove the clips. Then, attach the screws in positions 3 and 9 o’clock. Turn the chaff collector right side up again and you will see that to re-insert the clips so that they are in the positions of 12 and 6 o’clock, you have to slide one part of the clip under the plastic tab so that it is held back and in some tension around the post there. Then slide the base of the clip (with the hole in it) under the post so that you can insert and fasten the screw from the other side. I will get Tom to take a picture of this and post it because it is hard to explain in words entirely. But once the clips are put in there in these positions and put in correctly – it will be a much firmer fit. If this is too complicated – send it to me and I can fix it. Maria


Pin / nail to fix vibrating top
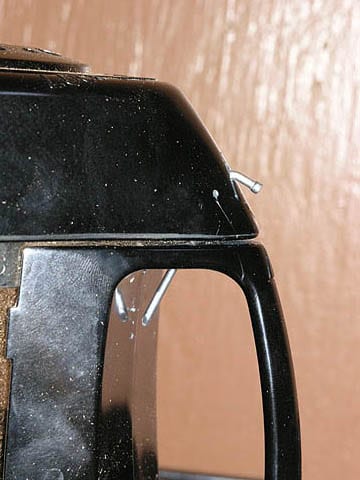
Problem #2 – the entire Chaff Collector vibrates loose from the glass roasting pot during roasting:
After using the roasted quite a bit, I started having a problem with the stock i-Roast chaff collector vibrating loose during the roast. This results in rapid air leakage from the roast chamber and dramatic under-roasting of the coffee.
I needed it to work and did not want to replace parts, so basically I drilled a angled hold through the plastic, bent a nail to form a “pin” that keeps the chaff collector aligned with the glass roasting pot … and voila- no more problems with vibration.
Quick Alteration to Chaff Collector for iRoasts that are running too dark. A suggestion from Marty, a Sweet Maria’s customer
I think I figured out why some iRoasts have loose fitting chaff rings. I had this problem until I read your FAQ section, and found the washer solution it worked OK but still did not fit tightly. So I took my chaff collector apart and I think I found the problem.
The metal base that the chaff ring sits on/in, was attached in the wrong screw holes. [NOTE: they are not in the wrong holes, since on machines that work perfectly the chaff collector is assembled the same way. But switching the holes will help a machine that is running too hot, where the chaff bypasses the collector, work more normally. – Maria ] There are 8 holes in the metal base, 4 that are dimpled (or countersunk), and 4 that are just plain holes. There are screws in the four countersunk holes and the rubber seal fits into the other four holes. The point is to change these – so that the screws are in the flat holes and the rubberseal fits into the countersunk holes. This might be clearer in a step by step explanation:
1. Turn the chaff collector upside down and pry off the rubber seal.
2. Unscrew the 4 screws (the metal base will now be loose) (The 2 screen locking clips, for the top, will also be loose)
3. Turn the metal base 1/8 turn and re-attach using the plain, flat screw holes (This will mount the metal base higher in the chaff collector, and in turn, move the chaff ring up and make a snug fit) Make sure to re-attach the screen locking clips at this time they ought to be directly across the base of the chaff collector from each other.
4. Re-insert the rubber posts, on the rubber seal, in the dimpled/countersunk holes. (The posts should now be in the dimpled/countersunk holes)
Not only does the chaff ring now fit snugly, the whole chaff collector unit seals better on the roasting chamber! I hope that this makes sense to you, if you take apart a chaff collector you will immediately see what I am talking about. I have had no luck with Hearthware, maybe you can tell them about this problem. I hope this helps, if you have any questions, I will be glad to try and explain this procedure further. Thanks Marty
PS – Hearthware has also suggested a different fix for this same problem – which involves bending the clips on the underside of the chaff collector up – so as to provide a firmer fit. I have not tried this – but another customer said that also helped get the chaff collector to fit more tightly together and so less chaff would bypass the chaff collector cup.
Cold Weather Roasting Tips from Justin Rounsefell 11/11/04:
I learned that there is a low-temp limit built into the roaster. It is set at around 65 degrees (F). I was trying to roast in an ambient temperatureThe temperature in a given room or space: This term is used to describe the overall temperature in a given environment, and is an important variable in coffee... ...more of about 63 degrees.
The manufacturer offered the following solutions…
1. Roast in a warmer location if possible.
2. Repeatedly bump the roast-button to gradually heat the roast chamber. (the low-temp sensor is near the element). It may take 10-15 tries to build up the temperature. (FYI – I tried this myself on a 58 degree day and it did not work with 20 tries.)
3. Store the roaster in a warm location (ie. indoors), fill/prepare the roaster in the warm location, then take the roaster to the cooler location and promptly start the roast. (FYI – this worked very well for me at 58 degrees outdoors – the indoor temp was about 70 degrees.)
Yet Another Cold Weather Roasting Tip – this time from Will Gardner 12/16/05:
“As winter took hold here in New England, I found my I-roast producing subpar roasts. As a solution to the problem, I found that if you use the hot exhaust air to maintain the intake air between 70∞F – 80∞F, the roaster produces excellent results. There are lots of ways to do this, but for now I am using a 4″ flexible aluminum dryer tube bent into a coffee cup handle shape that I hold in place with the opening about 2″-4″ above the exhaust of the roaster and the bottom of the tube pointing to the base. I have the base held about 1” off of the table by some wooden blocks and use a kitchen thermometer to monitor the temperature at the intake in the bottom of the base. “

