
A simple heat profile in Popper can yield some nice results, and a more balanced cup flavor.
After you have been using Popper is a Coffee Roaster a while, you might wonder if there is anything you can do with the settings to get different roast results, to change the heat or air settings to create “roast profiles.”
I have been doing a lot of tests lately to produce a varietyA botanical variety is a rank in the taxonomic hierarchy below the rank of species and subspecies and above the rank of form (form / variety / subspecies... ...more of roast profiles and evaluate what the differences are when cuppingCupping is a method of tasting coffee by steeping grounds in separate cups for discrete amounts of ground coffee, to reveal good flavors and defects to their fullest.... ...more the coffees side by side. With these tests, I am logging temperatures and energy usage by the Popper to record the path taken to achieve a particular roast level. In other words, you can roast a coffee to a similar roast level (measured by roast color, ending temperature, or weight loss from green to roasted coffee) but the way you got there, the temperature levels and durations, have an impact on the cup flavors. I can roast the same coffee and reach a finishing temperature of 440°F or a weight loss of 13.5% but they can taste quite different.
In short, that’s the importance of a roast profileRoast Profile refers to the relationship between time and temperature in coffee roasting, with the endpoint being the "degree of roast". Roast profiling is the active manipulation of... ...more. All we mean by a roast profile in this case is the time and temperature graph as it is recorded during the roast process, impacted by changes to the roaster settings. (And why is this called a “roast profile”? I have always assumed that the 2 dimensional X-Y axis graph, made by measuring bean temperature over time, forms an outline of the roast, like you might sketch a profile of a person’s face from the side. It is not the person, but it represents them.)
Take note: These tips all pertain to the latest production model of Popper, the “gray” machine. (The main bodyAssociated with and sensed by mouthfeel, body is sense of weight and thickness of the brew, caused by the percentage of soluble solids in the cup, including all... ...more is gray, unlike the black colorway of the first production runs of Popper). The gray model has a numbered heat dial; the black model has no numbers on the heat setting.
Cut to the Chase: Tips for Popper roast profiles
I want to give you a shortcut on how to approach roast settings on the Popper. You should take time to read the qualifiers and watch the video. But I also want to give a spoiler for those who don’t. (Come back and read to the end if my tips don’t work for you! I’ll probably tell you why…)
Each profile below starts with the same low heat setting of “1” on the heat dial for the first 3 minutes … and then there are options for progressively darker roast levels. ALL these roasts have the fan speed set to HIGH for the entire roast. We will have another article about using fan speed changes at the end of some roasts to raise the roast temperature. But let’s not complicate things with that now…
Start with a low heat level on Popper. Set the heat dial to “1” for the first 3 minutes.
- Air roasting is faster than other methods by nature, since the heat transfer in a rapid air stream is very efficient. But the initial heat bump in an air roaster is a bit of a shock, and the rapid development and bean expansion of an air roast can create a particular flavor distinct from roast processes with a slower hear transfer from the environment in the roast chamber to the green coffeeGreen coffee refers to the processed seed of the coffee tree fruit. Coffee is a flowering shrub that produces fruit. The seeds of the fruit are processed, roasted,... ...more.
- Using the “High” fan setting, start your roast on the lowest heat setting, “1.” It allows for a slower drying phase for the green coffee, setting it up for a more controlled finishSimilar to aftertaste, but it refers to the impression as the coffee leaves the palate. Aftertaste is the sensations gathered after the coffee has left the mouth. We... ...more at the end of the roast.
- All the recommendations below include starting your roast with 3 minutes at heat setting “1,” and then making adjustments.
- All the recommendations below assume fan speed is set to HIGH for entire roast.
- We assume you are weighing your batches and using the exact same amount in each roast, always!

1. For a lighter City roast, adjust the heat setting to “2” at the 3 minute mark.
- 3 minutes at “1,” 4 minutes at “2”: You might find that changing the heat to “2” is all you need to do… and let the roast play out until it goes into cooling at the 7:00 mark (3:00 on the count-down timer). Yes, it’s not much of a roast curve in terms of being complicated. But what we really want in roasting adjustments is to find the simplest path to the desired cup. Complicating things unnecessarily is just purely affect, and without substance. Let’s keep it real!

2. For a more aggressive approach to reach City+ level, adjust to heat setting “3” at the 3 minute mark, then reduce to “2” at the start of first crack.
- 3 minutes at “1,” 2 minutes at “3,” 2 minutes at “2”: Depending on your electrical line voltage, and corresponding wattage, this approach might work best for most people. You can use the “3” setting to push the coffee into first crackFirst crack in one of two distinct heat-induced pyrolytic reactions in coffee. It is distinguished by a cracking or popping sound in the coffee, and occurs between 390... ...more. Once you confirm first crackAn audible popping sound heard during roasting. In coffee, one refers to "first crack" and "second crack," which come from two different classes of chemical reactions.: An audible... ...more is under way, back off to “2” to allow for a controlled, prolonged first crack.

3. For Full City roast level, getting a few second crack snaps at the end, simply extend the time of the previous profile.
- 3 minutes at “1,” 2 minutes at “3,” 3+ minutes at “2”: If you want a darker roast level, you might find than holding the roast longer at the “2” setting at the end gets you where you want to be. Adding 1 minute for a total 8 minutes of roast time works great to get a balanced darker roast profile.

4. For espresso, extend the roast by 2 minutes or so, using heat level “2” to slowly reach towards City+ or Full City level
- 3 minutes at “1”, 6 minutes approximately at “2”: It’s said that using an air roaster for espressoA small coffee beverage, about 20 ml, prepared on an espresso machine where pressurized hot water extracted through compressed coffee.: In its most stripped-down, basic form, this is... ...more is difficult, but this approach to slowly edge the roast upward toward around 445°F has resulted in some outstanding balanced shots for me. You will be extending the roast time a couple minutes beyond the default 7 minute cycle here.
Alternative to Heat Profiling: Keep it simple and don’t change anything!
I find the above heat profiles to produce a very balanced cup profile, and one that tastes more like a slower drum roast method than a fast air roast.
But for filter drip coffee and pour-over methods, faster roasts with more initial heat are really delicious. They tend to produce a more dynamic cup, with more “bass and treble” while having less midtones. Plus, it’s less work too. All these roasts have the fan speed set to HIGH the entire time:
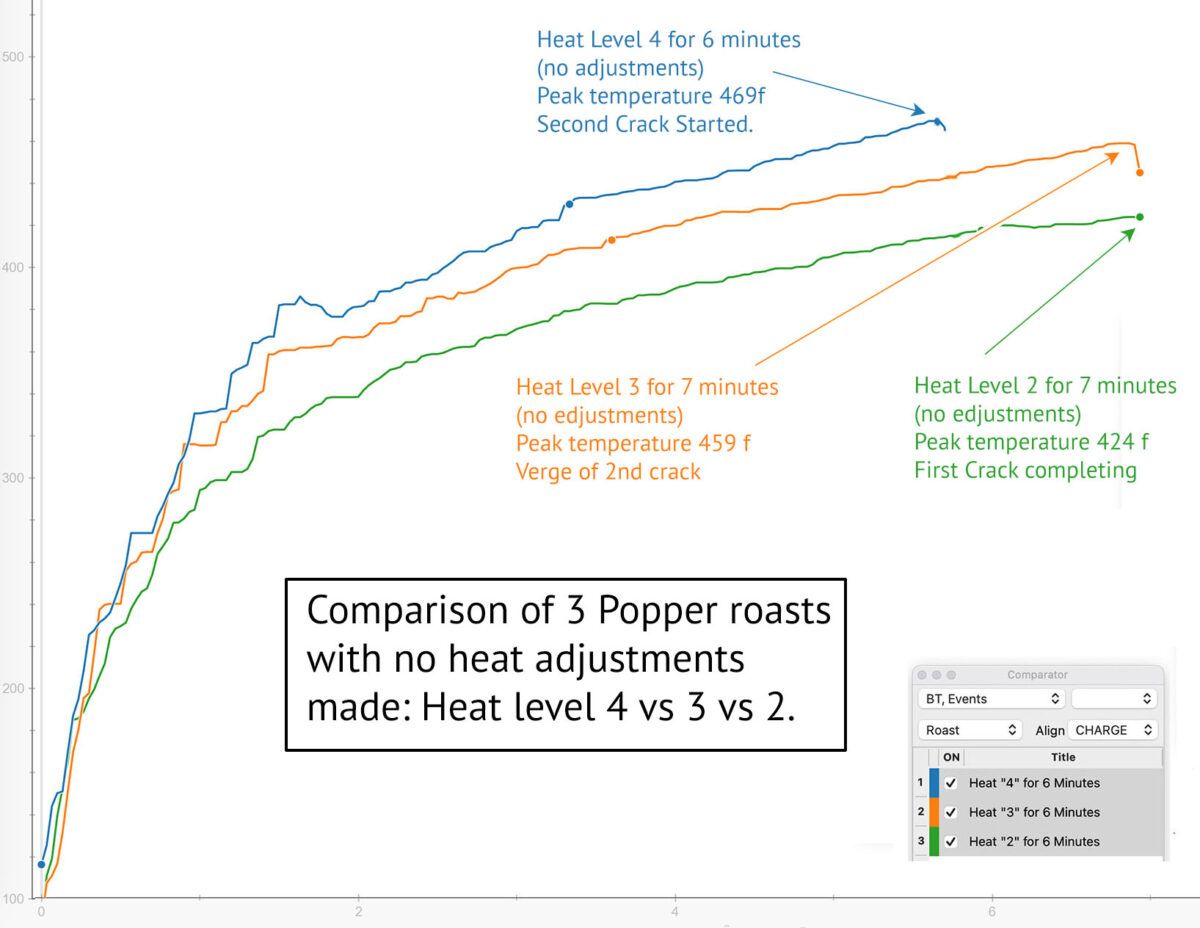
- Heat Level “2” for 7 minutes: This consistently produces a nice City roastCity roast is what we define as the earliest palatable stage that the roast process can be stopped and result in good quality coffee. City roast occurs roughly... ...more that shows the “originIn coffee talk, it refers to a coffee-producing region or country; such as, "I was just at origin." Of course "Origin" for most product we use is not... ...more character of the coffee very well. It should use 810–820 watts, First crack starting at 5:00 to 5:30, with about 1:30 of development time, and an ending temperature of 424°F. The cup character is bright and lively as pour-over, after 2 days of rest!
- Heat Level “3” for 7 minutes: This setting gets considerably darker, even a couple snaps of second crackAfter First Crack, a roast reaction around 440 to 450 degrees that is distinguished by a snapping sound. Second Crack is the second audible clue the roaster-operator receives... ...more at the end. It’s a Peet’s style roast, Full City+City+ roast is an ideal roast level that occurs roughly between 425 and 435 degrees Fahrenheit in many coffee roasters with a responsive bean probe where First Crack... ...more, and a lively, tangyAn adjective modifying a flavor descriptor, describing a sharp effect; tangy citrus, tangy bittersweet flavor, tangy green apple. ...more dark pour-over cup. Heat level “3” is drawing around 950 watts to get these results. First Crack starts at 4:40 or so, and at 7:00 I am seeing 459°F bean temperature reading.
- Heat Level “4” for 6 minutes: This is a faster roast, and I need to end it at 6:00 because it’s in Second Crack and getting dark already at that time. This is also something you might find at Peet’s or Starbucks, but fresh, so far better! It’s tangy, a little carbonyA roast-related flavor term, referring to burnt flavors from dark roast levels. For some this is a pleasant flavor if residual sweetness is present, but plain carbon flavor... ...more and dark. First crack can start as soon as 3:30, while drawing 1050 Watts of power. Finish at 6:00 and 469°F with second crack starting.
Shortcut Recommendations by Roast Level
City Roast (Light): Simply setting to Heat Level 2 and fan on High produced an excellent light roast in 7 minutes. If that roast is too light or barely reaches first crack in 7:00, you might have slightly lower voltage and need to bump it up to level “3” heat.
City+ Roast (Medium): Fan on High, Heat Level 1 for 3 minutes > Heat level 3 for 2 minutes > Heat Level 2 for 2 minutes. This was the best roast for slightly more development then City roast without getting too dark.
Full City RoastA coffee that has been roasted to the brink of second crack.: A coffee that has been roasted to the brink of second crack. The internal bean temperature... ...more (Medium Dark): For brewed coffeeBrewed Coffee refers to all coffee preparations produced by adding non-pressurized water to coffee grounds. Contrasted with espresso coffee, which is produced under pressure, brewed coffee is primarily... ...more, I honestly thought that using Heat Level 3 for the entire 7 minutes was a great, lively FC or FC+ roast! To get this roast level for espresso, I would see the rec. below and just add a bit more heat at the end.
Espresso: We like lighter roasts for espresso, not too ashyThe smell or taste of ash, such as an ashtray, cigarette smoke, or fireplace. Often a roast defect.: A quality in aroma or flavor similar to that of... ...more / dark. We had outstanding shots (that didn’t scream out “air roast” too) with this: Fan on High, Heat Level 1 for 3 minutes > Heat Level 2 for 6 minutes. Easy, with a slow RoR and lots of development time after First Crack. If you want it darker, you can add more heat with level 3 for a bit, or actually reduce Fan Speed to Low after first crack is finished.
Voltage and Temperature Variables: Why you might need to diverge from my recommended profiles
Some people have different voltage conditions or roast in a colder climate. If that’s applies to you, consider adding +1 to my heat setting recommendations across the board.
Like all roasters, Popper performs a little differently based on the energy it is fed by your outlet.
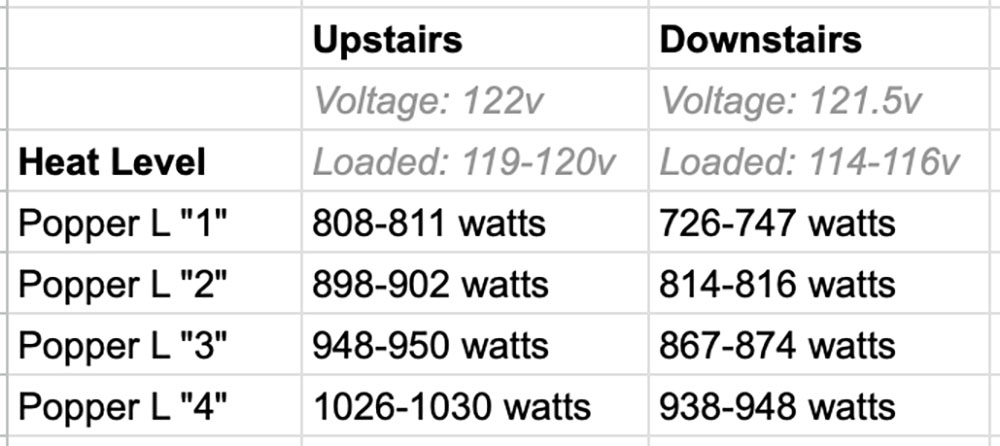
Every Popper we are shipping has been calibrated before we send it out. We test each one with 90 grams of a standard washed coffee to be sure we are seeing the same bean movement. But this has made us very aware of a factor that results in different people getting slightly different roast results: your electrical outlet.
We always check the voltage, the voltage drop (what is measured after the roaster is started), and the watts consumed at various settings. Even in our warehouse, we see a variation between the upstairs cupping lab and our downstairs testing room. Upstairs is closer to the electric panel, downstairs is further away. Although we often measure 122–123 volts before starting the roaster at both locations, upstairs dips to to 119-120 under load, whereas downstairs can go as low as 116 volts.
We think the variation we see within our own facility represents the range that might be experienced in the homes of Popper users. The resulting wattage is quite different for the various roast settings.
What that means is people with electrical supply more like our downstairs outlet should likely increase the recommended settings by +1. So you want to do the initial 3 minutes of roast at setting “2,” not “1”.
Ambient temperatureThe temperature in a given room or space: This term is used to describe the overall temperature in a given environment, and is an important variable in coffee... ...more (including even humidity and altitude) can impact roasting. If your roaster is taking in cooler air, such as an early morning roast versus one in the afternoon, you will likely need to boost your heat settings. We find that the electric supply to the roaster is the number one variable people encounter.
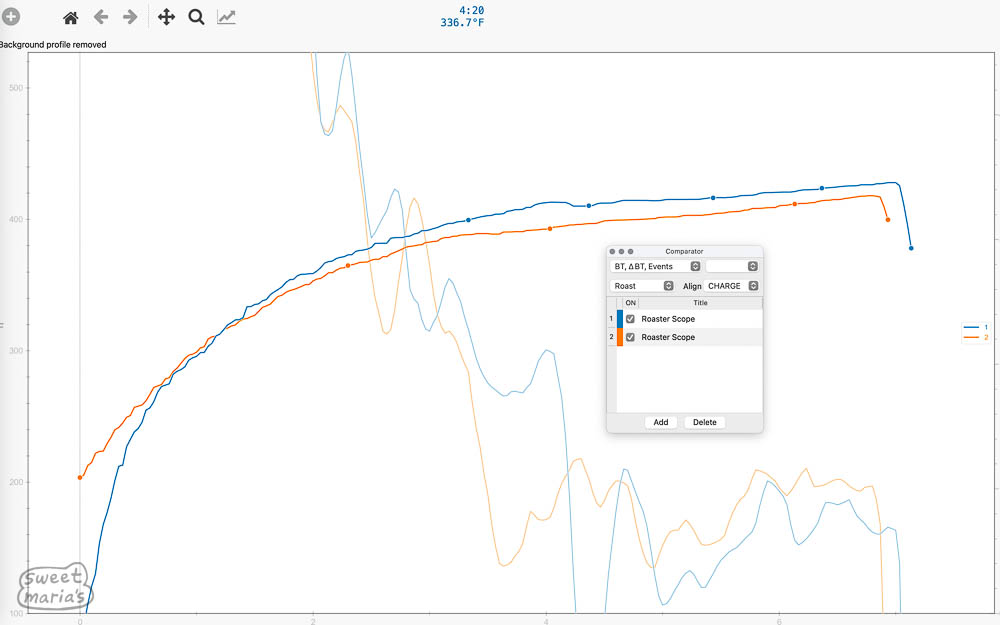
How do these roast curves compare?
Here is a comparative graph of the “straight roasts” where no heat level changes are applied.
Between the one where heat level “2” (light City roast) and heat level “3” (Full City+ roastA roast slightly darker than Full City. At Full City+, the roast is terminated after the first few snaps of second crack. The main cue that distinguishes the... ...more), there is a dramatic difference in the roast level and style.
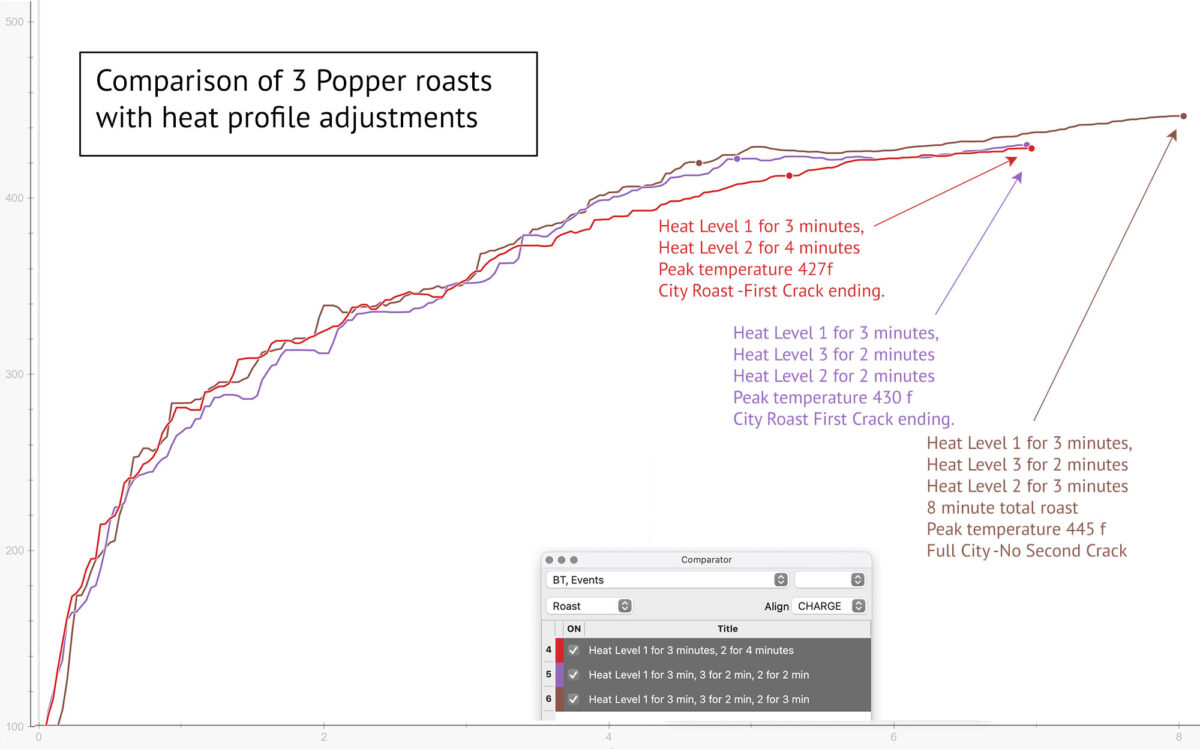
Below is a comparison graph of the 3 roasts with heat profiles applied. It is remarkable how they can end at the same final temperature but taste different in the cup.
The roast marked in red cupped lighter and brighter than the roast in purple, but ended at nearly the same finish temperature at the same time. For the roast in brown, which had a delicious darker roast level, simply +1 minute continuation of the roast in purple was the way to achieve this.
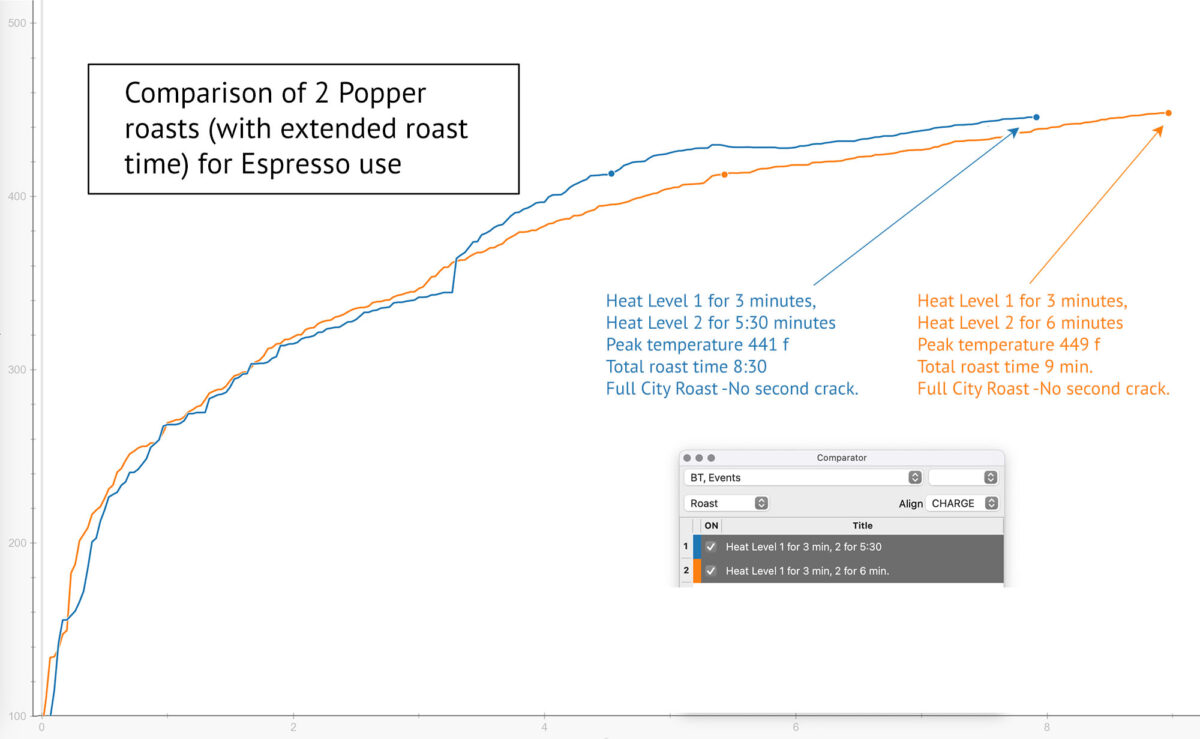
For espresso, we had really nice shots from this very simple, gentle roast curve with minimal intervention.
After our slow 3 minute warm up at heat level “1,” we use heat level “2” to gently edge the roast along with a slow ROR (Rate of Rise) to achieve an air-roasted espresso that really tastes more like a slow drum-roasted espresso.
P.S. I really want to provide guidance for getting better good results on the Popper roaster, but this project had a bit too much “nerd creep” and ended up feeling a bit disorganized. If I wasn’t clear enough about anything here, please let me know in the comments.


32 Responses
not too nerdy for me! I like the detail. thanks!
Yes, this is very helpful. I find that environmental conditions are also a big factor too since I roast outside. It was HOT today and things kicked much quicker than in the winter months when I take 5 minutes at “12 o’clock” to get everyone nice and toasty before cranking it up and adding more time.
“”
Yes… They ambient temperature makes a big difference for sure. Thanks for underscoring that!
It would be fun to see something like this for the fresh roast.
Almost not nerdy enough. I need a watt meter.
Haha – not nerdy enough! Yes would like to do the same procedure on Freshroast and try to narrow down some adjustments for various roast levels, espresso, and adjustments that might be beneficial during the roast.
Another variable is elevation (air density)–I believe you covered that in an article some time ago. I use a Freshroast both at sea level and 4200 ft. Very different settings to get a similar roast profile!
Very true. I don’t have the opportunity to test that much but people say it has to do with air pressure in the drum. That heat transfer is influenced by air pressure. I need to read up on that because I don’t understand it fully.
I love the variables you mention on line voltage and ambient variables. I typically use the 940 range as my 1 setting, 1050ish* as 2, 1140 as 3.
Im sure that seems crazy by comparison at first, but I did City + roast of a Guatemala recently and I most of the time was on 940 (aka 1) and about 45 seconds on 1140 (aka 3): First crack at 6:33 total roast time at 8:12 with 12.90 percent loss.
*Ive found my popper doesn’t typically stay in the 1000 range often most times it goes either in the 900s or the 1100s If I can keep it in 1000s I typically can do a great roast with fan on high with little adjustments needed focusing only on time.
Is it hard to hit the 1000 watt range? Just to find the setting or the knob moves with vibration in roasting? Curious
On my popper- if you try to adjust for 1000s it will typically slip up to 1100s or down to 900s, ive tried it in a few different locations for roasting and typically does the same thing. On a rare occasion it will stay in the 1000s but like once every 2 months
Is this a version 1? Maybe I could send you a repurposed control board if you want to switch them out. I have heard of this- where hitting a certain heat “step” is too difficult. Maybe you can email us at info@address if you want to try the swap.
Great stuff! I second the request for Freshroast settings. I just got a watt meter to see how they correlate, and I’m seeing 1270W at heat 1, up to 1615W at heat 9 on my SR800. So WAY more energy, but also I expect much more airflow compared to the Popper? I also have the extension tube, so there are a lot factors that are different.
I’m interested to try the lower heat initially. I’ve actually been doing the opposite lately, trying max heat for the first 40 sec or so, then backing down to a moderate level for the duration. Seemed to work surprisingly well. But I want to get back to doing espresso shots, so I’ll try the slower journey as you recommended.
Yes we are already talking about getting together a similar “profile mapping” project going for the FreshRoast. I think we will need to address with / without extension tube variants too, in order to make it useful to people, depending on their set up
You timed this writeup perfectly as I’m starting to get more curious about beginning roast profiles in my black Popper I received for Christmas. Thank you for the Popper, the beans, and the commitment to your customers and fans!
GLad to hear it!
Great article, has me motivated to break out the Popper! I have the original but upgraded the fan motor as mine went out. I use a watt meter so can adjust to different levels using that. If memory serves, not sure I can get as fine of change in watt output as your charts indicates. Like your approach to profiling with the Popper however. Mine was way more convoluted and hard to replicate. Appreciate y’all’s efforts!!!
Yes you should be able to use the Watt values to translate these curves to Popper V1. I think using about 11:00 for 3 minutes should be = to heat level 1 on the newer version. But one thing I want to_, and I wasn’t fully aware of with the motor replacement procedure. When you replace the fan and you push it back onto the shaft, if you push it all the way down, you’re getting much higher airflow, and therefore being movement Than the original set up. That’s a great thing because you can roast more coffee. But you really need to find the right batch size that keeps the coffee moving, but doesn’t allow so much air to pass by the coffee and out of the roaster, which slows down the roast. I have a new video all about air movement That we posted yesterday.
Thanks Thompson. Very helpful and iImpeccable timing for me on this post. Although not very nerdy and I love Popper’s simplicity, I was curious of what its roast curves look like on different settings.
I’m on my 40+ batch on a V2 purchased in March and have found that my Wattage readings seem to be incredibly low compared to your suggestions. This is good to know and thank you for sharing the specific wattage settings. For comparison, my 6 is around 1070w, 5 is around 1020 and my 4/5 Split is 940. (I can measure my other lower settings and update on the wattage readings later but at a quick glance it seems I am closer to your “downstairs”.)
I have been able to enjoy City roasts (my preference and desired roast level) consistently by employing the time-tested methods of timing the Yellowing to 1st Crack to Development ratio (thanks for your tips on that as well). Just this morning we enjoyed the beautiful Rwanda Dry Process Macuba which weighed in at 77.3g post-roast (of a 90g batch).
Love the Popper and thanks for providing additional insight into dialing it in. Looking forward to trying your suggested settings.
So good to get this feedback … I can only theorize people are getting different results based on the watt readings, but since I can’t test the Popper under all possible circumstances, it’s hard to know for sure what people are experiencing. Yes your readings are way different … and not a bad thing since you get to make better use of the dial range than I do. I’m down at the lowest end using 1, 2 and 3 on the dial. I am glad that bracketing the “suggested roast curves” with the watt readings worked … because if you followed them literally using heat levels 1 and 2 I doubt the coffee would even get to first crack at all!
I had a similar issue as Jeffrey’s. I followed the dial recommendations exactly for the first three roasts and, only after watching a YouTube video on the 4th attempt, realized that I was not reaching FC on my roasts. For the 4th roast, I cranked the dial up to 6 and reached FC at the 5 minute mark. On the 5th roast, I plugged in my wattometer and L6 pulls about 1000w. 5th roast turned out great and, for my next roast, I’ll follow one of the profiles in the article using wattage as the guide! Thanks for the article and comments!
I have 114 roasts on my V1 popper and have been taking photos before and after, and documenting my wattage levels for each roast. I had the issue where my unit goes from about 950w up to around 1140w in one step up, and about 700w with one step down. I got the replacement control board but I didn’t want to risk not having a working coffee roaster so I didn’t install it. I do have another outlet I can use where the wattages are much lower at the same level. I use 90g of beans each time to make it 5 roasts per lb, and I usually have them moving too fast, from what the video shows. Therefore I have been roasting with extremely hot temperatures compared to the instructions. For example for a city+ roast of the washed Kayanza Gahahe I did today, I used around 950w for the first 4m and then 1140w for the second 3 minutes, and had FC with about 30 seconds left before cooling, with an 87% yield. For a darker roast I usually boost the initial charge temp by doing like 1 or 2 m at 1140w and then turning it down to 950, sometimes back up after FC, or even extending the time if I want a super dark roast. Have had some good darker roasts with the hot start then turn down til FC method. I am wondering if gathering data like this would be at all desirable for someone who wants to make V1 Popper profiles?
My main roast of 950w, then turn up to 1150w at FC, sometimes extend the roast, has given me decent cups but I feel like I don’t have a lot of control over the end result. A lot of different methods still take me to an 85% yield medium roast with different coffees, so sometimes I feel like these attempts to profile are moot. Hoping I can figure it out though.
Thank for all this info. Yes I think what you are saying about higher airflow with your popper means that the higher temperatures you’re using make a lot of sense. If more heat is passing through the coffee and out of the roaster, you need to bring up temperatures to compensate. Sorry if I missed it, but did you replace the fan motor in yours? When I do the fan motor replacement, I’m generally pushing the fan blade fully onto the motor shaft when I’m reassembling it, and that results in much higher airflow. Therefore you need to make adjustments in temperature and or batch size afterwards. It’s a good thing to have that higher flow, but it just requires compensation
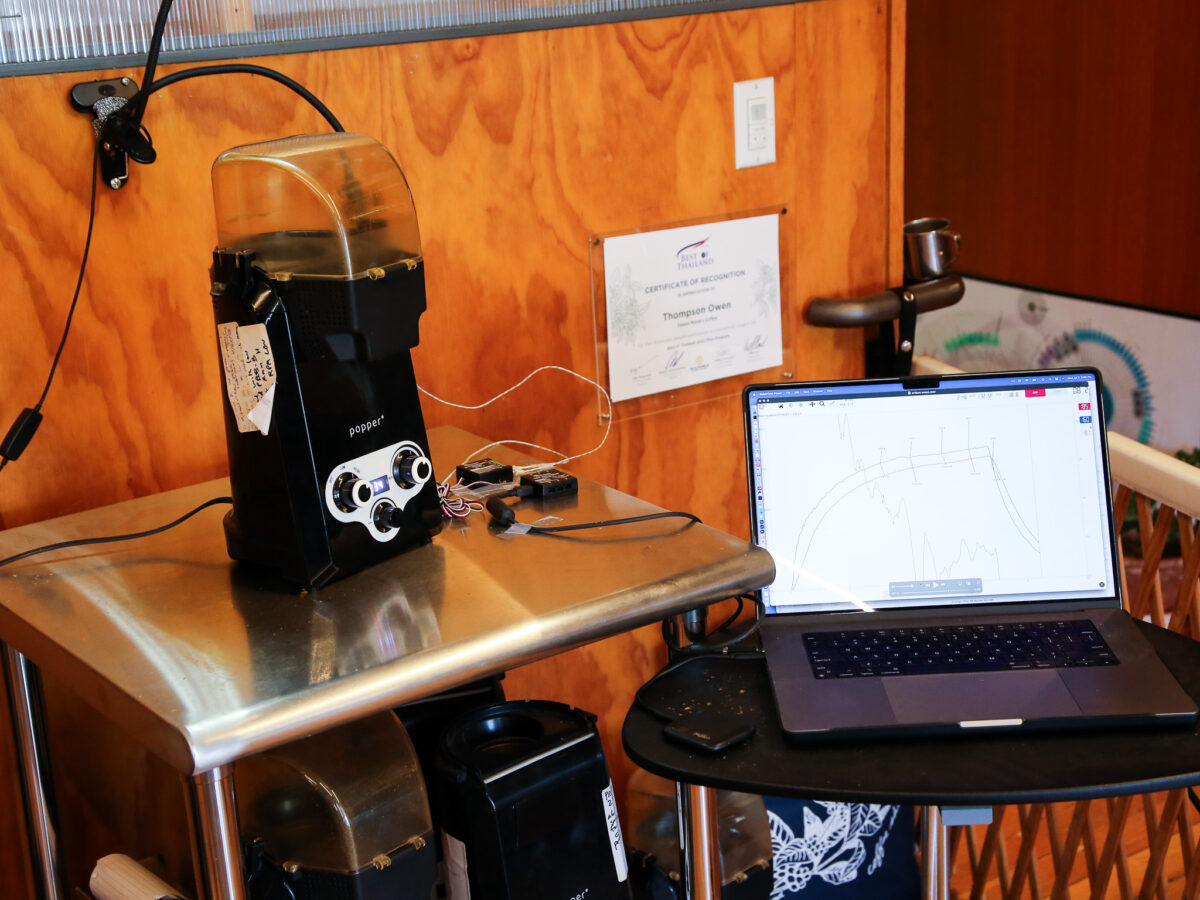
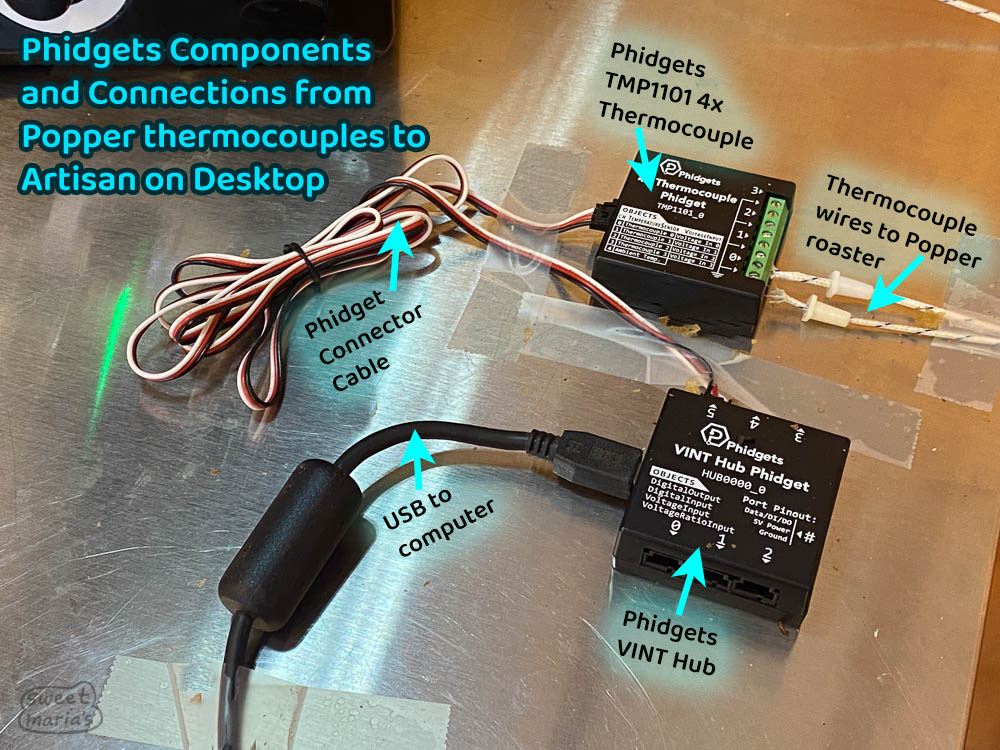
My readings are as follows: 1: 723, 2: 804, 3: 854, 4: 920, 5: 973, 6: 1030, 7: 1085. I have the V2 grey Popper. This presents a problem for me because I can’t just increase the heat level +1. I tried to follow the recommended recipe for City roast, but I was not able to recreate it because on my unit, It was 723W for 3 mins and 804 for 4, but that didn’t quite get me to first crack. Instead, I tried to match watts, but this was also an impossible task. The recommended was 810-820 for 3 mins and 895-905 for 4 mins. This isn’t possible on my unit. I settled on trying HL 2 (804) for the first 3 mins and 4 (920) for 4 mins. This ended up being darker than I wanted, because although 804 is pretty close to 810, 920 is quite a bit higher than 895 or even 905 that was recommended. I am still trying to find a good method for my machine, and I might end up getting phidgets and hooking it up to artisan to see if I can really nail down some roast profiles. This post sounds negative, but I love my Popper! I think it’s so cool to be able to affordably do this kind of thing and have some control over the process.
Hey Grayson, thanks for the detailed notes and it’s great to hear you are enjoying your Popper. We love to hear you are thinking about modifications that seem fun, one of the ideas with Popper is that you don’t need to mod it, but if you want to the construction of the machine is simple enough that you can. Your numbers are pretty close to the “Downstairs” numbers in the “Voltage and Temperature Variables” section, but like you note there are some differences. And this will be true for everybody, simply because of the variance intrinsic to our electrical supplies. We think the idea of the article is to give everybody some starting guidance depending on what they’re going for, but adjustments to batch size, timing, etc will always be necessary no matter what. If the second profile you tried worked pretty well except for finished roast level (HL 2 for 3 minutes, HL 4 for 4 minutes), you might just try reducing the time at HL 4 or basing it off second crack. Even reducing the roast time 30 seconds at the end can make a big difference. On Popper I’ll typically end my roast 60-90 seconds after first crack, depending on the coffee and what I’m going for. Happy roasting!
After reading this, I wonder if my Popper is operating the way it was intended. I bought my Popper last March and started to use it in June. It is the grey rev 3 model. I have been very successful using the Popper and am happy with the results. However, I don’t see how this method can really be done. The video sounds like the heat control should increase smoothly incrementally but mine seems to increase in fairly coarse jumps. For example, at level one it pulls 769 to 773 watts. Then when I turn it to slightly above the division between levels 1&2, it jumps to 856 watts. As I turn it up, it stays at 856 watts until I get to just about where the #3 is (middle of the 3 range), then jumps to about 901 watts. Then, as I turn it up it stays at 901 watts until I get to the divider between levels 3 and 4 where it jumps to 980 watts. It stays at about 980 watts until I get to the 4/5 divider then jumps to 1042 watts. From how the video presents, I would expect it to increase the power draw and, by proxy the heat, smoothly as I turn the heat knob up. Is that true? Is mine working as it should?
Hello Mark! Your Popper is working as intended. The power adjustment is not smooth-continuous. It is in steps just as you’re experiencing. The steps are all within a usable roasting range (and narrower) on the newest model that you have. On earlier versions the steps were much larger, and some were at a lower power that wasn’t useful in most cases. So the new heat dial is a real improvement. Glad you’re happy with your Popper and that you’re getting good results. We hope this confirmation eases any concerns!
Happy Roasting,
Jarrett
Yes – those measurements are in line with the way it operates. The heat levels are “stepped”
@ Thompson and Jarrett – Thanks for the confirmation. This is my first experience with roasting my own. I love the results I am getting with just the initial instructions! Now I am just starting to experiment with your profile information – starting with lower heat and extending the roast time a bit (I just drink espresso). So far I like the changes in my roasts. Thanks for all your efforts to offer an affordable entry point for roasting and such a supportive and informative roasting community!
I don’t understand. My wattage levels are close to yours for the various heat settings:
4: 950 W
5: 1015 W
6: 1070 W
7: 1120W
But if I roast at 4, I don’t think I’d ever reach first crack. I only tried 4 on my first roast, since that was your recommendation, and I gave up after 5 minutes and bumped it up to 5. Now I routinely do the entire roast at 6, ~1070 W, and 1st crack doesn’t start until 5 to 5 1/2 minutes. I hear 1st cracks for 1 to 2 minutes, and stop the roast 20-60 seconds after the last “1st crack”, which sometimes isn’t until 8 minutes. (I’ve never heard a 2nd crack.)
How are you even getting to 1st crack at level 2???
Note: I always start with 90g and after 7-8 mins at 6 my weight loss is ~15%.
Hey JB, good question. Seems like you’re tracking everything well, keeping good notes, and have found settings that work for you and the coffee you’re roasting, which is the most important thing. The guide is meant as a starting place and as a reference for how the roaster works and the impacts of setting changes, but there are still lots of variables that can require different approaches. One big consideration (especially this time of year) is ambient temperature. What’s the temperature like where you roast?
This guide was written based on roasting in our office where’s it’s pretty regularly in the low to mid 70s. If you are roasting somewhere where the ambient temperature is a lot cooler (or even a little cooler), simply speaking you’ll need more power to heat the air. As with all things roasting the most important thing is how does the coffee taste? Anecdotally speaking I still roast on a Popper V1 and basically do what you’re doing, run it at around 900w for a few minutes then 1050w-1100w all the way through and hit first crack in around 7 minutes. Coffee tastes pretty good!
Hello! Are you still going to do an article on fan speed changes?
Yes – how to use the motor / fan speed setting in roasting. Will get to that