
Some things to know about how Aged coffee handles differently in the roaster.
There’s nothing quite like aged coffeeAged coffee is not the same as old coffee. Aged coffee typically has very strong earthy flavors, and can be very pungent, leather or tobacco aromas and flavors.:... ...more in terms of flavor, or appearance. Deep toned bass notes, thick bodyAssociated with and sensed by mouthfeel, body is sense of weight and thickness of the brew, caused by the percentage of soluble solids in the cup, including all... ...more, and potent earth and spice qualities make it a great candidate for dark roasting. But the brown mottled exterior of Aged coffee makes it look partially roasted, and therefore a bit difficult to judge roast level by sight. With the launch of our latest Sumatra Aged Gayo – 5 Year Vintage lot, we want to share a few simple roasting tips to help take some of the guess work out of getting the most from this uniquely processed coffee.
Aged Coffee, Not “Old” Coffee
An important distinction to make is that Aged coffee is not the same as old coffee. The aging process is very controlled, keeping quality and flavor as the target. The coffee is typically stored in jute fiber bags that allow the coffee to breathe, and many suppliers stack the bags in layers with pallets in between to help maximize airflow. They then rotate the bags every few months, emptying and re-bagging in-between rotations to promote even exposure, and the consistency as a result.
Aged Indonesian coffeeIndonesian coffee is known for its unique earthy, potent flavors. Some like it, some hate it, but it's certainly distinctive. Much of the coffee in Indonesia is processed... ...more dates back to a time when coffee was transported by sailing ships, the long voyage in the cargo hold darkening the bean’s exterior, and changing the flavor over time. Dried coffee still has some moisture content, and acts like a sponge. Without the protection of the modern barrier bags, like GrainProA multi-layer plastic bag with a gas barrier. The bags have been shown to extend the flavor life of the coffee significantly over storage in jute or burlap... ...more, coffee absorbs the flavors of whatever it’s next to, be it other agricultural products, or the oak wood of an old maritime cargo vessel.
The resulting product would be consider defective by today’s standards, but the profile became prized, commanding a substantial premium over coffees from other countries. It also pushed business minded coffee professionals to start thinking of ways to replicate the effects, eventually leading to the Aged coffee process we see today.
The Second Half of the Roast Really Matters
A result of the aging process is that the coffee loses some of the moisture content from when it was fresh. One way this transfers to roasting is that first crackFirst crack in one of two distinct heat-induced pyrolytic reactions in coffee. It is distinguished by a cracking or popping sound in the coffee, and occurs between 390... ...more starts early, and slowly gains momentum over a much longer duration than most non-aged coffees. It means paying special attention to the second half of the roast in order to make sure you don’t end your batch too soon.
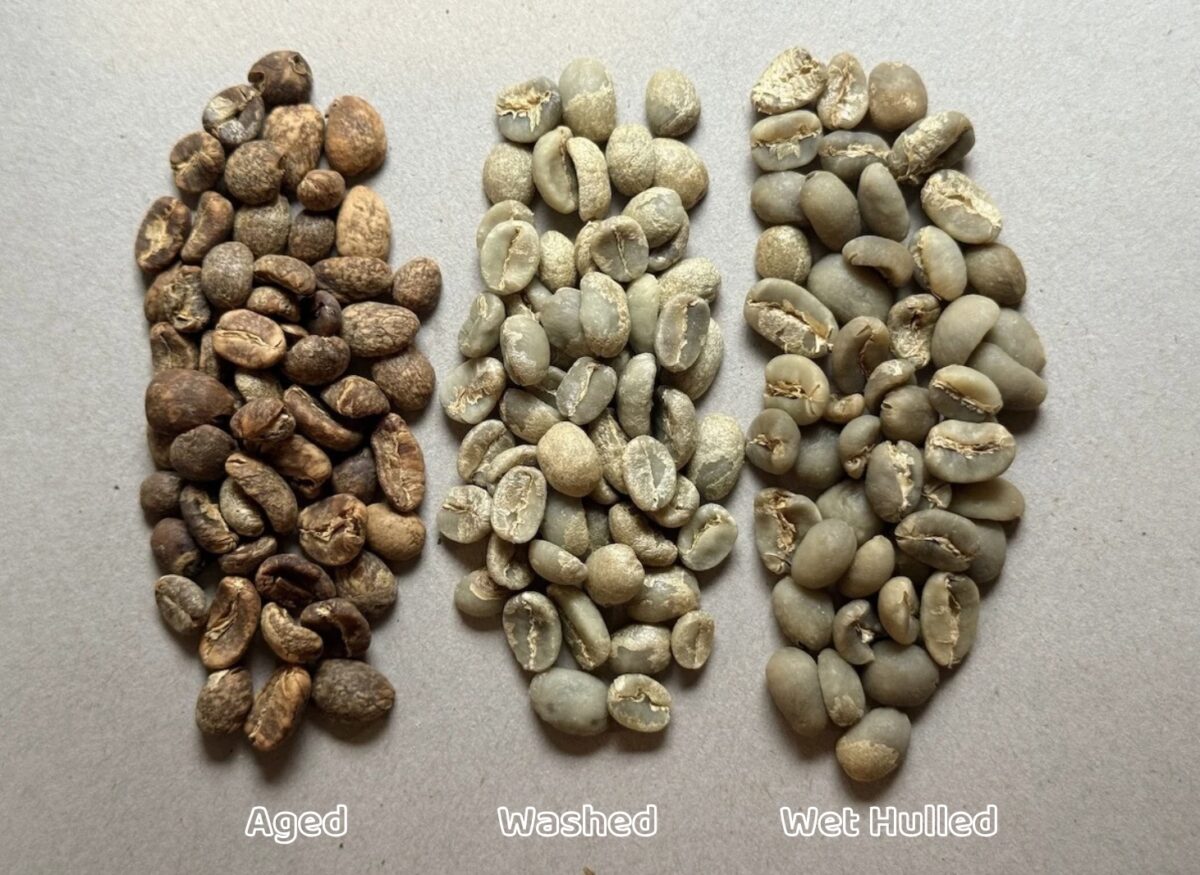
To help illustrate that difference in development, I roasted 100 grams batches of our Aged GayoGayo is ethnic group from the area of Aceh Sumatra around Lake Takengon. They use the name Gayo Coffee to market their production. The Acehnese are a different... ...more, along with a Wet Hulled Sumatran coffee, and a Wet Processed Guatemalan coffee, noting the changes in 1 minute intervals. Before doing so, I measured the moisture content of each coffee to see how they compared. At 12.1%, the Wet Hulled coffee had the highest moisture content, followed by the Wet Processed GuatemalaGuatemalan coffee is considered a top quality coffee producer in Central America. Due to our proximity to Guatemala, some of the nicest coffees from this origin come to... ...more (11.0%), and the Aged Gayo being the lowest (10.5%).
I used our Poppo roaster for this test, partly because I only had 100 grams left of the Aged Gayo! But also, Aged coffee tastes best at the darker end of the roast spectrum, and the Poppo air roaster is well suited for dark roasts.
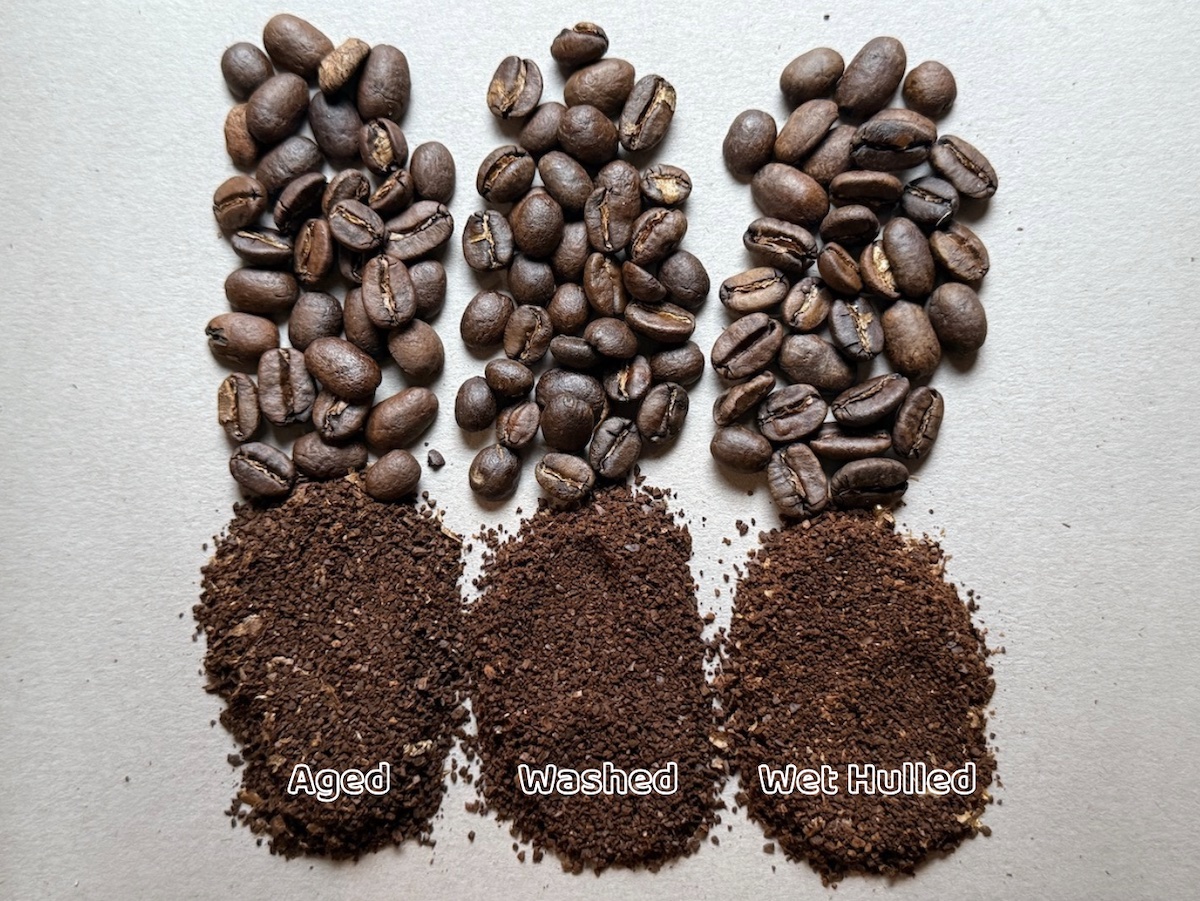
You can see from the below photo comparison that fracturing occurred for the Aged coffee in the third minute, whereas the other two occurred in minute four. The exact times:
- Wet ProcessWet-processing starts by removing the outer skin of the coffee cherry with a machine called a pulper, then fermenting the remaining fruit (with green bean inside) in water... ...more – 4:02
- Wet Hulled – 4:25
- Aged – 3:19
For the Aged coffee, the onset of First CrackAn audible popping sound heard during roasting. In coffee, one refers to "first crack" and "second crack," which come from two different classes of chemical reactions.: An audible... ...more occurred slowly, with intermittent pops and snaps for about the first 40 seconds. Cracks became more rapid around 4:05, and did not end until 6:25. That makes the total time of First Crack around 3:00 minutes from when it started.

That’s a very long First Crack time for Poppo. By contrast, the Wet Processed coffee cracked for 1:00 before ending, which is pretty typical for this roaster. The long, latent snaps can really throw you off, making you think First Crack has rolled right into Second CrackAfter First Crack, a roast reaction around 440 to 450 degrees that is distinguished by a snapping sound. Second Crack is the second audible clue the roaster-operator receives... ...more. You have to ditch your working knowledge of how long First Crack should be on your roaster, and wait for cues like a defined cessation of snaps, and in the case of Poppo, the slowing of chaffChaff is paper-like skin that comes off the coffee in the roasting process. Chaff from roasting is part of the innermost skin (the silverskin) of the coffee fruit... ...more production from the roasted coffee.
You can also see in the photo that Aged coffee doesn’t undergo the same color transformation as Wet Processed or Wet Hulled. It starts off brown, and ends darker brown, with subtle gradients in-between (a lot like decaf!). This makes judging the roast level by sight tricky. For roasters with visual access to the coffee, be sure to monitor those subtle changes, and look for fracturing in the beans. But it’s really the audible cues that are going to be the greatest guide.
A Coffee for Dark Roasts
Medium-to-dark roasts are where Aged coffees excel, drawing out super dense body and bittersweetBittersweet is from the language of chocolate, and describes the co-presence of positive bittering compounds balanced by sweetness. It is directly related to caramelization, but has inputs from... ...more profiles, along with pungentRefers to an aggressive, intense aroma or flavor, often related to spices (pepper) or roast tastes. Pungent foods are often called "spicy", meaning a sharp or biting character,... ...more aromatics consistent with the process method. I was shooting for Full City/Full City+City+ roast is an ideal roast level that occurs roughly between 425 and 435 degrees Fahrenheit in many coffee roasters with a responsive bean probe where First Crack... ...more with all three coffees, ending the roasts at the very start of Second Crack.
The overall roast time for the Aged coffee was 7:38, and weight loss was 15.6%. All three coffees I roasted had a weight loss between 15.4-15.7%. Ironically, while these three coffees look quite different when green, dark roasting has an equalizing effect on physical appearance.
I’m really pleased with the way my roast turned out. The intense roast flavors do a nice job tempering earthiness a bit so that it doesn’t overpower the cup. I brewed the coffee using a Clever Coffee Dripper, a hybrid full immersion/drip cone brewer. You get the body and mouthfeelHow a coffee feels in the mouth or its apparent texture, a tactile sensation : A major component in the flavor profile of a coffee, it is a... ...more of a long steep immersion brewer without the sediment, which is perfect for this coffee. (For those interested, my brew batch was 20 grams of coffee to 300 ml of water, with a steep time of 4:00 minutes).
The intensityWe have a simple scale to rate intensity in our coffee reviews, from Mild to Bold. Low intensity does not mean low quality!: We have a simple scale... ...more of aged coffee can’t be overstated. The hot cup had smokeyUsually a defect of roasting, or of green coffee processing, smokey notes are sometimes found as a positive flavor in a few exotic coffees; This smell and flavor... ...more bittersweet notes, like dark roasted cacao nibs, and charred hickory chips. The liqueur is inky and thick, acidityAcidity is a positive flavor attribute in coffee, also referred to as brightness or liveliness. It adds a brilliance to the cup, whereas low acid coffees can seem... ...more muted, and as it cools a rusticA general characterization of pleasantly "natural" flavors, less sophisticated and less refined, but appealing. : What is Rustic? This is a general term we came up with... Dried... ...more aromaAroma refers to sensations perceived by the olfactory bulb and conveyed to the brain; whether through the nose or "retro-nasally": The aromatics of a coffee greatly influence its... ...more emerges, lining the finishSimilar to aftertaste, but it refers to the impression as the coffee leaves the palate. Aftertaste is the sensations gathered after the coffee has left the mouth. We... ...more with hints of cedar, palo santo, brown spices, and leather. The aftertasteAftertaste refers to lingering residual sensations in the mouth after coffee has swallowed. It might be distinguished from "finish" which is the final sensations of the coffee while... ...more is deep toned, with long bittering flavors of unsweetened cocoa, accented by oaky notes and a hint of tobacco. Aged coffees have a fairly singular flavor profileFlavor Profile implies a graphical impression of a particular coffee, whether it be an artistic portrait or data graph of the perception of flavor compounds. In the case... ...more, though they do show some parity with elements of wet hulled coffee, and even echo some nicer Robustas.
We think that Aged coffee shows best after at least 3 days rest, but you might even find that you prefer it after 5-7 days. Coffee releases gasses like carbon dioxide for several days after being roasted. It’s a natural part of the roasting process, but too much carbon dioxide can inhibit extractionRefers to the process of infusing coffee with hot water. Hot water releases or "extracts" the flavor from the roasted, ground coffee. The term is used mostly with... ...more when brewing, negatively impacting the cup. With Aged coffee, and Wet Hulled Sumatran coffees generally, we find that the 3-5 days is when some of the disparate flavors seem to coalesce in the cup.


6 Responses
Hi! Any tips for the Behmor? I just got 5 lbs and excited to drink!!
Hi Chelsea, I’d try roasting 220g of coffee using the P1 profile and see how that goes (I always select the 1 lb setting for maximum time). This coffee is best at dark levels, and I would wait until the very first snaps of 2nd Crack to enter the cooling cycle. Don’t wait too long though, as roast progression coasts a little with the Behmor cooling phase. The main thing I wanted to point out is to not be fooled by the light ‘pops’ you might hear the 1st Crack really gets underway.
Hope that helps.
Great overview!
Since I was a roaster at Starbucks in the early and mid 1980’s I became quite familiar with roasting aged Indonesians, which at both Peet’s and Starbucks had long been highly valued both for straight drinking and as valuable components of blends (most importantly Christmas Blend).
Two things: if you want to try blending with aged Indonesians the other components of the blend also need to be roasted to at least full city/full city, +. Aged Sumatra is all about body and autumnal, forest-floor flavors, so think about adding it in small amounts (e.g. starting with 10%) to a base blend made of Guatemala or other chocolatey Centrals taken close to (or well into) second pop.
The other delicious experiment not to be missed when the rare opportunity presents itself is to taste coffee history by making old-school Mocha-Java: blend Yemen Mocha (roasted separately of course) and Aged Sumatra to make Aged Mocha-Java. We know of course that for most of coffee history “Java” just meant any coffee from Indonesia (and was thus much more likely to come from Sumatra than Java and was wet-hulled, not wet-processed), and arrived at port brown not green due to the long sea voyage, while and of course Mocha was the first coffee ever cultivated.
Apparently traditional Mocha-Java blends started with a ratio of 1/3 Mocha to 2/3 “Java” but I find 50:50 more balanced. And as should go without saying, whether one’s drinking straight Aged Sumatra or Aged Mocha Java you want a brewing method that accentuates the ultra heavy body and nearly nonexistent acidity: French Press (preferably Espro so you can skip the grit), Aeropress or (for the truly daring) espresso.
I really appreciate you going to the trouble to offer this taste of coffee history to humble small roasters.
Thanks for chiming in, Kevin. It’s always great to get the perspective and insight from someone with a rich coffee history, like yourself! I love that idea of doing a version of the Moka-Java blend with aged coffee, and might have to try that this week (I’m reviewing a Yemeni coffee, so good timing!). And agreed on full immersion being the preferred brew method. Those Espro’s look like they do a pretty good job of filtering out the silt.
Hope you enjoy the coffee!
I like to roast dark on the stovetop. Any good drop temperature recommendations for the Aged Gayo?
Hey Matt, thanks for the question. I think 350-400 (IR reading of bottom) is a good start, but it’s safe to go with your regular profile and adjust from there. One of the reasons I used Poppo was its limitations (i.e. no temp control, etc). I was happy with the results of all three coffees, but think people should be aware that you might experience a long/latent 1st Crack with the Aged coffee, which may cause some to pull their batch early. Especially those who don’t want to take it to 2nd Crack.